AND ET Series, ET-30KAM, ET-60KAL, ET-150KAL, ET-300KAX Manual
- Instruction manual (21 pages)
Advertisement
- 1 PRODUCT DESCRIPTION
- 2 INSTALLATION
- 3 DISPLAY & KEYS FUNCTION
- 4 OPERATION
- 5 Functions
- 6 CALIBRATION
- 7 PRECAUTIONS
- 8 Documents / Resources
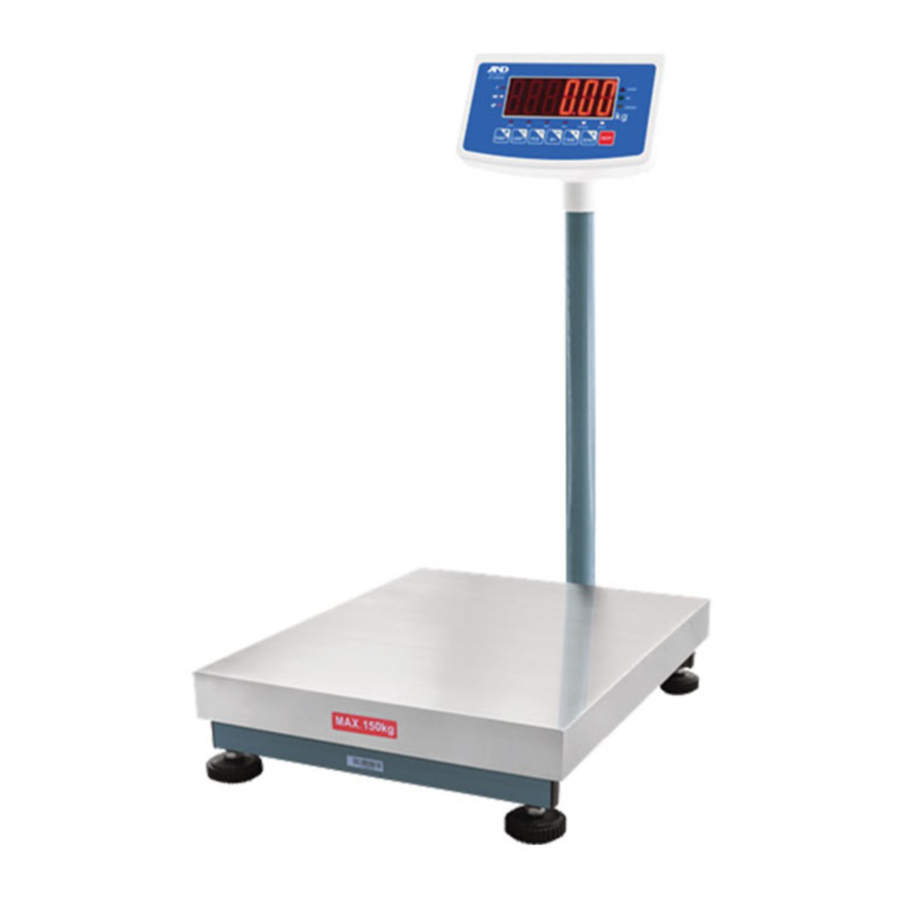
PRODUCT DESCRIPTION
General
- The ET series platform scale amplifies signals from a load cell, converts them to digital data and then displays them as a mass value.
- It is suitable for general weighing or more specialised applications such as check weighing, counting, motion weighing and accumulation applications.
- 52mm high LED display.
- There are three platform sizes: 300mm x 400mm (KAM), 400mm x 500mm (KAL), 500mm x 600mm (KAX)
Overall View


- Weight display
- Check weighing indicator
- Keysheet
- Indicator bracket
- Column
- Stainless steel pan
- Adjustable leveling foot
- RS232 port (Not available)
- Load cell connector
- Guide rail support base
- End stop support base
- AC adapter jack
INSTALLATION
Unpacking
When you receive the scale, inspect it to make sure that it is not damaged and that all are parts are included:
- Remove the scale from the carton.
- Remove the protective covering. Store the packaging to use if you need to transport the scale later.
- Inspect the indicator for damage.
- Make sure all components are included.
- Indicator
- Power Adaptor
- Instruction Manual
- Column assembly
- Platform base
- Stainless steel pan
Installing the platform
 |
|
 |
|
Leveling
 | The scale is equipped with a level indicator located on the back of the scale on the base bracket. |
 | Use the adjustable leveling feet located on the bottom of the scale until the bubble appears in the center of the indicator. |
Installing the column
 |
|
 |
|
 |
|
Installing the Indicator
- Insert the indicator into the column bracket as shown.

- Push down the indicator until you hear a click.
![]()
- Connect the load cell cable into the indicator load cell connector. Load cell connector is located on the rear of the indicator.

- Tilt display to desired position with adjustment knob.
![]()


Power Connection
- Connect the adaptor pin in to the indicator adaptor jack.
- Adaptor jack is located on the rear side of the indicator.
- Adaptor connects into your AC power socket. Scale must be installed near an easily accessible power point with a protective ground/ earth contact.
Rechargeable battery operation
Note: Please charge the battery before using the scale for the first time.
- The symbol
![]() to the left side of the weight display indicates that the battery is getting low, and the display will be show b-err.
to the left side of the weight display indicates that the battery is getting low, and the display will be show b-err. - Approximately 30 minutes of instrument usage is left; afterwards it will shut off automatically.
- Plug in the power adaptor to recharge the battery.
Charging the battery
- Before the first use, the battery should be charged by connecting it to the mains power supply for at least 5 hours.
- On the left side of the weight display there is a charging LED to indicate the status of battery charging
- Charge status of rechargeable battery is indicated by the LED display as follows.
Red: Charging battery
Green: Battery is completely charged
Battery maintenance
- Do not use any other type of power adaptor than the one supplied with the scale.
- Rechargeable battery should be charged every three months when not in use.
- If the scale is not used for an extended period of time, remove the battery from the battery compartment to avoid leakage.
- Store the battery in a sealed bag or box in a dry, temperate environment.
Load cell connections
- Connect the load cell cables to the terminal as shown below.
- The load cell drive voltage is 3.3V DC ±5% between Excitation + and Excitation -.
| Pin | Connection |
| Pin 1 | Signal + |
| Pin 2 | Signal - |
| Pin 3 | Shield |
| Pin 4 | Exc - |
| Pin 5 | Exc + |
DISPLAY & KEYS FUNCTION
Keysheet

| Keys | Description |
 | On/off switch. Used to turn the scale on or off. |
 |
|
 |
|
 |
|
 |
|
 |
|
 |
|
Indication Description
 | Charging indicator. Indicates the battery charging status. |
 | Battery indicator. Indicates battery is low and needs to be recharged. |
 | Animal weighing indicator. Indicates the scale is in animal weighing mode. |
| OVER | Limits indicator. Indicates the high-low limits in check weighing and counting mode. |
| OK | |
| UNDER | |
| PCS | Counting mode indicator. Indicates scale is in counting mode. |
| FN | Menu setting indicator. Indicates the scale is in function mode |
| MR | Accumulation indicator. Indicates the scale is in accumulation mode |
| NET | Net indicator. Indicates scale is displaying the net weight. |
| STABLE | Stable indicator. Indicates the scale weight is stable. |
| ZERO | Zero indicator. Indicates the scale is at zero. |
| kg | Current weighing unit |
OPERATION
Initial Start-up
Allow the scale to warm up for 15 minutes to stabilize the measured values after switching on.
Switching on/off
- Switch on the indicator by pressing
![]() switch. The display will show the scale version and will start after self checking.
switch. The display will show the scale version and will start after self checking. - After self checking, the display will be come to normal weighing mode.
- To switched off the scale, press
![]() switch again.
switch again.
 switch. The display will show the scale version and will start after self checking.
Zero
- Environmental conditions can lead to the balance not showing zero in spite of the platform not taking any strain. However, you can set the display of your balance to zero any time by pressing
![]() switch and therefore ensure that the weighing starts at zero.
switch and therefore ensure that the weighing starts at zero.
 switch and therefore ensure that the weighing starts at zero.
Tare
- The weight of any container can be tared by pressing
![]() switch so that with subsequent weighing the net weight of the object being weighed is always displayed.
switch so that with subsequent weighing the net weight of the object being weighed is always displayed.
 switch so that with subsequent weighing the net weight of the object being weighed is always displayed.
Taring a container
- Load weight on the platform.
- Press
![]() switch. Zero is displayed, and tare is subtracted. NET indicator light will be on.
switch. Zero is displayed, and tare is subtracted. NET indicator light will be on. - Remove weight on the platform. Tared weight is displayed. Only one tare value can be set. Tare weight will be shown with a minus value.
Muti-tare
- Load weight on the platform.
- Press
![]() switch. Zero is displayed, and tare is subtracted. NET Indicator light will be on.
switch. Zero is displayed, and tare is subtracted. NET Indicator light will be on. - Load another weight on the platform.
- Press
![]() switch. Zero is displayed, and tare is subtracted. NET Indicator and stable light will be on.
switch. Zero is displayed, and tare is subtracted. NET Indicator and stable light will be on. - Remove weight from the platform. Total tared weight is displayed. Tared weight will be shown with a minus value.
Clearing tare
- To clear the tare value, remove the load from the platform.
- Press
![]() switch. Zero is displayed, the NET indicator light and tare weight is cleared.
switch. Zero is displayed, the NET indicator light and tare weight is cleared.
Select Weighing Unit
The default weighing unit is kg, to change weighing units please enter function menu.
Operation:
- Press and hold
![]() switch 3 seconds to enter function setting in the normal weighing mode, the display will show "U KG "and the FN Indicator will be on.
switch 3 seconds to enter function setting in the normal weighing mode, the display will show "U KG "and the FN Indicator will be on. - Press
![]() switch to select lb weighing unit, display will show "U lb "
switch to select lb weighing unit, display will show "U lb " - Press
![]() switch to confirm the selection.
switch to confirm the selection. - Press
![]() switch to exit to the normal weighing mode.
switch to exit to the normal weighing mode.
 switch 3 seconds to enter function setting in the normal weighing mode, the display will show "U KG "and the FN Indicator will be on.
Check weighing & Counting Mode
When weighing or counting, an Upper and Lower limit can be set.
When the value is within the limits an alarm will sound.
- To enable check weighing or counting function, press
![]() switch in normal weighing or counting mode. The display will show lim-on.
switch in normal weighing or counting mode. The display will show lim-on. - To disable check weighing or counting function, press
![]() switch in normal weighing or counting mode. The display will show lim-of.
switch in normal weighing or counting mode. The display will show lim-of.
Note: Check weighing or counting available only when weight is more than 20
Set Check Weighing & Counting Mode
- Press and hold
![]() switch 3 seconds in normal weighing mode. The display will show hi.
switch 3 seconds in normal weighing mode. The display will show hi. - Press
![]() switch to select check weighing & counting mode (HI/LOW/INSIDE/OUTSIDE).
switch to select check weighing & counting mode (HI/LOW/INSIDE/OUTSIDE). - Press
![]() switch to confirm.
switch to confirm.
| Check Mode | Description |
| INSIDE |
|
| OUTSIDE |
|
| Hi |
|
| LOW |
|
Note: Check weighing available only when weight is more than 20d
Setting limits for target weight
- Press and hold
![]() switch 3 seconds in the normal weighing mode. The display will show INSIDE.
switch 3 seconds in the normal weighing mode. The display will show INSIDE. - Press
![]() switch to confirm. The display will show 10000.0
switch to confirm. The display will show 10000.0 - Enter the lower limit value using the
![]() switch to move the digits to the right and use the
switch to move the digits to the right and use the ![]() switch to increment the value.
switch to increment the value. - Press
![]() switch to confirm. The display will show h0000.0
switch to confirm. The display will show h0000.0 - Enter the upper limit value using the
![]() switch to move the digits to the right and use the
switch to move the digits to the right and use the ![]() switch to increment the value.
switch to increment the value. - Press
![]() switch to confirm. The display will show end and return back to normal weighing mode.
switch to confirm. The display will show end and return back to normal weighing mode.
Note: To delete limits, enter 0000.0
 switch to increment the value.
 Setting limits for target quantity
- Press
![]() switch to enter counting mode. The display will show 0
switch to enter counting mode. The display will show 0 - Press and hold
![]() switch for 3 seconds in counting mode. The display will show INSIDE.
switch for 3 seconds in counting mode. The display will show INSIDE. - Press
![]() switch to confirm. The display will show l00000
switch to confirm. The display will show l00000 - Enter the lower limit value using the
![]() switch to move the digits to the right and using the
switch to move the digits to the right and using the ![]() switch to increment the value.
switch to increment the value. - Press
![]() switch to confirm. The display will show h00000
switch to confirm. The display will show h00000 - Enter the upper limit value using the
![]() switch to move the digits to right and using the
switch to move the digits to right and using the ![]() switch to increment the value.
switch to increment the value. - Press
![]() switch to confirm. The display will show end and return back to normal counting mode.
switch to confirm. The display will show end and return back to normal counting mode.
Note: To delete limits, enter 00000
Accumulation
The scale can be set to accumulate manually by pressing the switch.
Before operation the scale should be stable and returned to zero. Accumulation is available only when the weight is more than 20d.
Accumulation Operation
- Place the weight on the platform.
- Press the
![]() switch when the STABLE indicator is illuminated.
switch when the STABLE indicator is illuminated. - The display will show the total saved value for two seconds and the MR indicator will be illuminated.
- Remove the weight from the pan.
- When the display shows zero and stable then place the next weight on the platform.
- These steps can be repeated until the memory gets full or 99 items have been recorded.
Memory Recall
- To recall the memory press
![]() switch when the scale has nothing on the platform and the display is zero.
switch when the scale has nothing on the platform and the display is zero. - The display will show the total saved value for two seconds.
Memory Clear
- Press the
![]() switch in zero point. The display will show the total saved value.
switch in zero point. The display will show the total saved value. - Press the
![]() switch. All accumulation values will be cleared from the memory and the scale will return back to normal weighing mode.
switch. All accumulation values will be cleared from the memory and the scale will return back to normal weighing mode.
Counting Mode
The scale can perform a counting procedure once the average weight of the part is known. Proceed by putting on a certain number of the parts to be counted. The balance determines the total weight and divides it by the number of parts. This is called the reference quantity. Counting is then carried out on the basis of the calculated average piece weight.
Enter Counting Mode
- In normal weighing mode, Press the
![]() switch to enter the parts counting mode. The PCS indicator will be illuminated and the display will show 0
switch to enter the parts counting mode. The PCS indicator will be illuminated and the display will show 0
Counting Mode Operation
- Press the
![]() switch to change the parts quantity. The display will show C00000
switch to change the parts quantity. The display will show C00000 - Change the parts quantity as you need by using the
![]() switch to move the digits to the right and using the
switch to move the digits to the right and using the ![]() switch to change the value.
switch to change the value. - Place objects intended for sampling on the platform.
- Press the
![]() switch to confirm. The display will show the quantity you set.
switch to confirm. The display will show the quantity you set. - Then add items and the display will update the parts quantity automatically.
Exit Counting Mode
Press the  switch to return back to normal weighing mode.
Animal Weighing Mode
This mode is used to weigh a moving object such as an animal.
To enter Animal Weighing Mode
Press and hold  switch 2 seconds in normal weighing mode and the scale will enter animal weighing mode. The display will flash ANI-ON and the animal symbol will be illuminated.
Animal Weighing Operation
- Place the animal on the platform.
- When the load is stable briefly, the weight will be locked for few seconds on the display.
- You can add or remove loads to update the locked weighing values.
Exit Animal Weighing Mode
To disable the animal weighing mode, press and hold  switch for 2 seconds. The display will flash ANI-OF and the scale will return back to normal weighing mode.
Auto sleep function
This will allow the scale to enter into auto sleep mode for conserving power.
Operation:
- Press and hold
![]() switch for 3 seconds to enter menu setting in the normal weighing mode. The display will show u kg
switch for 3 seconds to enter menu setting in the normal weighing mode. The display will show u kg - Press
![]() switch until the display shows SDBY N
switch until the display shows SDBY N - Press
![]() switch to select Y or N option
switch to select Y or N option - Press
![]() switch to confirm
switch to confirm - Press
![]() switch to exit menu and return back to normal weighing mode.
switch to exit menu and return back to normal weighing mode.
| Option | Description |
| SDBY y |
|
| SDBY N | To disable the auto sleep function. |
LED brightness
This allows you to adjust the LED brightness. There are three settings.
H: high
M: medium
L: low
To enable the function.
Operation:
- Press and hold
![]() switch for 3 seconds to enter the menu setting in the normal weighing mode. The display show u kg
switch for 3 seconds to enter the menu setting in the normal weighing mode. The display show u kg - Press
![]() switch until the display shows ledb-h
switch until the display shows ledb-h - Press
![]() switch to select option.
switch to select option. - Press
![]() switch to confirm.
switch to confirm. - Press
![]() switch to exit menu and return back to normal weighing mode.
switch to exit menu and return back to normal weighing mode.
 switch for 3 seconds to enter the menu setting in the normal weighing mode. The display show u kg
Internal Counts Checking
- Press
![]() switch to turn on the scale.
switch to turn on the scale. - Press and hold
![]() switch for 3 seconds during self-checking to check the internal counts.
switch for 3 seconds during self-checking to check the internal counts. - Press
![]() switch to back to normal weighing mode.
switch to back to normal weighing mode.
 switch to turn on the scale.
  switch to back to normal weighing mode.
Local Gravity Setting
- Press
![]() switch to turn on the scale.
switch to turn on the scale. - Press and hold
![]() &
& ![]() switches together for 9 seconds during self-checking to enter local gravity setting.
switches together for 9 seconds during self-checking to enter local gravity setting. - Release
![]() &
& ![]() switches until display shows 1.00000
switches until display shows 1.00000 - Use the
![]() switch to move digits to the right and use the
switch to move digits to the right and use the ![]() switch to increment the value.
switch to increment the value. - Press
![]() switch to return back to normal weighing mode.
switch to return back to normal weighing mode.
 switch to return back to normal weighing mode.
Note:
- The new gravity value is the ratio between the gravity value of calibrated location and the gravity value of the scale's current location.
- The new value needs to be entered after calibration is completed.
Functions
Function Settings
Enter into the Menu
- Press and hold the
![]() switch for 3 seconds to enter the function settings in the normal weighing mode. The display will show U KG and the FN indicator will be illuminated.
switch for 3 seconds to enter the function settings in the normal weighing mode. The display will show U KG and the FN indicator will be illuminated.
Enter the Selected Menu
- Press
![]() switch to scroll through the functions.
switch to scroll through the functions.
Select the Sub Menu
- Press
![]() switch to choose the sub menu block one by one.
switch to choose the sub menu block one by one.
Return to Weighing Mode
- Press
![]() switch to exit the menu and return to the weighing mode.
switch to exit the menu and return to the weighing mode.
Function List
| Menu | Sub Menu | Description | Default |
| U | U KG | To select the weighing unit Options: kg/lb | kg |
| U LB | |||
| BUAD | Buad48 | To select the baud rate Options: 4800/9600 | 9600 |
| Buad96 | |||
| Rs (Not Available) | RS OFF | To set RS-232 communication function off | RS CO |
| RS CO | Data send continues | ||
| RS SCO | Send data continuously, when stable | ||
| RS ST | Send data one time, when stable. | ||
| RS PR | Send data one time, when press print key in printer mode | ||
| SDBY | SDBY Y | To enable the sleep mode function on | N |
| SDBY N | To disable the sleep mode function off | ||
| filt | Filt-1 | To set filter speed Options: 1/2/3/4/5 | 1 |
| Filt-2 | |||
| Filt-3 | |||
| Filt-4 | |||
| Filt-5 | |||
| zero | Zero-0~ Zero-9 | To set zero tracking range from 0d~9d Default range is 0d | 0d |
| L-AZ | L-AZ-0~ LAZ-9 | To set return to zero when unload the weight range from 0d~9d | 0d |
| ledb | Ledb-h | To set the brightness of LED Options: H: high M: medium L: low | L |
| Ledb-m | |||
| Ledb-l |
CALIBRATION
- Turn off the indicator.
- Press and hold
![]() switch for 10 seconds and then press the
switch for 10 seconds and then press the ![]() switch together to turn on the scale.
switch together to turn on the scale. - Release the
![]() switch until the display shows d 5
switch until the display shows d 5 - Press
![]() switch to select the division (1/2/5/10/20/50) as you need.
switch to select the division (1/2/5/10/20/50) as you need. - Press
![]() switch to confirm. The display will show p 0.00
switch to confirm. The display will show p 0.00 - Press
![]() switch to select the decimal point (0/0.0/0.00/0.000/0.0000) as needed.
switch to select the decimal point (0/0.0/0.00/0.000/0.0000) as needed. - Press
![]() switch to confirm. The display will show FULL
switch to confirm. The display will show FULL - Press
![]() switch to confirm. The current full capacity weight will be displayed and PCS indicator will be illuminated. Use the
switch to confirm. The current full capacity weight will be displayed and PCS indicator will be illuminated. Use the ![]() switch to move digits to the right and the light below the corresponding digit will be on. Use the
switch to move digits to the right and the light below the corresponding digit will be on. Use the ![]() switch to increment the value.
switch to increment the value. - Press
![]() switch to enter zero-point calibration. If the display shows noload remove the load on the platform. The platform must be empty when performing calibration.
switch to enter zero-point calibration. If the display shows noload remove the load on the platform. The platform must be empty when performing calibration. - Press
![]() switch to confirm while stable indicator is on. The display will show adload
switch to confirm while stable indicator is on. The display will show adload - The calibration weight will be displayed. To change weight value, press the
![]() switch to move digits to the right and the light below the corresponding digit will be on. Use the
switch to move digits to the right and the light below the corresponding digit will be on. Use the ![]() switch to increment the value.
switch to increment the value. - Press
![]() switch to confirm.
switch to confirm. - Load the calibration weight on the platform.
- Press
![]() switch to confirm. The calibration is finished. The display will show end and return to the normal weighing mode.
switch to confirm. The calibration is finished. The display will show end and return to the normal weighing mode.
 switch for 10 seconds and then press the
  switch together to turn on the scale.
  switch to select the division (1/2/5/10/20/50) as you need.
  switch to increment the value.
 Calibration Weights
| Model | kg |
| ET-30KAM | 30kg |
| ET-60KAL | 60kg |
| ET-150KAL | 150kg |
| ET-300KAX | 300kg |
PRECAUTIONS

DISCONNECT ALL POWER TO THIS UNIT BEFORE INSTALLING, CLEANING, OR SERVICING. FAILURE TO DO SO COULD RESULT IN BODILY HARM OR DAMAGE THE UNIT.

- Permit only qualified persons to service the instrument.
- Before connecting or disconnecting any components, remove the power adaptor.
- Failure to observe these precautions may result in bodily harm or damage to the equipment.

- The weighing indicator is a precision electronic instrument, handle it carefully.
- Do not install the scale in direct sunlight.
- Install the scale on a solid and level surface.
- Verify the local voltage and power adaptor are correct for the scale.
- Only use original power adaptor, others could cause damage to the scale.
- Do not install the scale where there is flammable or corrosive gas present.
- Do not install the scale near equipment which produces magnetic fields.
- Avoid unstable power sources. Do not use near large users of electricity such as welding equipment or large motors.
- Avoid sudden temperature changes, vibration, wind and water.
- Avoid heavy RF noise.
- Keep the indicator clean.
A&D Australasia Pty Ltd
Head Office & Warehouse
32 Dew Street,
Thebarton SA 5031
A&D New South Wales Office
Unit 4, 14 Abbott Road,
Seven Hills NSW 2147
A&D Victorian Office
Unit 38, 326 Settlement Road
Thomastown VIC 3074
Documents / ResourcesDownload manual
Here you can download full pdf version of manual, it may contain additional safety instructions, warranty information, FCC rules, etc.
Download AND ET Series, ET-30KAM, ET-60KAL, ET-150KAL, ET-300KAX Manual
Advertisement


Need help?
Do you have a question about the ET Series and is the answer not in the manual?
Questions and answers