Advertisement
Quick Links
Advertisement

Related Manuals for AND FG-CWP Series


Summary of Contents for AND FG-CWP Series
- Page 1 FG-CWP Series Waterproof Digital Platform Scale FG-30KCMWP FG-60KCLWP FG-150KCLWP 1WMPD4004367...
- Page 2 No part of this publication may be reproduced, transmitted, transcribed, or translated into any language in any form by any means without the written permission of A&D Company Ltd. The contents of this manual and the specifications of the instrument covered by this manual are subject to change for improvement without notice.
- Page 3 Setup ..............................11 7.1. Attaching Pole to Base ......................... 11 7.2. Installation ............................ 11 Basic Operation ..........................12 8.1. Turning Power On and Off ......................12 8.1.1. Mobile Battery ........................13 8.2. Basic Operation ........................... 13 8.3. Readability ........................... 14 Counting Function ..........................
- Page 4 16.1. USB interface ..........................33 16.2. Data Format ..........................35 17. Options ............................... 41 17.1. Option list ............................. 41 18. ID Number and GMP, GLP ......................... 42 18.1. ID Number Setting Procedure ...................... 42 18.2. GMP, GLP Report........................43 19. Password Lock Function ........................47 19.1.
- Page 5 □ Please note that this equipment generates, uses and can radiate radio frequency energy. It has been tested and found to comply with the limits of a Class A computing device pursuant to Subpart J of Part 15 of FCC rules. These rules are designed to provide reasonable protection against interference when it is operated in a commercial environment.
- Page 6 1/12,000 (1/15,000 with some models), and 1/30,000. Resolution can be switched as needed for the usage. (Resolution = Readability / Weighing capacity) □ The FG-CWP series has two sizes of weighing pans: M size for FG-30KCMWP and L size for FG-60KCLWP / FG-150KCLWP.
- Page 7 □ Install the scale in an indoor location out of direct sunlight with stable temperature and humidity that is free of drafts and vibrations, on a solid and level surface and with a stable power supply. □ Do not install on a soft floor or where there is vibration.
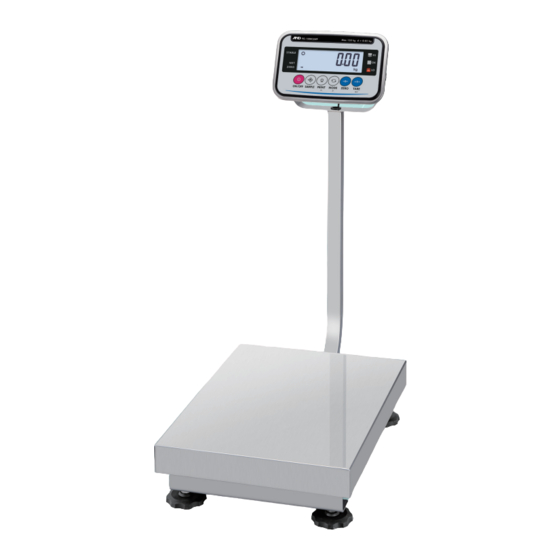
- Page 8 5. Items Included The following items are packed. ● Main Unit ● Quick Start Guide FG-30KCMWP FG-60KCLWP FG-150KCLWP ● AC Adapter 6. Part Names Display Unit (SUS304) Rating Label Serial Number USB Cable(Approx.3m) Pole (SUS304) USB Plug Weighing Pan (SUS304) Display unit knob Load Cell...
- Page 9 ZERO This is lit when the scale is at the zero point (reference point for weighing). “ kg”, “ g” , “ pcs” , “ oz” and “lb ” is lit. Weighing Units Note: “ g” is only used with the FG-30KCMWP.
- Page 10 ZERO key when the weighed value is stable within ±2% of the weighing capacity sets the zero point there and the zero point indicator ◄ is lit when zero is displayed. If tare function is in use, the net is deleted.
- Page 11 7. Setup 7.1. Attaching Pole to Base 1. Take the base unit and the pole out of the Display Unit packaging box while being careful not to pull the load cell cable. Pole 2. Remove the weighing pan from the base.
- Page 12 Rear of Display Unit 8. Basic Operation 8.1. Turning Power On and Off 1. Insert the USB plug into the AC adapter included with this product and connect it to the power supply. □ Confirm that local voltage and receptacle type are correct.
- Page 13 8.1.1. Mobile Battery If using a mobile battery □ Turn off the scale and disconnect the AC adapter if using a mobile battery. □ Connect the USB plug to the mobile battery. Refer to "15. Function Table" to set the function table bat 2 .
- Page 14 8.3. Readability Mass can be displayed on FG-CWP series with the following four types of readability (scale interval or "division"). The ratio of readability and weighing capacity expressed as display resolution is shown in the following table. Function table Display resolution...
- Page 15 10. Comparator Function The comparator function compares the weighed value against the set values and displays the results using LEDs (yellow / green / red). Comparison is done based on the following table, and the results are displayed/output. LED Display...
- Page 16 Max resolution 10.000 kg 30.000 kg / 0.001 kg Counting mode 10000 pcs 10.1. How to Operate Press and hold the SAMPLE key while in STABLE mass display to enter comparator setting mode. ZERO Press and Hold Display the selected memory number (0-9).
- Page 17 PRINT key to change the memory number display. Press 2. Press the MODE key. LO is lit and the lower limit value of the memory number selected is displayed. Press 3. Press the MODE key.
- Page 18 PRINT key to change the memory number display. Press Press the MODE key. LO is lit and the lower limit value is displayed. Press the TARE key. The digit of the value blinks. Change the value with the keys below.
- Page 19 Display Hold Condition The weighed value is held and displayed when it becomes stable at 5d or more, or when the weighing value is 5d or more and fluctuates within the "Display hold width" for 2 seconds.
- Page 20 Cp-p 1 This is a method of comparing against negative mass values. After a container with objects in it is placed on the weighing pan and tared, take objects away while staying in the OK range to compare masses. The same operation is also possible in the ordinary method of comparing, but comparison results start from HI, changing from HI to OK to LO as more objects are taken away.
- Page 21 Method 1 (using operation keys) 1. Confirm that the scale is in weighing mode (display shows “kg” (“g”) or “pcs”). 2. Press and hold the TARE key for 4 sec. or longer. Release the key when Cal is displayed. (Then go to “14.2.
- Page 22 Relations between items in sensitivity adjustment mode and key operations are shown in the diagram below. Weighing mode Method 2 Method 1 Press Press and hold In sensitivity adjustment mode (transition method) Sensitivity adjustment using a weight Press Press...
- Page 23 Note: Prepare a weight. (A weight equivalent to the weighing capacity of the scale to be adjustd is recommended. However, the value for the weight can be set (changed).) 1. Turn on the scale and supply it with power for 30 minutes or longer. □ Change the parameter for the function table item...
- Page 24 Moves the blinking digit Increases the blinking digit by 1 Press 5. Press the TARE key to display end and save the parameter. 6. To adjust using a weight, return to step 2 of “14.2 Sensitivity Adjustment Using a Weight”.
- Page 25 You will be returned to the status in step 2. Press 5. If is displayed, press the TARE key to ClrC go restore to factory default and display end . To end setting, press the ZERO key or CAL switch. This will return you to weighing mode.
- Page 26 15. Function Table This is the function for viewing and changing items that determine the operation of the scale. Function table values are stored in non-volatile memory even when the display is turned off. Parameter Item 15.1. Parameter Setting Procedure 1.
- Page 27 15.2.1. Setting Example To set auto power-off function to “Enabled”, and the display resolution function to “1/3000”: func . 1. Display the class See“15.1 Parameter Press Setting Procedure”. 2. Press the TARE key to display poff 0 . Each pressing...
- Page 28 □ To cancel the operation, press the ZERO key.The display turns off automatically. □ In addition to the function tables, the unit mass of the counting function and the limit values of the comparator function are also restored to the factory default.
- Page 29 Changes the value for readability “d”. (Resolution = Readability / Weighing capacity) Stability band width: When the weighed value is within a certain width (stability band width) and a certain amount of time (stability band time) has passed, the scale judges that weighing is stable and lights up the stability indicator.
- Page 30 Decimal point Dot (.) 0 Comma (,) GLP output 0 info ON (DATE and TIME : PC date and time) ON (DATE and TIME : blank (handwritten)) Serial interface baud rate 2400 bps 0 4800 bps 9600 bps...
- Page 31 Compare all data Compare all stable data Compare data except that at -4d to +4d Compare stable data except that at -4d to +4d Compare all data at +5d and above Compare stable data at +5d and above Comparator ordinary Ordinary comparison ...
- Page 32 Class Item Parameter Content/use Hold release time Release immediately. Hd-t 5 seconds 10 seconds 2 15 seconds 20 seconds 30 seconds 1 minute 2 minutes 5 minutes 10 minutes Impact Shock Detection 0 Mobile battery 0 Do not set this parameter. ID number for GLP output ID number setting Password lock function...
- Page 33 1. Connect it to your PC. The driver will be installed automatically. If the driver is not installed, please refer to "Details on how to use and examples " below and install the driver. 2. Confirm the COM port number.
- Page 34 3. Click the Start button of RsCOM of WinCT. Transmission and receiving of data is enabled. 4. Press the scale's PRINT key to output weighed values from the scale and receive them via RsCom. Note: The method for outputting weighed values can be changed in the scale’s function tables.
- Page 35 LO : When the weighed value is low - - : When not comparing □ The data consists of nine characters including the polarity and decimal point. □ There are three types of units, as shown below. _ k g :Mass data “kg”...
- Page 36 (auto print width) from the standard "zero display", and the comparator ap-b result is OK and the stable value mark is on, the weighed value will be output once. Also, if PRINT key is pressed while the stable value mark is on, the weighed value will be output once.
- Page 37 Baud rate Select the baud rate according to the device to be connected. □ 2400 bps ( bp5 0 ) □ 4800 bps ( bp5 1 ) □ 9600 bps ( bp5 2 ) Command mode In command mode, the scale is controlled by commands from an external device such as a computer.
- Page 38 □ To tare the weighed value when weighed value is stable (no response if erCd 0 ) Command T C Response When zeroing operation is possible <AK> □ To switch the weighing unit (no response if erCd 0 ) Command U C Response When zeroing operation is possible <AK>...
- Page 39 Error code Description and how to resolve Communications error EC,E00 A protocol error occurred in communications. Check the format and the baud rate. Undefined command error EC,E01 An undefined command was received. Check the command. Not ready The command received cannot be processed.
- Page 40 □ To set the HI limit value (no response if erCd 0 ) Sends a six-digit number that does not contain “+/-” or decimal point Command H Response H □ To set the LO limit value (no response if erCd 0 ) Sends a six-digit number that does not contain “+/-”...
- Page 41 17. Options 17.1. Option List Option name Contennts FG-27CWP Bluetooth communication interface AD-8541-PC Bluetooth dongle for PC connection AD-8931 Bluetooth External Display AX-TB301 AC adapter See the optional instruction manual for details.
- Page 42 □ “Start Block” and “End Block” for GMP, GLP data 18.1. ID Number Setting Procedure 1. With the display turned off, while pressing and holding the TARE key, press the ON/OFF key to turn the display on and display the class func .
- Page 43 □ To output the GMP, GLP report to a personal computer, select the function setting info 2 . ・ info 1 :DATE and TIME are PC date and time ・ info 2 :DATE and TIME are blank (handwritten) ・Sensitivity adjustment Report 1.
- Page 44 Sets the parameter. Weighing unit 4. With nothing on the weighing pan, press the TARE key. The zero point is measured and the weighed value is displayed in “kg” for a few seconds. Then, the value of the weight is displayed. Weight 5.
- Page 45 : Line feed, ASCII 0Ah ・Output of “Title block” and “End block” When weighed values are recorded as the GMP, GLP report, “Title Block” and “End Block” are added at the beginning and at the end of the group. Press and ・Title Block...
- Page 46 Press and 3. Press and hold the PRINT key until recend appears, hold and then release the key. The scale outputs the “End Block.” 4. The scale automatically returns to weighing mode. To output the “End block” Title block Format...
- Page 47 In the factory default setting, the password lock function is disabled. To enable/disable the password lock function and to register the password, refer to the class "15.3. Parameter List” .Set the password according to the table below. For...
- Page 48 19.2. To Changing the Function Table After setting lock 1 or 2 With the display turned off, while pressing and holding the TARE key, press the ON/OFF key to turn the display on and display the software version p-X.XX . After viewing the software version p-X.XX , choose between...
- Page 49 19.2.2. To Changing the Function Table in gUe5t Press the MODE key to select the gue5t , and then ⋆ press the TARE key to display func Press the TARE key to display the class. Refer to the Press table below to change items or set details. Refer to ”19.2.3...
- Page 50 Compare all data Compare all stable data Compare data except that at -4d to +4d Compare stable data except that at -4d to +4d Compare all data at +5d and above Compare stable data at +5d and above Comparator ordinary Ordinary comparison ...
- Page 51 ・No zero display when the display is turned on. Remove anything that is on the pan. ・Perform zero point adjustment. ・Did you use the hold function ? Fixed display. Refer to “15. Function Table” and change the function Hold . ・Turn off scale and turn it on again.
- Page 52 20.3. Error Code Table When any of the following errors are displayed, try turning the display off and on again. Display Content is displayed The temperature sensor has failed. error 0 The memory (circuit) has failed. error 3 is displayed is displayed The internal circuitry has failed.
- Page 53 Display 7 segment LCD with backlight(Character height 30 mm) Display update Approx. 10 times/second Dust and water protection Complying with IP67 Operating Consitions -10 °C to 40 °C, 85% R.H. or less (non-condensing) AC adapter or mobile battery or USB port Power Supply USB Cable Length: Approx.
- Page 54 21.2. Dimensions FG-30KCMWP FG-60KCLWP FG-150KCLWP...
- Page 55 Gravity Acceleration Map Values of gravity at various locations Amsterdam 9.813 m/s Manila 9.784 m/s Athens 9.800 m/s Melbourne 9.800 m/s Auckland NZ 9.799 m/s Mexico City 9.786 m/s Bangkok 9.783 m/s Milan 9.807 m/s Birmingham 9.813 m/s Moscow 9.816 m/s Brussels 9.811 m/s New York...
- Page 56 A&D Company, Limited 3-23-14 Higashi-Ikebukuro, Toshima-ku, Tokyo 170-0013, JAPAN Telephone: [81] (3) 5391-6132 Fax: [81] (3) 5391-1566 A&D ENGINEERING, INC. 4622 Runway Boulevard, Ann Arbor, Michigan 48108, U.S.A. Telephone: [1] (800) 726-3364 A&D INSTRUMENTS LIMITED Unit 24/26 Blacklands Way, Abingdon Business Park, Abingdon, Oxfordshire OX14 1DY United Kingdom Telephone: [44] (1235) 550420 Fax: [44] (1235) 550485 A&D AUSTRALASIA PTY LTD...
Need help?
Do you have a question about the FG-CWP Series and is the answer not in the manual?
Questions and answers