Kramer VIA GO Quick Start Manual
Wireless presentation device
Hide thumbs
Also See for VIA GO:
- User manual (58 pages) ,
- Quick start manual (4 pages) ,
- Quick start manual (4 pages)

Related Manuals for Kramer VIA GO


Summary of Contents for Kramer VIA GO
- Page 1 USER MANUAL MODEL: VIA GO Wireless Presentation Device P/N: 2900-300637 Rev. 5 www.kramerAV.com...
-
Page 6: Table Of Contents
Configuring Settings Using the Embedded Web Pages Technical Specifications Figures Figure 1: VIA GO Wireless Presentation Device Figure 2: Connecting the VIA GO Wireless Presentation Device Figure 3: VIA Web Interface Welcome Screen Figure 4: Kramer VIA Login Screen Figure 5: VIA Home Screen... - Page 7 Figure 52: Digital Signage > Schedule Playlist WHEN to Play Tab Figure 53: Digital Signage > Schedule Playlist WHAT to Play Tab Figure 54: WHAT to Play Tab Figure 55: Set Running Time for Web page Figure 56: Scheduled Campaign displayed in the Schedule Playlist Tab VIA GO – Contents...
-
Page 8: Introduction
1 Introduction Welcome to Kramer Electronics! Since 1981, Kramer Electronics has been providing a world of unique, creative, and affordable solutions to the vast range of problems that confront video, audio, presentation, and broadcasting professionals on a daily basis. In recent years, we have redesigned and upgraded most of our... - Page 9 Avoid interference from neighbouring electrical appliances that may adversely influence signal quality Position your VIA GO away from moisture, excessive sunlight and dust This equipment is to be used only inside a building. It may only be connected to other equipment that is installed inside a building.
-
Page 10: Overview
Windows & Android mirroring. With industry-leading 1024-bit encryption and built-in Wi-Fi, you can securely use VIA GO on your internal network. Every local connection to VIA GO is wireless, free of dongles, cables, and other compatibility peripherals. Key features of VIA GO: ... - Page 11 1.2.1 Applications & Features Here are just a few of the things you can do with VIA GO: Multiviewing: Show two participant screens at the same time. VIA GO automatically sizes each screen to the maximum available resolution. Finished sharing? Tap Stop Presenting to disconnect.
- Page 12 Click Share to send it by email. For a complete, updated list of available features go to: www.true-collaboration.com/products.html# 1.2.2 Supported Devices The following user devices are supported by the VIA GO Wireless Presentation Device: Windows 7/8/10® (32-bit/64-bit) computer ...
-
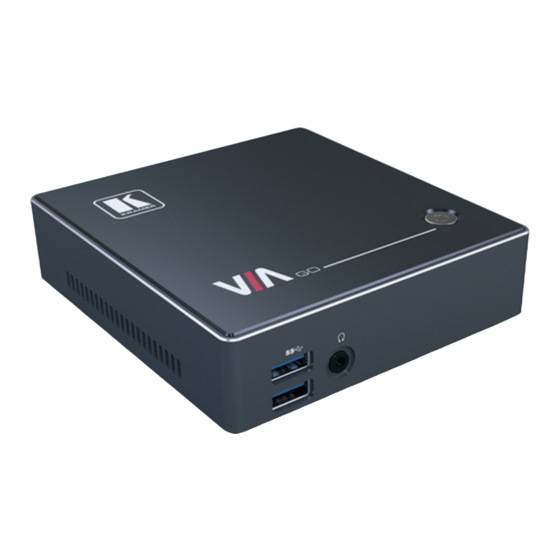
Page 13: Defining Via Go
2 Defining VIA GO This section defines VIA GO. Figure 1: VIA GO Wireless Presentation Device Feature Function USB 3.0 Connectors Connect to up to two USB devices. 3.5mm Mini Jack Connector Connect to earphones or a speaker (digital embedded audio from HDMI and analog audio supported). -
Page 14: Connecting Via Go
3 Connecting VIA GO Always switch off the power to each device before connecting it to your VIA GO. After connecting VIA GO, connect its power and then switch on the power to each device. Figure 2: Connecting the VIA GO Wireless Presentation Device... - Page 15 After connecting the display, VIA GO’s internal video card reads the EDID (Extended Display Identification Data) of the display and automatically sets the optimum display resolution and image refresh rate through the HDMI or Mini DisplayPort jacks. 2. Connect the RJ-45 connector to your network using a LAN (Local Area Network) cable or connect to your network using a commercial wireless router.
-
Page 16: Setting Up Via Go
4 Setting Up VIA GO Running the Kramer VIA App Your device should run the Kramer VIA app to enable you to present on the display using VIA GO. 4.1.1 Running the Kramer VIA App for PC and Mac To run Kramer VIA, for PC and Mac computers: 1. - Page 17 Store (Windows Phone). To run Kramer VIA for Chromebook or the Chrome Browser: 1. Open your Chrome browser and type the name of your VIA GO device as it is shown on the main display. The VIA embedded web pages Welcome screen appears (Figure 2.
-
Page 18: Logging In To Via Go
(section .2.2) 4 Logging In to VIA GO Using a VIA Pad (section .2.3) 4 Logging In to VIA GO Using a VIA NFC Tag for Android (section .2.4) VIA GO - Setting Up VIA GO... -
Page 19: Figure 4: Kramer Via Login Screen
4.2.1 Logging In to VIA GO Manually To log in to VIA GO manually: 1. Connect your device to the same network that VIA GO is connected to. 2. Run the Kramer VIA app. The Kramer VIA login screen appears. - Page 20 The Code can only be seen by those present in the meeting room and the Code changes regularly. This is a security feature that ensures that only those present in the room can participate in the presentation. 6. Click Login. You are logged into VIA GO. VIA GO - Setting Up VIA GO...
-
Page 21: Figure 6: Via Home Screen With Qr Code Icon
The following instructions are for iOS, Android & Windows Phone users. To log in to VIA GO using the QR Code: 1. Connect your device to the same network as the VIA GO and run the Kramer VIA app on your device. - Page 22 4.2.3 Logging In to VIA GO Using a VIA Pad Make sure that your VIA Pad has been paired with your VIA GO unit 7 before using it (see section .2.5). The following instructions are for Windows and Mac OS users.
- Page 23 4. When prompted, touch the Android device to the writable tag. A message appears, confirming that the tag was successfully written. 4.2.4.2 Logging in Using the NFC Tag The Kramer VIA app must be installed on your device to log in using the 4 NFC tag (see section .1).
-
Page 24: Figure 7: Client Preferences Screen
To define the encoding format: 1. Click Settings in the VIA taskbar menu (Figure 17). The Client Preferences screen appears. Figure 7: Client Preferences Screen 2. Select the required Encoding Format for Presentation. VIA GO - Setting Up VIA GO... -
Page 25: Figure 8: Room List Manager Window
To access the Room List Manager: Click the location icon to the right of the Room Name field on the VIA login window (Figure The Room List Manager window appears. Figure 8: Room List Manager Window VIA GO - Setting Up VIA GO... -
Page 26: Figure 9: Plain Text Room List File
Figure 9: Plain Text Room List File 2. On the Room List Manager window, click Import and open the plain text file. The addresses in the text file appear in the Room name list. VIA GO - Setting Up VIA GO... -
Page 27: Figure 10: Rename Room Text Box
2. Select the location for the room shortcut. A shortcut is created. 3. Click the shortcut to open a VIA login window with the Room Name field filled in with the name you selected in step 1. VIA GO - Setting Up VIA GO... -
Page 28: Mirroring Using Ios/Os X Airplay Service
All participants in a meeting using an Apple device can mirror their screen on the main display using the Apple AirPlay service. No application is required to activate this mode. However, you must enable the iOS mirroring feature in the VIA GO 7 embedded webpages (see section .2.8.1). -
Page 29: Mirroring Android Devices Using Kramer Via
Your device must support Android version 5.1 as a minimum. The latest Android OS version is recommended. To mirror your Android device screen using Kramer VIA: 1. Connect your Android device to the network that VIA GO is connected to. 4 2. Log in to Kramer VIA (see section .2). -
Page 30: Figure 13: Presenting (Mirroring) Confirmation Message
4. Click START NOW to confirm. Mirroring starts and your screen appears on the main display. 5. Minimize the Kramer VIA app by clicking the Home button of your device and open any content on your device to share it on the main display. -
Page 31: Via Go Functions
5 VIA GO Functions VIA GO dashboard enables using VIA functions and configuring settings. VIA GO presents two types of dashboards: Gateway Dashboard – section 5 .1 User Dashboard – section 5 .2 In addition, many VIA GO functions are accessed from the: ... -
Page 32: Administrator Dashboard
VIA GO Settings Performs settings on the LAN, system controls, and Wi-Fi Participants Provides a list of all participants in the session Figure 15 shows the VIA GO main User screen and its functions: VIA GO - VIA GO Functions... -
Page 33: User Dashboard
User Dashboard Figure 15: VIA GO User Dashboard Item Icon Action Multimedia Supports video formats: avi, vob, mp4, mov, mpx (ex. mpg). Shares smooth full-motion video Present / Stop Allows the user to show his device's screen on main display, or to... -
Page 34: Via Go Taskbar Menu
Settings – opens Client Preferences that include Encoding Format (see 4 section .2.5) Session Reset – resets the current session and disconnects all users. Logout – logs the user out of Kramer VIA. VIA GO - VIA GO Functions... -
Page 35: Using Via Go
Clicking the Multimedia tab on the main menu allows the user to access the video player of VIA GO. Users can add and remove movies to this list and also select the ones they want to play on main screen. -
Page 36: Handling Multimedia
VIA. VIA GO features a 10Mbps maximum video bitrate for 30fps or 60fps videos and handles video files of up to 8GB. It supports up to 6Mbps video bit rate when using the built-in Wi-Fi module in Access Point mode. -
Page 37: Figure 18: Vlc Media Menu
Clients of media servers issue commands like play and pause, to facilitate real-time control of playback of media files from the server. VIA GO supports RTSP. A media played locally on a computer can be streamed on VIA GO, provided the computer and VIA GO are on connected networks. -
Page 38: Figure 19: Open Media Window
2. Click Media > Stream. The Open Media window appears. Figure 19: Open Media Window 3. Click Add and select a file to stream and click Stream. The Stream Output/Source window appears. Figure 20: Stream Output/Source Window VIA GO - Using VIA GO... -
Page 39: Figure 21: Stream Output/Destination Setup Window
The Stream Output/Destination Setup window appears. Figure 21: Stream Output/Destination Setup Window 5. Select RTSP from the New Destination drop down and click Add. The RTSP tab appears. Figure 22: Stream Output/Destination Setup RTSP Tab VIA GO - Using VIA GO... -
Page 40: Figure 23: Stream Output/ Transcoding Options Window
6. Type a short name to be used as a Path and click Next. The Stream Output/Transcoding Options window appears. Figure 23: Stream Output/ Transcoding Options Window Clear the Activate Transcoding checkbox and click Next. The Stream Output/Option Setup window appears. Figure 24: Stream Output/Option Setup Window VIA GO - Using VIA GO... - Page 41 7. Select Stream all elementary streams and click Stream. 8. Open the VIA GO dashboard and click Features > Multimedia > Streaming Player. 9. Type a URL name in the following format: rtsp://<local computer IP address>:8554/<name mentioned in step 6>.
- Page 42 Web-based push-to-talk features. VIA GO supports RTP. Media can stream on a VIA GO unit, provided the computer and VIA GO are on connected networks. To stream RTP using VLC: 1.
-
Page 43: Configuring Via Go
7 Configuring VIA GO Configure basic settings directly from the Settings window of the Kramer VIA app 7 (see section .1). Configure advanced settings from the VIA embedded web 7 pages (see section .2). Configuring Settings from the Kramer VIA App The Settings window is where you configure your VIA GO unit. -
Page 44: Figure 25: Settings Window - Lan Settings Tab
Network settings can also be configured from the embedded web pages 7 (see section .2). Your VIA GO unit is set to DHCP LAN settings by default. When changing Network settings, make sure they are correct. Incorrect values can cause a loss of communication. To change the IP address: 1. -
Page 45: Figure 26: Settings Window - System Control Screen
The system controls access the control panel, audio settings, display settings, system health and log files of VIA GO. The log folder is only available if system logging is activated from the configurations tab of settings. Clock and language for VIA GO can also be changed here. -
Page 46: Figure 27: Settings Window - Wifi Tab
2. On the Wifi tab, click one of the following subtabs: AP (Access Point) Mode – see section 7 .1.3.1 Client Mode – see section 7 .1.3.2 Wifi IP Info – view IP address information VIA GO - Configuring VIA GO... - Page 47 7.1.3.1 AP (Access Point) Wi-Fi Mode In AP mode, VIA GO uses the built-in Wi-Fi module, that offers 2.4 GHz band support, IEEE 802.11bgn, 802.11i, 802.11w with WPA2, AES-CCMP security level (in AP mode). The device creates an autonomous Wi-Fi network (SSID) named “VIA_WIFI”.
- Page 48 Kramer VIA app, connecting it to VIA GO. The only thing to do is now to click Present from the VIA menu to start sharing a content on the main display.
- Page 49 3. Click Create. Once done, remove the USB from VIA GO. 4. Connect this USB to the user’s PC/Mac and make sure that the Wi-Fi of this PC/Mac is turned ON: the user’s laptop automatically joins the VIA GO access point Wi-Fi and launches the Kramer VIA application. Click Present.
- Page 50 7.1.3.2 Client Wi-Fi Mode In Client mode, the VIA GO built-in Wi-Fi module is configured to provide 2.4GHz and 5GHz bands support, IEEE 802.11abgn, 802.11ac, 802.11i, 802.11h, 802.11w with WEP 64bit-128bit, AES-CCMP, TKIP, WPA, WPA2, WPA2 Enterprise 802.1X (EAP-TLS, PEAP, EAP-FAST), PAP, CHAP, TLS, MS-CHAP, MS-CHAPv2 security level.
-
Page 51: Configuring Settings Using The Embedded Web Pages
To access the VIA GO embedded web pages: 1. Open the Web browser and go to the IP address for your VIA GO unit. The embedded web pages Welcome page appears (Figure... -
Page 52: Figure 28: Via Web Pages - Administrator Login Page
4. Type the two Captcha Text “words” with a space between them in the text box. Note: You can change the Captcha Text by pressing the red Refresh button to the right of the text box. VIA GO - Configuring VIA GO... -
Page 53: Figure 29: Via Web Pages - Home Page > System Information
Viewing System Information View system information such as firmware version, date/time, disk space, iOS Mirroring status, Chrome status, and LAN parameters on the Home > System Information tab of the VIA embedded web pages (Figure 29). VIA GO - Configuring VIA GO... -
Page 54: Figure 30: Via Web Pages - Add User Tab
Creating New Users The VIA embedded web pages enable creating new users and defining what system activities each user has access to. There are two default users available to log in to VIA GO: Moderator Level User: Default user name: su... - Page 55 Digital Signage – able to configure the Digital Signage (see 7 section .2.14) 4. Click Save. A new user is added and the User List tab appears with the new user added to the list. VIA GO - Configuring VIA GO...
-
Page 56: Figure 31: Via Web Pages - Network Settings Tab
3. Click Apply Settings after making changes. Alternatively, you can set the DHCP option as default to get an automatic IP address, for easy Plug and Play setup when connecting your VIA GO to the network. VIA GO - Configuring VIA GO... - Page 57 Select Standalone Wi-Fi to create an autonomous network (without Internet access). Once defined as required, click Apply before rebooting your device. 7 .1.3.1 Refer to section for more information about the Wi-Fi AP mode of your device. VIA GO - Configuring VIA GO...
- Page 58 To configure the Wi-Fi module in client mode: 1. To connect your VIA GO as a client device to your main network: 2. Select the Client Mode tab and confirm the pop-up message. 3. Browse for and select an available network.
- Page 59 To connect your VIA GO as a client device to your main network while simultaneously using the LAN primary network: 1. Browse for and select an available network. 2. Enter the required password. 3. Select the Enable Dual Network checkbox 4.
-
Page 60: Figure 32: Via Web Pages - Change Password Tab
Figure 32: VIA Web pages – Change Password Tab 2. Type the Old Password, New Password and Confirm Password. 3. Click Update. The password is changed and you are logged out of the web pages. VIA GO - Configuring VIA GO... -
Page 61: Figure 33: Via Web Pages - User List Tab
2. Click the icon in the Edit column. The Edit User tab appears. Figure 34: VIA Web pages – Edit User Tab 3. Type and confirm a new password in the Password and Confirm boxes. VIA GO - Configuring VIA GO... - Page 62 VIA Pad overrides Room Code: Enable this feature if you want the VIA Pad to bypass the need to type in the Room Code authentication. Room Name: Is automatically populated; it reflects the name of VIA GO. Wi-Fi Configuration ...
- Page 63 VSM (VIA Site Management) is an optional, web-based software application (subject to a separate pricing) that enables an administrator to monitor and make changes to all connected VIA GO or all VIA gateways connected to the network. VSM enables and administrator to: ...
- Page 64 Firmware upgrade scheduling Analytics reports VSM can automatically provide individual configuration to added gateways or you can configure settings locally through the gateway. Contact your regional sales representative for more details about this solution. VIA GO - Configuring VIA GO...
-
Page 65: Figure 35: Via Web Pages - Via Site Management Tab
Click Save for changes to be saved with no validation from VSM. Since validation is not made immediately, any error entered at this stage – like duplication of ID must be corrected manually at a later stage. VIA GO - Configuring VIA GO... -
Page 66: Figure 36: Via Management > Wallpaper Tab
1. Click VIA Management > Wallpaper on the left tabs of the VIA web pages. The Wallpaper tab appears. Figure 36: VIA Management > Wallpaper Tab 2. Click Click Here to Upload. 3. Select Wallpaper (must be an image file – jpeg, png, bmp) from your system VIA GO - Configuring VIA GO... -
Page 67: Figure 37: Via Web Pages - System & Ios
4. All previously uploaded wallpapers are saved and shown as below. To select one of them, click “Set”. To delete one of them, click “Delete”. 5. Then click Reboot. The background image on VIA GO changes after rebooting 7.2.8 Using the VIA Settings Subtab To use the VIA Settings subtab: 1. - Page 68 Activate System Log - Activates the logging of all system activity either by the client or the gateway to aid diagnosing a problem with VIA GO. Activate Energy Saver Mode - To allow your unit to enter into sleep mode after 1 minute of inactivity.
- Page 69 6, To resize QR code, click and drag it from the code frame to any desired size: 7.2.8.3 Customizing the VIA Home Screen The VIA GO embedded web pages enable you to change the position and color of elements of the VIA Home screen (Figure 5) and to display a customized DNS (Domain Name System) name if local DNS services are supported by the network.
-
Page 70: Figure 38: Via Settings Tab - Display Settings
1. Click VIA Management > VIA Settings on the left tabs of the VIA web pages. The VIA Settings tab appears (Figure 37). 2, Click Display in the menu of the VIA Settings screen. The Display settings screen appears. Figure 38: VIA Settings Tab – Display Settings VIA GO - Configuring VIA GO... -
Page 71: Figure 39: Via Web Pages - Customize Gateway Screen
Home screen preview to change their position. 5. Select one of the red boxes and change the name of the box and color of the text in the Properties section of the Gateway screen. VIA GO - Configuring VIA GO... -
Page 72: Figure 40: Via Settings > Power Settings
Auto Hide field to set the amount of time the Room Name is displayed. 7. Click Apply to save changes and reboot VIA GO for changes to take effect. 7.2.8.4 Selecting Preferred Language On the VIA Settings Tab –... -
Page 73: Figure 41: Via Settings > Date & Time Settings
2. In the Date and Time Format for embedded web pages section, select the Date and Time Format from the option box. 3. In the VIA Gateway Timezone Configuration section, select the required time zone from the Set Time Zone option box. VIA GO - Configuring VIA GO... -
Page 74: Figure 42: Via Settings > Advanced Settings
Secure – API commands can be sent to the VIA gateway securely over a TLS port. Non-Secure – API commands can be sent to the VIA gateway on a non- secure, plain text port. Select this option if your controller does not support TLS. VIA GO - Configuring VIA GO... - Page 75 3. Click Apply and reboot VIA GO. To login into the VIA GO client when basic moderator mode is activated: 1. Open the VIA GO client and enter the location (IP address of the VIA GO gateway). 2. Enter the nickname. The Room Code field appears.
- Page 76 “Present” to share content on the main screen. The moderator must click Allow (full screen or auto-position if another participants already presenting) to approve the request to start the participant’s presentation on the collaboration display or Deny to reject the request: VIA GO - Configuring VIA GO...
- Page 77 7. Click Leave Moderation anytime to stop moderating the session. Anyone else can now click Become Moderator and type in the password to access this privilege. Note: The moderator can "Present" at any time without permission. VIA GO - Configuring VIA GO...
- Page 78 Digital Signage is an optional feature available through separate licensing and pricing. Contact your local Kramer office for more details. The Digital Signage feature enables you to use VIA GO to display dynamic content and information on the main display when there is no meeting in progress. Use a predefined template or create your own display configuration with up to three frames of content that appear simultaneously.
-
Page 79: Figure 43: Digital Signage > Upload Media File Tab
To create and upload digital signage media: 1. On the left side of the embedded web pages, select Digital Signage > Manage Content. The Upload Media File tab appears. Figure 43: Digital Signage > Upload Media File tab VIA GO - Configuring VIA GO... -
Page 80: Figure 44: Digital Signage Create Url Window
Figure 44: Digital Signage Create URL Window 3. Type the URL address and File Name (name that will appear on the Existing Media list) and click Save. The new URL is added to the Existing Media list. VIA GO - Configuring VIA GO... -
Page 81: Figure 45: Digital Signage Scroll Text Editor Window
Font/Background Color to pick the text and background color. 8. Click Preview. A preview of the scroller appears at the top of the window. 9. Click Save. The new Scroller is added to the Existing Media list. VIA GO - Configuring VIA GO... -
Page 82: Figure 46: Digital Signage Upload Media File Browser
43), click Upload Media. A file browser window appears. Figure 46: Digital Signage Upload Media File Browser 11. Select an image or video file and click Open. The file is added to the Existing Media list. VIA GO - Configuring VIA GO... -
Page 83: Figure 47: Digital Signage > Template Manager Subtab
To add and manage digital signage templates: 1. On the left side of the embedded web pages, select Digital Signage > Template Manager. The Template Manager tab appears. Figure 47: Digital Signage > Template Manager Subtab VIA GO - Configuring VIA GO... -
Page 84: Figure 48: Digital Signage Template Preview Window
2. Click the name of a template. A window opens, showing a preview of the selected template. Figure 48: Digital Signage Template Preview Window 3. Click Add Template. The template builder screen appears. Figure 49: Digital Signage Template Builder Screen VIA GO - Configuring VIA GO... -
Page 85: Figure 50: Digital Signage Template Builder Screen - New Frame
11. Click Save. The new template appears in the Template Manager list (Figure 47). 12. Click Edit to open the template builder screen and edit the selected template. 13. Click Delete to delete the selected template. VIA GO - Configuring VIA GO... -
Page 86: Figure 51: Digital Signage > Schedule Playlist Tab
To define a digital signage campaign: 1. On the left side of the embedded web pages, select Digital Signage > Schedule Playlist. The Schedule Playlist tab appears. Figure 51: Digital Signage > Schedule Playlist Tab VIA GO - Configuring VIA GO... -
Page 87: Figure 52: Digital Signage > Schedule Playlist When To Play Tab
5. Select a Start Date on the first calendar and an End Date on the second calendar. 6. Select the checkbox next to Start (hh:mm) to define a start time for the first day of the campaign and an end time for the last day of the campaign. VIA GO - Configuring VIA GO... -
Page 88: Figure 53: Digital Signage > Schedule Playlist What To Play Tab
Figure 53: Digital Signage > Schedule Playlist WHAT to Play Tab 8. In the Template View section on the right side, select a template. A preview of the selected template appears in the Template View section. VIA GO - Configuring VIA GO... -
Page 89: Figure 54: What To Play Tab
9. Click one of the frames in the template preview, select one or more media objects from the media section and click Add to Playlist. All selected media for the selected frame appears in the Schedule Details area. Figure 54: WHAT to Play Tab VIA GO - Configuring VIA GO... -
Page 90: Figure 55: Set Running Time For Web Page
Figure 55: Set Running Time for Web page 11. Click Save. The new campaign is saved and it appears on the Schedule Playlist tab. Figure 56: Scheduled Campaign displayed in the Schedule Playlist Tab VIA GO - Configuring VIA GO... - Page 91 7.2.15 Viewing Gateway/Webadmin Activity Log Activate and retrieve logs of your VIA GO unit on the Gateway and/or the Web interface. Export this data to a .csv file. 7.2.16 Update Firmware Register your VIA GO unit to our VIA Registration Portal and get your authentication file.
- Page 92 Once FW version 2.2.1017.918 is installed, you will no longer be required to upload an authentication file in order to enable future FW updates. To update VIA GO, ONLY use the .rpm file available for download from our technical support Web page: www.kramerav.com/support/downloads.asp.
- Page 93 If you need to re-activate the VIA unit, upload the activation key on this page: 7.2.18 Maintenance Click Utilities on the left menu and then select Maintenance. Select the default configurations one-by-one to reset or click select all to reset to complete default factory settings. VIA GO - Configuring VIA GO...
-
Page 94: Technical Specifications
11.70cm x 10.70cm x 3.00cm (4.61" x 4.21" x 1.18" ) W, D, H NET WEIGHT: 0.5kg (1.1lbs) approx. INCLUDED ACCESSORIES: 1x power cord, 1x Kramer mini DP to VGA adapter, VESA mounting bracket Specifications are subject to change without notice at www.kramerav.com VIA GO - Technical Specifications... - Page 96 Disconnect the unit from the power supply before opening and servicing For the latest information on our products and a list of Kramer distributors, visit our Web site to find updates to this user manual. We welcome your questions, comments, and feedback.
Need help?
Do you have a question about the VIA GO and is the answer not in the manual?
Questions and answers