Kramer VIA Collage User Manual
Wireless presentation and collaboration solution
Hide thumbs
Also See for VIA Collage:
- User manual (151 pages) ,
- Quick start manual (61 pages) ,
- Quick start manual (4 pages)

Subscribe to Our Youtube Channel
Related Manuals for Kramer VIA Collage


Summary of Contents for Kramer VIA Collage
- Page 1 K R A ME R E LE CT R O N IC S L T D . USER MANUAL MODEL: VIA Collage Collaboration Hub P/N: 2900-300403 Rev 1...
-
Page 6: Table Of Contents
User Experience Technical Specifications Figures Figure 1: VIA Collage Collaboration Hub Figure 2: Connecting the VIA Collage Collaboration Hub Figure 3: VIA Collage Admin Features Figure 4: VIA Collage Main User Screen Figure 5: The Participant List Figure 6: Enable Control... - Page 7 Figure 23: Third Party Apps Screen Figure 24: Setting Application Name Figure 25: Wallpaper Screen Figure 26: System Control Screen Figure 27: Android Tablet Figure 28: Samsung Galaxy Figure 29: iPad Figure 30: iPhone Figure 31: PC VIA Collage - Contents...
-
Page 8: Introduction
Each participant in a VIA Collage session can quickly view, edit, annotate, comment, and share content with other participants. Participants can share their ideas through the primary screen, or break off with others into smaller groups during a meeting. -
Page 9: Applications & Features
Here are just a few of the things you can do with VIA Collage: Up to six different participant screens can be shown at the same time. VIA Collage automatically sizes each screen to the maximum available resolution, displaying tiles for two or more screens. -
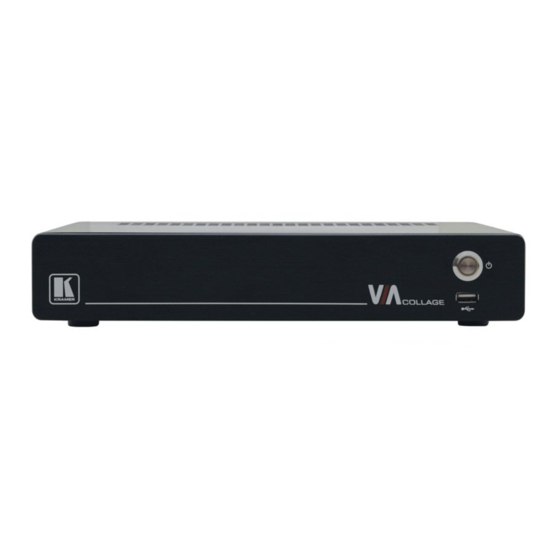
Page 10: Figure 1: Via Collage Collaboration Hub
Figure 1: VIA Collage Collaboration Hub Feature Function Power Button For turning the machine on and off USB Connector For upgrading firmware or connecting a USB device RS-232 Connector Not in use VIDEO IN HDMI-IN Connector Connects to an HDMI source AV –... -
Page 11: Setting Up Via Collage
Always switch off the power to each device before connecting it to your VIA Collage. After connecting VIA Collage, connect its power and then switch on the power to each device. To connect the VIA Collage as illustrated in the example in Figure 2 you need: A VIA Collage Wireless Collaboration Hub A display (projector, monitor, or screen). -
Page 12: Connecting Via Collage To A Display
Unlike the HDMI port, the DisplayPort jack does not carry embedded audio and requires a separate audio connection VIA Collage’s internal video card reads the Extended Display Identification Data (EDID) for any connected display and sets the optimum display resolution and image refresh rate automatically through the HDMI and DisplayPort jacks. -
Page 13: Downloading And Running Via Collage Software
(PC, Mac) or the appropriate Android/iOS app. To access the PC and Mac executable files: Open your Web browser and enter the IP address for your VIA Collage unit Click on the file format (Win7/8, Mac OS) for your computer. You are prompted to save this file to your computer. -
Page 14: Logging In To Via Collage
VIA Collage iOS and Android First, enter the IP address for the VIA Collage. This is found on the main display screen in the lower left Next, choose a username (nickname) for your device (it can be any mix of letters and numbers) then enter it on the login screen of your device Finally, enter the room code as seen on the lower right part of the screen. -
Page 15: Via Collage Functions And What They Do
VIA Collage Functions and What They Do VIA Collage presents two types of screens depending whether it is being used by the Admin or by a User. The following screen shots illustrate both types. The illustration below shows the VIA Collage main Admin screen and its... - Page 16 Microsoft Lync Opens Lync client for audio and video conferencing Web Browser Opens the browser at the VIA Collage gateway to present any content directly from the Web site View Main Shows a mirror of the VIA Collage collaboration display on the Screen user’s devices (laptop, iPAD, MacBook, Android tablet).
-
Page 17: Figure 4: Via Collage Main User Screen
The illustration below shows the VIA Collage main User screen and its functions: Figure 4: VIA Collage Main User Screen VIA Collage - VIA Collage Functions and What They Do... - Page 18 Multiple users can interact and control the main display at the same time View Main Shows a mirror of the VIA Collage collaboration display on the Screen user’s devices (laptop, iPAD, MacBook, Android tablet). The user can see all the activities of the VIA Collage collaboration display on his system (this feature is called "Screen Share"...
-
Page 19: Using Via Collage
VIA Collage Main Menu This section refers to the user's experience. The VIA Collage User main menu has three tabs across the top – Features, Step- In/Out, and Participants. Clicking on the Features tab on the main menu allows the user to see and... -
Page 20: Figure 5: The Participant List
Start a presentation at a display The user is currently presenting Chat Status Start a chat session with any available participants The participant is currently chatting with you. Click to open the chat session VIA Collage - Using VIA Collage... -
Page 21: Enabling Control
Start Collaboration icon and drag his laptop mouse to the top and off their local screen. That cursor now moves to the VIA Collage unit and appears on the main display of Dave. Buttons are shown in the picture below:... -
Page 22: Chatting With Participants
The admin or user can start a chat session to exchange text messages between users. To initiate a chat session: Go to the participant list and click the chat icon for the desired participant. The chat window opens and you can chat with selected participant: VIA Collage - Using VIA Collage... -
Page 23: Sharing Files
The user can check for active chat sessions by going to Features > Chat Sharing Files VIA Collage can transfer files between PC/Mac logged in users. To share a file: Go to the participant list and click on the file share icon for the desired participant with whom you wish to share a file. -
Page 24: Figure 8: Admin File Sharing
Once completed, the file is saved on that participant’s system. Figure 9: User File Sharing When completed, the file is saved at receiver’s system. You can check or cancel currently sharing file from Features > File Transfer. VIA Collage - Using VIA Collage... -
Page 25: Accessing Cloud Data
To delete all files from the cloud directory, click on Clean Directory A warning note appears that this is a permanent delete action Whiteboard Collaboration The whiteboard function creates a canvas on the VIA Collage hub. With whiteboard, you can: Access a wide range of drawing and annotating tools... -
Page 26: Whiteboard Functions
Save Saves all your activities either as PDF or as JPEG format Show Desktop Displays your desktop with all running applications. The user can also annotate at the running application using the desktop stylus VIA Collage - Using VIA Collage... -
Page 27: Figure 12: Wide Desktop
1 to screen 2 and retrieve pages from screen 2 to screen 1. When a participant sends any page to screen 2 and then annotates it on the main VIA Collage screen, those annotations show simultaneously on screen 2. - Page 28 4.7.2 Screen Share Screen Share allows the admin to share his screen with all available users so that the user can see all the activities of the gateway running at their local system only. VIA Collage - Using VIA Collage...
-
Page 29: Figure 14: Screen Sharing
Notes: The user is asked to accept to view the shared screen, as shown below. To view the main collaboration display on the user’s system, the user needs to stop both his display and media. VIA Collage - Using VIA Collage... -
Page 30: Showing Content From A Third Party Device
Apple TV, Roku, video cameras with composite video or HDMI outputs, and Samsung’s AllShare Play wireless hub, along with your display. You can connect an extra device to VIA Collage using the HDMI input, or add an external HDMI switcher to select from multiple third-party devices. -
Page 31: Calling With Skype
4.10 Calling with Skype VIA Collage lets you call using Skype to any other Skype user in the world. To activate Skype: Click on Features and click on This launches Skype and you can login and call/chat with any available contact 4.11... -
Page 32: Using Microsoft Lync
4.14 Accessing a Web Page VIA Collage can directly launch a Web browser. You do not need to exit VIA Collage to open a Web site, or launch a Web-based presentation. To open the Web browser:... -
Page 33: Figure 16: Settings Screen
Authentication – activates presentation mode and define moderator/participants settings Streaming Server– configures your IP streaming server address To open the settings page use keyboard and mouse connected to VIA Collage unit: Click on Features to expand Click on Settings. It requests the password for the VIA Admin user Enter the password “viaadmin”... -
Page 34: Figure 17: Lan Settings Screen
DNS server 1, DNS server 2 Figure 17: LAN Settings Screen When finished, click on Apply Settings Click OK at the Confirmation Message Click on Reboot to restart the system with the new settings VIA Collage - Using VIA Collage... -
Page 35: Figure 18: Room/Name Code Screen
Room Name, enter the new address or DNS name, then click on Apply and reboot VIA Collage. To login any device to the VIA Collage client, you must enter the same Room Name in the location field on your... -
Page 36: Figure 19: Configurations Screen
Show Room Name / Code on second Display also: Supported only if there is a second display connected to the VIA Collage unit. This feature allows you to show the Room Name on the wallpaper of the second display... - Page 37 VIA Collage Enable Quick Client Access – Enables a floating icon on the desktop of the VIA Collage gateway to open the VIA Collage menu. The user can click on this icon and the menu opens Collaboration Data Directory Path –...
-
Page 38: Figure 20: Authentication Screen
Figure 20: Authentication Screen There are 2 default users available to login into VIA Collage client in Presentation mode. Moderator: Default user name: su Default password: supass Participant: Default user name: user Default password: userpass You can create more users as needed. -
Page 39: Figure 21: Moderator Mode
Now any user who was created by the moderator can get permission to join the session. To login into the VIA Collage client when Presentation Mode is activated: Open the VIA Collage client and enter the location (IP address of the VIA Collage gateway) Enter user name and password (as defined by moderator) Now you see the Room Code field. -
Page 40: Figure 22: Login Screen When Moderator Mode Is Active
Figure 22: Login Screen When Moderator Mode is Active To start a presentation: Click on “Step-In” and VIA Collage sends a request to the moderator for display permission The moderator clicks on “Allow” to start the participant’s presentation on the... -
Page 41: Figure 23: Third Party Apps Screen
The user can also change the icon image and name of the added third party application. To change the icon image and name of application: Click on Advance The Set Application Name and Icons page opens Click on “Click here” to browse and change the icon image VIA Collage - Using VIA Collage... -
Page 42: Figure 24: Setting Application Name
Close this page and the settings page as well. Reboot the VIA Collage hub To Install a Third Party Application: Click on Install Applications When asked to logout as a VIA Collage user, click Yes VIA Collage - Using VIA Collage... -
Page 43: Figure 25: Wallpaper Screen
Click on Upload Wallpaper Select Wallpaper (must be an image file – jpeg, png, bmp) from your system Click on Reboot The background image on VIA Collage changes after rebooting Figure 25: Wallpaper Screen VIA Collage - Using VIA Collage... -
Page 44: Figure 26: System Control Screen
System Control Settings System controls access the control panel, audio settings, display settings, task manager, system health and log files of the VIA Collage unit. The log folder is only available if system logging is activated from the configurations tab of settings. -
Page 45: User Experience
4.16 User Experience VIA Collage enables a high level of collaboration in meetings. Participants can share files, chat, edit a common document, or stream full HD (1080p/60) video content. Following is a summary of VIA Collage functions: Note: Different devices enable different features depending on the device capabilities. -
Page 46: Figure 27: Android Tablet
Figure 27: Android Tablet VIA Collage - Using VIA Collage... -
Page 47: Figure 28: Samsung Galaxy
Figure 28: Samsung Galaxy VIA Collage - Using VIA Collage... -
Page 48: Figure 29: Ipad
Figure 29: iPad VIA Collage - Using VIA Collage... -
Page 49: Figure 30: Iphone
Figure 30: iPhone VIA Collage - Using VIA Collage... -
Page 50: Figure 31: Pc
Figure 31: PC VIA Collage - Using VIA Collage... -
Page 51: Technical Specifications
10% to 90%, RHL non-condensing DIMENSIONS: 11.7” x 2.2” x 8.3” W, D, H WEIGHT: 2.3kg (5.0lbs) INCLUDED ACCESSORIES: 3 power cords (US, EU, UK) OPTIONAL: 2U rack adapter Specifications are subject to change without notice at http://www.kramerelectronics.com VIA Collage - Technical Specifications... - Page 53 For the latest information on our products and a list of Kramer distributors, visit our Web site where updates to this user manual may be found. We welcome your questions, comments, and feedback. Web site: www.kramerelectronics.com E-mail: info@kramerel.com SAFETY WARNING...
- Page 54 VIAPad Getting Started...
- Page 55 Connect VIA Pad to your VIA device. Touch VIA Pad to begin pairing. When pairing is complete, VIA Pad will light up green. Pair your VIAPad of any VIA device Make sure your VIA unit has been programmed for VIA Pad before Once connected, VIA Pad will light up blue.
- Page 56 Connect your VIA Pad to your laptop. Open the VIA Pad folder and double Touch to present! click on “VIA Pad”. If necessary, type in your room code and click “Login”. Connect your VIAPad Room Name 173.168.1.42 Nick Name johndoe Code Login Once connected, VIA Pad will light up white.
- Page 57 For more information, visit us at: www.True-Collaboration.com VIAPad Quick Start...
Need help?
Do you have a question about the VIA Collage and is the answer not in the manual?
Questions and answers