cecotec CECOFRY&GRILL DUOHEAT 10000 Manual
- Instruction manual (168 pages) ,
- Instruction manual (47 pages)
Advertisement
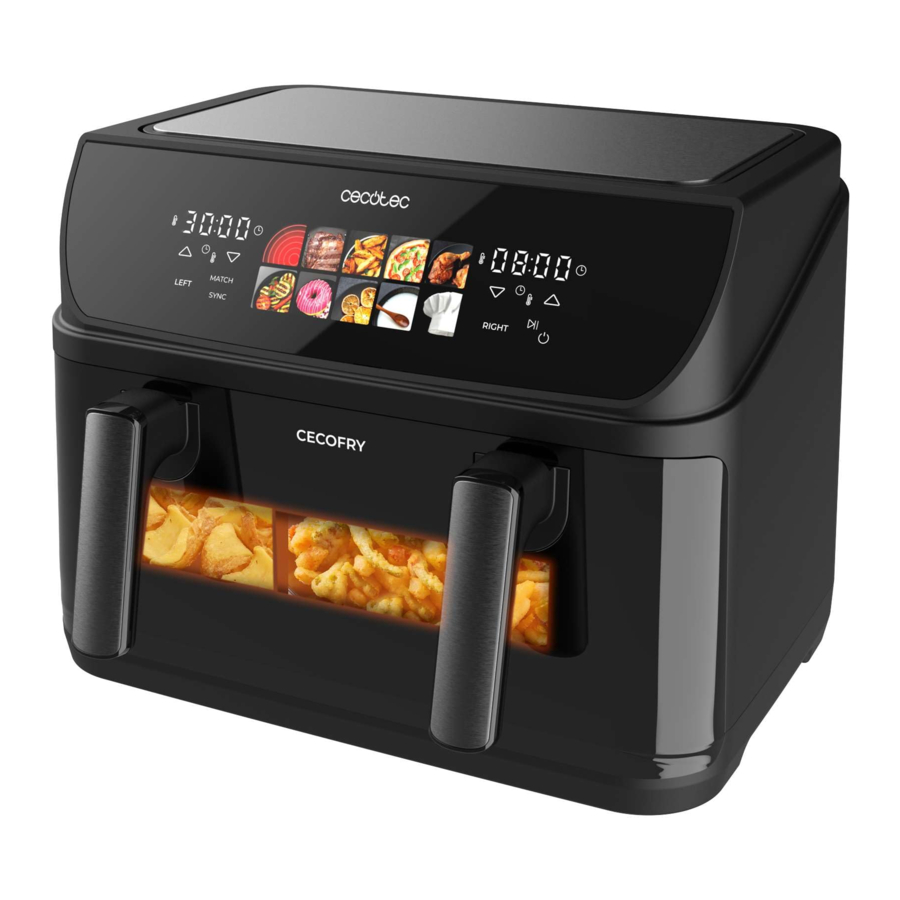
PARTS AND COMPONENTS
Appliance

Fig. 1
- Touch control panel
- Basket separator
- Grill
- Double heating element
- Basket
- Handle
Control panel

Fig. 2
- Left chamber temperature mode indicator light
- Left chamber display for time and temperature
- Left chamber time mode indicator light
- Left chamber time/temperature increase icon
- Left chamber time/temperature decrease icon
- Left chamber selection icon (LEFT)
- MATCH function icon
- SYNC function icon
- Preset menus:
- Preheating
- Steak/Fillet
- Frozen chips
- Pizza
- Chicken wings/thighs
- Vegetables
- Dessert
- Dehydrate
- Ferment
- DIY (manual function)
- Right chamber temperature mode indicator light
- Right chamber display for time and temperature
- Right chamber time mode indicator light
- Right chamber time/temperature decrease icon
- Right chamber time/temperature increase icon
- Right chamber selection icon (RIGHT)
- Power icon
- Left chamber temperature/time mode selection icon
- Right chamber temperature/time mode selection icon
 Note:
Note:
The graphics in this manual are schematic representations and may not exactly match the appliance.
BEFORE USE
- This appliance includes a safety package to protect it during transport. Unpack the appliance and keep the original packaging and materials in a safe place. It will help prevent any damage if the appliance needs to be transported in the future. In case the original packaging is disposed of, make sure all packaging materials are recycled accordingly.
- Make sure all parts and components are included and in good conditions. If there is any piece missing or in bad conditions, contact the official Cecotec Technical Support Service immediately.
- Clean the interior and the exterior of the appliance with a damp cloth. Do not wet the heating elements.
- Clean the basket and rack thoroughly with hot water, washing-up liquid, and a non-abrasive sponge.
- Place the rack properly in the basket and place the basket back in the appliance for use.
- Do not fill the appliance with oil or any other liquid.
Box content
- Air fryer
- Instruction manual
OPERATION
Using the air fryer
- Place the air fryer on a flat, stable, and heat-resistant surface, away from any possible splashing water or heat source.
- Place the basket inside the air fryer properly.
- If desired, place the separator of the chambers following the top guide that is on the appliance itself.
- Do not place any objects on top of the appliance to avoid interrupting the air flow.
- Connect the power cable to an earthed outlet, the power icon will light up.
- Remove the basket from the air fryer with extreme care.
- Put the ingredients in the basket.
- Use the control panel as follows:

Place the separator of the chambers following the top guide that is on the appliance itself to avoid that this separator comes in direct contact with the heating elements, as it can cause damage.
NOTE: never exceed the MAX indicator on the basket, as the final result and the quality of the appliance may be affected.
 TIP: to ensure perfect results, it is recommended that you avoid overfilling the basket with food, as it will not cook evenly.
Double heating element operation
The appliance has a double heating element, the top one generates more heat, and the bottom one is used to increase the temperature of the base of the basket. For best results using both heating elements, it is always recommended to use the special programmes with the default preheating function.
Power icon
Once the basket and rack are securely in place in the fryer, the power icon will light up. Press the power icon to switch on the appliance. Then, select the chamber you want to use by pressing on the desired chamber selection icon. The time and temperature display will show "----". Select the chamber you want to cook in. The selected chamber will show the default time (15 min) and temperature (180°C). Temperature and time are displayed alternately.
Preset menus
These icons allow you to choose from the 10 preset menus. Once selected the desired option, cooking time and temperature values will be set by default (see "Table of preset menus" in this section). The time and temperature values are manually adjustable by pressing the icons for time and/or temperature control.
NOTE:
The steak, pizza, fish and DIY programmes are special programmes with a preset preheating time of 5 minutes which cannot be deactivated. When preheating is complete, the appliance will beep several times and display "ADD" to indicate that the food should be added.
Temperature and time mode selection icons
(Icons 17 and 18)
Press the icons for temperature and time mode selection corresponding to each chamber to modify time or temperature.
Time control icons
(icons 4, 5, 13 and 14)
Press the icons to increase and/or decrease the time to adjust the cooking time according to the allowed ranges (see "Table of preset menus" in this section), depending on the chamber you have selected.
Temperature control icons
(icons 4, 5, 13 and 14)
Press the icons to increase and/or decrease the temperature to adjust the cooking temperature according to the allowed ranges (see "Table of preset menus" in this section), depending on the chamber you have selected.
MATCH function icon
(icon 7)
The MATCH function allows the selection of time and temperature of both chambers at the same time. To do this, select either chamber and press the MATCH icon, both displays will show the same temperature and time.
SYNC function icon
(icon 8)
The SYNC function makes it possible to synchronise the end of the cooking process of both chambers. To do so, select the times and temperatures of both chambers and press the SYNC icon. It will remain lit. At the start of cooking, the chamber with the shorter time will show "HoLd" on the display and wait for the chamber with the longer time to use it up until both have the same time left to finish.
- In order to improve the result of certain foods, ingredients can be shaken halfway through the cooking process. To shake or turn the ingredients, remove the basket from the appliance by the handle and shake or turn the ingredients in the basket with clamps. Put the basket back in the air fryer.
![]()
- Be very careful when shaking the basket, as it contains hot food.
- Do not use metal utensils, as they could damage the inner coating of the basket.
![warning]() NOTE:
NOTE:
The steak and DIY programmes are special programmes that beep to turn over the food in the middle of the cooking cycle. When the cooking cycle has reached the halfway point, the appliance will beep several times and display "TRN" to indicate that the food should be turned over.
- When you hear the beeping, the set cooking time will have elapsed. Remove the basket from the appliance and place it on a heat-resistant surface. Make sure the food is cooked. If the food isn't cooked enough, slide the basket back into the fryer and add a few more minutes.
- To remove food, e.g. chips, remove the basket from the air fryer and place it on a heat-resistant surface. Use non-metallic tongs to remove the ingredients. Be careful not to burn yourself. Do not place the basket upside down to remove the food.
- Do not overfill the basket; respect the quantity indicated in the chart so that the cooking result is not affected.
- Do not touch the basket during or immediately after operation to avoid burns. Hold the basket only by the handle.
Table of preset menus
| Symbol | Type | Preheating | Temperature (°C) | Time (min) | Temperature range (min-max) | Time range Min-max | Notes |
 | Preheating | - | 200 | 4 | 160-200 | 3-10 | - |
 | Steak* | Yes, 5 min | 200 | 8 | 170-200 | 1-30 | Message to add food (ADD) Message to turn over (TRN) |
 | Chips | - | 195 | 18 | 160-200 | 1-60 | - |
 | Pizza* | Yes, 5 min | 180 | 10 | 120-200 | 1-60 | Message to add food (ADD) |
 | Chicken | - | 200 | 25 | 100-200 | 1-60 | - |
 | Vegetables | - | 175 | 16 | 140-190 | 1-60 | - |
 | Dessert | - | 160 | 20 | 100-190 | 1-60 | - |
 | Dehydrate | - | 55 | 6 hrs. | 40-100 | 0.5 h-24 h | - |
 | Ferment | - | 40 | 1 h | 40-90 | 0.5 h-24 h | - |
 | DIY* | Yes, 5 min | 200 | 20 | 40-200 | 1-60 | Message to add food (ADD) Message to turn over (TRN) |
NOTE:
As ingredients differ in origin, size, shape, and brand, we cannot guarantee the best setting for the ingredients that you are using. If necessary, change the times and/or temperature values to adjust the cooking to the type of ingredient.
*The marked special programmes have a 5 minutes preheating time not modifiable, all programmes except "Pizza" have a warning in the middle of the cooking cycle to turn the food over. This preheating time improves the final result of the meal.
Tips for cooking
- Smaller ingredients require a shorter preparation time than larger ones.
- A larger quantity of ingredients only requires a slightly longer preparation time, and a smaller quantity of ingredients only requires a slightly shorter preparation time.
- Shaking smaller food midway through the cooking process optimises the end result and prevents uneven cooking.
- Add some oil to the fresh potatoes for a crispier result. Cook the food in the air fryer just after adding oil to it.
- Do not cook extremely fatty ingredients such as sausages in the air fryer.
- Oven-ready food can also be cooked in the air fryer.
- The optimal amount for preparing crispy fries is 500 grams.
- Pre-made dough requires a shorter preparation time. Pre-made dough requires a shorter preparation time than home-made dough.
- Place a baking pan or baking dish in the air-fryer's basket if you want to bake a cake or quiche or if you want to fry fragile or stuffed foods.
- You can also use the air fryer to reheat food.
CLEANING AND MAINTENANCE
- Clean the appliance after every use.
- The basket and rack have a non-stick coating. Do not use metal utensils or abrasive products to clean the basket and/or rack, as this may damage their non-stick surface.
- After each use, do not leave hot food inside the appliance as condensation may affect the metal parts of the appliance.
- Unplug the appliance and allow it to cool down before cleaning.
![warning]() NOTE: remove the basket to let the appliance cool down more quickly.
NOTE: remove the basket to let the appliance cool down more quickly. - Clean the interior and the exterior of the appliance with a damp cloth.
- Clean the basket and rack thoroughly with hot water, washing-up liquid, and a non-abrasive sponge. The use of a degreasing liquid is recommended to remove any remains.
![information]() TIP: if the dirt is stuck to the rack or basket, fill the basket with hot water and a little dishwashing liquid and soak the basket and rack for about 10 minutes.
TIP: if the dirt is stuck to the rack or basket, fill the basket with hot water and a little dishwashing liquid and soak the basket and rack for about 10 minutes. - Clean the inside of the appliance with hot water and a non-abrasive sponge.
- Clean the heating element with a soft brush to remove any food residue.
- Make sure all its parts are clean and dry before storing or using the appliance again.
Storage
- Unplug the appliance and let it cool down.
- Make sure all its parts are clean and dry before storing the product again.
TROUBLESHOOTING
| Problem | Possible causes | Possible solution |
| E1 | Temperature sensor is not working. | Contact the official Cecotec Technical Support Service. |
| E2 | Short-circuit in the temperature sensor. | Contact the official Cecotec Technical Support Service. |
| E3 | Appliance overheating. | Contact the official Cecotec Technical Support Service. |
| The air fryer does not work | The appliance is not plugged in. | Plug the appliance to an earthed wall socket. |
| The double heating element is not operating | The food is not cooked. | The use of special programmes with preheating is recommended to improve the final result of the meat. |
| The ingredients fried with the air fryer are not done | The food is too big. | Put smaller batches of food in the basket. Food cooks faster if small. |
| The selected temperature is too low. | Increase the cooking temperature (see the "Operation" section). | |
| The preparation time is too short. | Increase the cooking time (see the "Operation" section). | |
| The ingredients have been cooked unevenly | Some types of food need to be shaken during the cooking process. | Ingredients that lie on top of or across each other (e.g. chips) need to be shaken halfway through the preparation time. See the "Operation" section. |
| Fried foods are not crispy when they are removed from the air fryer | You used a type of food that is meant to be prepared in a traditional deep fryer. | Cook oven food or brush food with a little oil for crispier results. |
| The basket does not slide into the appliance properly | There are too many ingredients in the basket. | Do not fill the basket beyond the max. indication. |
| The rack is incorrectly placed inside the basket. | Push the rack downwards into the basket until you hear a click sound. | |
| White smoke comes out of the appliance | You are preparing greasy ingredients. | When cooking fatty foods in the air fryer, a large amount of oil seeps into the basket. Oil produces white smoke. This does not affect the appliance or the result. |
| The basket still contains grease residue from previous use. | The white smoke is due to the fat heating up in the basket. Make sure you clean the appliance properly after each use. | |
| Chips are unevenly fried | You did not use the right potato type. | Use fresh potatoes and make sure they stay put during frying. Use potatoes of the types suggested. |
| You did not rinse the potato sticks properly before you fried them. | Rinse the potatoes well in water for 3 minutes to remove the starch and dry thoroughly afterwards. | |
| Chips are not crispy when they come out of the air fryer | The right kind of potato is not being used. | Make sure you dry the potato sticks properly before adding the oil. |
| Cut the potato sticks on smaller pieces for crispier results. | ||
| Add a little bit more of oil for a crispier result. |
TECHNICAL SPECIFICATIONS
Product name: Cecofry&Grill Duoheat 10000
Product reference: EU01_100842
Rated voltage: 220-240 V
Rated frequency: 50/60 Hz
Basket capacity: 10 l
Rated input power: 2800 W
Technical specifications may change without prior notice to improve product quality.
TECHNICAL SUPPORT AND WARRANTY
It is recommended that repairs are carried out by qualified personnel.
If at any moment you detect any problem with your product or have any doubt, do not hesitate to contact the official Cecotec Technical Support Service at +34 96 321 07 28.
Documents / ResourcesDownload manual
Here you can download full pdf version of manual, it may contain additional safety instructions, warranty information, FCC rules, etc.
Advertisement


Need help?
Do you have a question about the CECOFRY&GRILL DUOHEAT 10000 and is the answer not in the manual?
Questions and answers