Cecotec CECOFRY DUAL 9000 - Air Fryer Manual
- Instruction manual (128 pages) ,
- Instruction manual (14 pages)
Advertisement
PARTS AND COMPONENTS
Air fryer

Fig. 1
- Housing
- Control panel
- Basket handle
- Basket
- Grille
- Ventilation grille
- Power cord
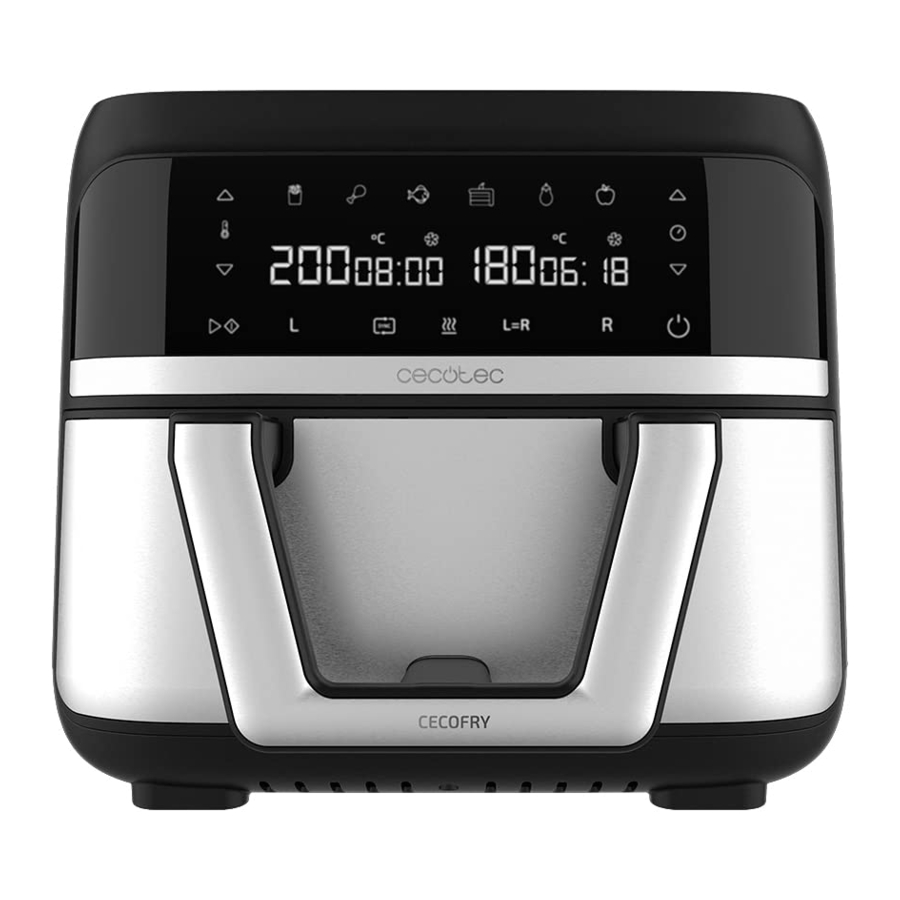
Control panel

Fig. 2
- Power icon
- Frying-time increase/decrease icons
- Default programmes
- Frying temperature increase/decrease icons
- Start/Pause icon
- Left-hand single basket compartment icon
- Cooking sync icon
- Preheating icon
- Dual setting icon
- Right-hand single basket compartment icon
- Left-hand single basket compartment display
- Right-hand single basket compartment display
NOTE:
The graphics in this manual are schematic representations and may not exactly match the product.
BEFORE USE
- This product includes a safety package to protect it during transport. Unpack the device and keep the original packaging and materials in a safe place. It will help prevent any damage if the product needs to be transported in the future. In case the original packaging is disposed of, make sure all packaging materials are recycled accordingly.
- Make sure all parts and components are included and in good conditions. If there is any piece missing or in bad conditions, contact the official Cecotec Technical Support Service immediately.
- Clean the interior and the exterior of the device with a damp cloth. Do not wet the heating elements.
- Clean the basket and grilles thoroughly with hot water, washing-up liquid, and a non-abrasive sponge. (Fig. 3)

- Place the racks properly in the single basket compartments and place the basket again in the device to be able to use it. (Fig. 4)

- Do not fill the device with oil or any other liquid.


OPERATION
With this device you can cook in both baskets at the same time with different temperatures and times, saving time when making your favourite recipes. This device includes a recipe book with several recipes which you will be able to cook easily.
- Place the device on a flat, even and waterproof surface. Never place it on a glass-ceramic hob.
- Plug the power cord to the electric circuit.
- Press the power icon (8) to turn the device on.
- Remove the basket and place the food on the corresponding racks. The device has a larger basket separated in the middle by a metal plate that prevents odours and flavours to transfer from one single basket compartment to the other. Each single basket compartment has a separate rack to place the food to be cooked on.
- Carefully align the metal divider plate and the mark on the fryer body to place it to its original position.
- Select the whole basket (16) or the single basket compartment (13/17) to be used and select a programme or set the cooking time and temperature manually.
- Press the Start/Pause icon (12) for the device to start cooking.
- When the device finishes cooking, it will emit an acoustic alert to warn you.
- Check if the ingredients are cooked as desired. Otherwise, put the basket back inside the device and set the timer for a few more minutes.
- Once the food is cooked to your liking, remove the basket and place it on a heat-resistant surface. Depending on the type of ingredients, steam may be released, so be careful when removing the basket.
- Empty the basket into a bowl or plate. Use tongs to remove the ingredients. Be careful not to burn yourself. Do not place the basket upside down to remove the food.
- You can use the device again just after having used it.
Note
- The device has a safety system preventing operation if the basket isn't correctly placed.
- It is recommended not to exceed 4 cm in height in the basket with food, as this could negatively affect the final result of the cooked food.
- The fan may continue working after cooking, even if the device is off. This is normal, as the fan is cooling down the device.
- Do not touch the basket nor the inferior of the air fryer during or after its use, as it reaches high temperatures. Hold the basket by the handle.
Power icon
- When the basket and rack are correctly placed in the device, the power icon (8) will light up. If you press this icon (8), the icons for the left-hand single basket compartment (13), dual setting, (16) and right-hand single basket compartment (17) will automatically light up.
- To switch off the device, press this icon (8) until only the icon (8) itself is on.
- To cancel cooking, press this icon (8) once and "Cool" will automatically be showed on the display, followed by the word "End" after a few seconds. To resume cooking with the same settings, press the icon (8) again: the previous icons will light up and cooking will resume.
Frying-time increase/decrease icons
- With both icons (9), placed above and below the watch icon, you can increase or decrease the frying time as desired.
- However, to set the time, you must first select one single basket compartment (13 or 17) or the whole basket (16).
Default programmes
This air fryer features 6 programmes with pre-set temperature and time (10), you can check them in this table:
| Icon | Programme | Temperature | Time | Amount | Shake |
 | Frozen chips | 200 ºC | 20 min | 400-500 grams approx. | Yes |
 | Chicken wings | 200 ºC | 25 min | Basket surface | Not necessary |
 | Fish | 180 ºC | 10 min | 250 grams approx. | Not necessary |
 | Dessert | 170 ºC | 12 min | - | Not necessary |
 | Vegetables | 160 ºC | 16 min | - | Depends on the type of vegetable |
 | Dehydrate | 60ºC | 8 hrs | Basket surface | Not necessary |
Note
This information is indicative, as ingredients differ in origin, size, shape and brand, we cannot guarantee the best setting for the ingredients that you are using.
Tips
- Smaller ingredients require shorter preparation time than the larger ones.
- A larger quantity of ingredients only requires a slightly longer preparation time, and a smaller quantity of ingredients only requires a slightly shorter preparation time.
- Stirring small ingredients during the frying process optimises the result and can help prevent unevenly cooked ingredients. To do so, remove the basket and shake it.
- Add some oil to raw chips for a crispier result.
- The optimal amount for preparing crispy fries is 400 grams.
- Do not use the device to fry greasy food (such as sausages).
- Food that can be cooked in an oven can also be cooked with the device.
- Pre-made dough requires a shorter preparation time than home-made dough.
- You can also use the device to reheat ingredients. To do so, set the temperature at 150ºC for 5-10 minutes.
Frying temperature increase/decrease icons
- With both icons (11), placed above and below the thermometer, you can increase or decrease the frying temperature as desired.
- However, to set the temperature, you must first select one single basket compartment (13 or 17) or the whole basket (16).
Start/Pause
This icon (12) will allow you to start or pause the selected cooking.
- If you press this icon (12) after selecting the programme (10) or temperature (11) and time (9), the device will start cooking.
- If you press this icon (12) when there is a cooking in process, you will pause it. To restart it, press it again (12).
Left-hand single basket compartment
This icon (13) is used to set the left-hand single basket compartment only. Press the icon (13), select the desired time (9) and temperature (11) or programme (10). Next, press the Start/ Pause icon (12) to start cooking.
Synchronisation
- This function is useful when different cooking times have been set for the single basket compartments and you want frying to end at the same time. With this function, if you have selected 20 min for the left-hand single basket compartment and 10 min for the righthand one, frying in the right-hand single basket compartment will start 10 minutes later to allow frying in both compartments to finish simultaneously.
- To programme this function, first select the left (13) or right-and single basket compartment (17), then select the desired programme (10) or enter the desired time (9) and temperature (11). Press the 'Sync' icon (14) for it to stop flashing. The other single basket compartment will start flashing: select the desired programme (10) or enter the desired time (9) and temperature (11). Press the start/pause icon (12) to start cooking.
- When this function is activated, the single basket compartment with the shorter programmed time will enter Standby mode and "Hold" will appear on the display until there is no time difference. Then, frying will start and both compartments will be left with the same remaining cooking time.
Note
If you remove the basket, "Out" will be displayed for both single basket compartments. If it takes more than 90 seconds but less than 5 minutes to place the basket, the sync function will be deactivated. When the basket is reinserted, a countdown for both single basket compartments will start.
Preheating
- With this function, preheating will start in the single basket compartment of choice, i.e., the left-hand compartment, the right-hand one or both.
- To select this function, first select the compartment or basket (13, 16 or 17) to be used, then select the preheating function (15) and set the desired preheating temperature (11). The preheating time is 5 minutes by default, but if you wish to cancel it at any time, press the power icon (8).
- Once preheating has finished, press the icons 13 or 17, depending on the preheated single basket compartment, and press the programme (10) or set the desired time (9) and temperature (11) manually and next, press the Start/Pause icon (12).
Dual setting (L=R)
- This function is used to apply the same setting to both single basket compartments, that is, if you press this icon and then the "chips" programme, this setting will be applied to both compartments.
- To use it, first select one of the compartments (13 or 17) and set the desired time (9) and temperature (11) or programme (10) and then press this function (16). Next, press the Start/Pause icon (12) to start cooking.
Right-hand single basket compartment
This icon is used to set the right-hand single basket compartment only. Press the icon (17), select the desired time (9) and temperature (11) or programme (10). Then, press the Start/ Pause icon (12) to start cooking.
CLEANING AND MAINTENANCE
Cleaning
- Always clean the device after each use.
- Disconnect the device from the power supply and allow it to cool down before cleaning.
- Do not use metallic tools or abrasive products to clean the basket and racks.
- Use a soft, damp cloth to clean the product exterior surface.
- Do not immerse the device in water or other liquids.
- Do not use abrasive cleaners or scouring pads to clean the product.
- Clean the basket thoroughly with hot water, detergent, and a non-abrasive sponge. Rinse them well and dry it before introducing them again in the device.
- Do not insert the basket into the main body if wet or damp.
- The use of a degreasing liquid is recommended to remove any remains.
- If there is dirt stuck in the basket and rack, we recommend filling the basket with hot water and detergent and then clean it with a non-abrasive sponge.
- Clean the heating element with a soft cleaning brush to remove any food residue. Be careful not to damage the heating element.
Tip
Remove the basket to let the appliance cool down more quickly.

The basket and racks are not dishwasher safe.
Storage
- Unplug the device and allow it to cool down.
- Make sure all parts are clean and dry when you store the device.
- Wring the power cord.
TROUBLESHOOTING
| Problem | Possible cause | Possible solution |
| The device does not work. | The product is not plugged in. | Plug the appliance in. |
| You have not set the timer. | Press the power icon (8) and start a programme. | |
| The ingredients inside the device are not fried. | There are too many ingredients inside the basket. | Place smaller pieces inside the basket so they are cooked more evenly. |
| The temperature used is too low. | Increase temperature. | |
| The preparation time is not enough. | Increase the time. | |
| The ingredients are cooked unevenly in the air fryer. | Some types of food need to be sautéed during the cooking process. | Ingredients that lie on top of or across each other (e.g. chips or nuggets) need to be stirred during the preparation time. |
| Fried food is not crispy when they come out the device. | You used a type of food that is meant to be prepared in a traditional deep fryer. | Oil the food a little bit to get a crispier result. |
| The temperature used is too low | Increase temperature. | |
| The basket cannot fit in the gap in the device. | There are too many ingredients inside the basket. | Do not fill the device with food over the 'Max' mark. |
| The basket is not inserted correctly. | Place the basket until it clicks into place. | |
| White smoke comes out of the device. | You are preparing greasy ingredients. | When greasy food is cooked, a large amount of oil will leak into the container. Cooking oil causes white smoke to come out of the device and it gets hotter than normal. This does not affect the device or the result. |
| The basket is still greasy from previous uses. | White smoke is caused by heating up oil in the basket. Make sure you clean the basket properly after each use. | |
| Chips are cooked unevenly in the device. | The right kind of potato is not being used. | Use fresh potatoes and make sure they stay consistent while being cooked. |
| If you use frozen chips, use chips that are special for oven cooking. | ||
| You did not rinse the chips properly before you cooked them. | Rinse the potato sticks properly to remove the starch. | |
| Fried food is not crispy when they come out the device. | Make sure you dry the potato sticks properly before adding the oil. | Make sure you dry the potato sticks properly before adding the oil. |
| Cut the potato sticks on smaller pieces for crispier results. | ||
| Add a little bit more of oil for a crispier result. |
TECHNICAL SPECIFICATIONS
Product reference: 04996
Product: Cecofry Dual 9000 air fryer
Power: 2850 W
Voltage: 220-240 V~
Frequency: 50/60 Hz
Maximum operating capacity: 4.5 l per single basket compartment
Temperature setting: 80 ºC - 200 ºC
Timer: 0-60 min.
Technical specifications may change without prior notification to improve product quality.

Documents / ResourcesDownload manual
Here you can download full pdf version of manual, it may contain additional safety instructions, warranty information, FCC rules, etc.
Advertisement


Need help?
Do you have a question about the CECOFRY DUAL 9000 and is the answer not in the manual?
Questions and answers