Cecotec CECOFRY RAIN PACK - Air Fryer Manual
- Instruction manual (142 pages) ,
- Instruction manual (51 pages)
Advertisement
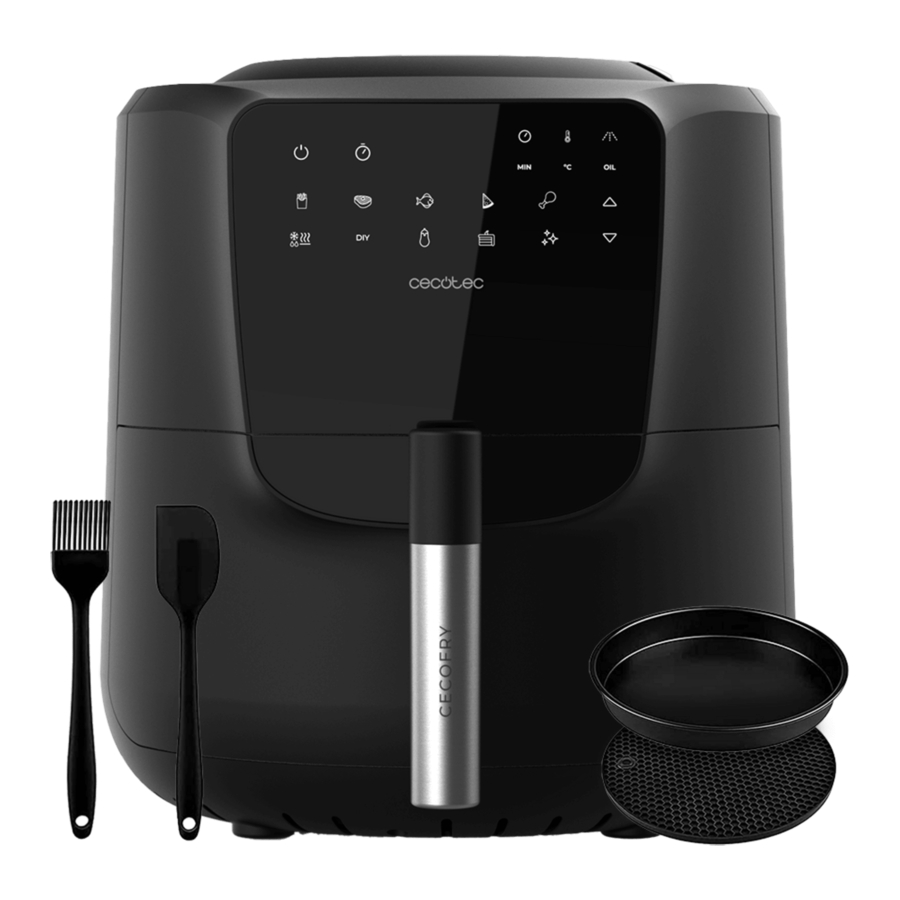
PARTS AND COMPONENTS

Fig. 1
- Control panel
- Main body
- Display
- Basket
- Handle
- Oil tank
- Air outlet
- Power cable
- Silicone brush
- Silicone spatula
- Silicone mat
- Silicone mould
Control panel.

Fig. 2
- Menus
- Temperature touch icon
- Timer touch icon
- Timer knob
- Oil level touch icon
- Power/Start/Pause button
- Increase touch icon
- Display
- Decrease touch icon
Note:
The graphics in this manual are schematic representations and may not exactly match the appliance.
BEFORE USE
- This appliance is packaged in a way as to protect it during transport. Take the device out of its box and remove all packaging materials. You can keep the original box and other packaging elements in a safe place. This will help you prevent damage to the device when transporting it in the future. In case the original packaging is disposed of, make sure all packaging materials are recycled accordingly.
- Make sure all parts and components are included and in good conditions. If there is any piece missing or in bad conditions, contact the official Cecotec Technical Support Service immediately.
- Clean the basket, basket grille, heating element protective grille and oil tank thoroughly with hot water, detergent and a non-abrasive sponge.
- Clean the inside and outside of the appliance with a soft damp cloth. Do not fill the appliance with oil or other liquids.
- Place the metal grille into the appliance until it clicks into place as shown in figure 8.

Fig. 8

Protective metal grille
Installation.
Fig. 8
The protective metal grille is located at the top of the inside of the air fryer. This grille protects the heating element. Due to the use of oil spray this part is removable for cleaning.
The protective metal grille features
- A flexible flange that can be pressed to facilitate the exit or entry of the grille.
- A fixed flange to support the grille before fitting it against the flexible flange.
- Two lateral supports to guide the grille.
To attach or remove the grille
To attach the grille to its bracket you first need to insert the grille into the fixed flange and be guided by the two side brackets, once this step is done, you have to press the grille against the flexible flange to fix the grille completely.
Cleaning
- The grille should be cleaned after each use to prevent oil build-up on the grille.
- To clean the grille, use hot water, a non-abrasive detergent and a non-abrasive sponge.
- Make sure that the fryer is completely cool before cleaning.
OPERATION
Preparation
- Always place the appliance on an horizontal, flat and stable surface. Do not place the appliance on hot surfaces such as induction hobs.
- Do not place the appliance on a dry, stable, and heat-resistant surface.
- Place the basket rack in the basket itself as shown in figure 3.
![]()
Fig. 3 - Make sure that the oil tank is fitted to the appliance and that it is full. If the oil tank is not inserted correctly or is empty, the appliance will emit an acoustic alert and the message "Add Oil" will appear on the control panel display every time the device is to spray oil. The appliance will not spray oil on the food if there is not enough oil in the tank or if the tank is empty and will continue the process until the end of the programme. To add oil, remove the oil tank as shown in the figure. 7, open the tank cover and fill the tank to the MAX mark.

Fig. 7 - do not use the basket or grille with oil or any other liquid.
- Do not place any objects on top of the appliance, as this will interrupt the airflow and affect the cooking result.
- You will hear a loud noise caused by the internal pump during the first use: this is normal and does not indicate a malfunction.


Air fryer
- Connect the power cable to an earthed plug socket.
- Remove the basket from the air fryer. Fig. 6

Fig. 6 - Make sure that the protective grille is securely in place Fig. 8
- Put the basket back in the air fryer. Carefully align the guides of the basket and the fryer body and insert it. Fig. 4
Note: you should use the fryer with the grille placed inside the basket to promote air flow and obtain better results.
![]()
Fig. 4 - Determine the time, temperature and oil level for the preparation according to each food, or select a default programme (see the "Settings" section of the "Operation" section).
- Before starting each programme, the device will warm up to improve the preparation results. The device will show a rectangle loading. This warm-up can take a few minutes.
- Place the food in the basket (Fig. 5).

Fig. 5 - Some ingredients must be stirred halfway through the cooking process. To stir, pull the basket out of the appliance using the handle and remove the food using a wooden or plastic kitchen utensil. Then slide the basket back into the air fryer.
- When you hear the timer signal, the set preparation time has elapsed. Remove the basket from the appliance and place it on a heat-resistant surface. Be careful when removing the basket as it can give off heat and steam.
Note: You can also stop the appliance manually. to do so, touch the power/start/pause touch icon. if you want to cancel the programme, press and hold the power button. - Make sure the food is cooked. If the food isn't cooked enough, slide the basket drawer back into the air fryer and add a few more minutes to the timer. If this happens when the programme has finished, the programme will resume preheating, but this will take no more than a few seconds after the warning, simply remove and reinsert the basket to start the cooking process.


- Do not touch the basket during operation or immediately after use to avoid burns. Hold the basket only by the handle.
- Never use metal utensils as these can damage the surface.
- do not turn the basket upside down so that the excess oil accumulated in the bottom of the basket does not spill over the ingredients. The ingredients, basket, and the fryer itself will be hot. Depending on the type of ingredients cooked, steam may escape from the basket drawer.
Operation
- The power/start/pause touch icon will remain on after the fryer has been started.
- If you press the power/start/pause touch icon, you will hear an acoustic signal and the display will show "---". The menu icons will light up.
- Select the desired menu and make sure that the oil tank is full and properly installed.
- If you wish to delay the start of cooking, select a menu and modify the desired values by pressing the timer icon and selecting the time you wish to delay cooking, then press the power/start/pause icon to start the process. The time can be set from 0.5 to 24 hours using the increase and decrease icons.
- You can adjust the cooking time from 1 to 60 minutes in one-minute intervals by clicking on the time icon and changing the time using the increase and decrease icons. The time can be adjusted during cooking.
- You can adjust the temperature from 70 to 200°C in 5°C intervals by clicking on the temperature icon and changing the temperature using the increase and decrease icons. Temperature can be adjusted during cooking.
- You can adjust the oil spray level from 0 to 7 in increments of 1 by clicking on the oil level icon and changing the level using the increase and decrease icons. The oil level can be adjusted during cooking.
- Press the power/start/pause touch icon to start the device. The heating element switches on and off during a complete cycle several times, this is completely normal in order to keep the temperature of the basket constant.
- The control panel display will show a rectangle loading to indicate that the fryer is preheating. This warm-up may take a few minutes if the device is completely cool. When the fryer has finished preheating, the display will show "Add Food" and a warning signal will sound.
- After hearing the warning signal and seeing the corresponding message on the display, remove the basket and place the ingredients in the basket (the display will show "PAUSE").
- After adding the ingredients, place the basket back into the fryer and the fryer will automatically start the cooking process.
- When cooking is complete, the display will show "End" for 15 seconds and three beeps will sound.
- Press and hold the power/start/pause touch icon to access the menu selection interface.
Once inside, press and hold the power touch icon again to turn the fryer off. - The fryer will enter "Stand-By" mode after 5 minutes without selecting any option.
Menus
The following table shows the temperatures and times of the menus:
| Min-max Amount (g) | Temp (ºC) | Time (min.) | Oil level | Shake | |
| Chips | 200 - 600 | 200 | 20 | 6 | YES |
| Steak | Surface* | 180 | 10 | 4 | - |
| Fish | Surface* | 180 | 8 | 6 | - |
| Pizza | Surface* | 180 | 8 | 0 | NO |
| Chicken wings / drumsticks | Surface* | 200 | 25 | 4 | NO |
| Muffins / CupCake | Surface* | 170 | 10 | 0 | NO |
| DIY (Manual) | Surface* | 200 | 20 | 4 | - |
| Defrost / Keep warm** | Surface* | 70/80 | 25/10 | 0 | - |
| Cleaning indicator light | Surface* | 70 | 20 | 0 | - |
| Vegetables | 100-400 | 170 | 10 | 4 | YES |
Note:
*For foods with the recommended amount of surface area, do not fill more than the surface of the basket for best results, if you fill more than the recommended amount, the food underneath will not cook properly.
** Within the Defrost / Keep warm programme you can select one option or the other by clicking again on the default programme icon.
As ingredients differ in origin, size, shape, and brand, we cannot guarantee the best setting for the ingredients that you are using. If necessary, change the times and/or temperature values to adjust the cooking to the type of ingredient.
Briefly removing the basket during the frying process does not affect the cooking.
Tips
- Smaller ingredients require a shorter preparation time than larger ones.
- A larger quantity of ingredients only requires a slightly longer preparation time, and a smaller quantity of ingredients only requires a slightly shorter preparation time.
- Shaking smaller food midway through the cooking process optimises the end result and prevents uneven cooking.
- Do not cook excessively fatty foods in the air fryer (e.g. sausages).
- Oven-ready snacks can also be cooked in the air fryer.
- The optimal amount for preparing crispy fries is 500 grams.
- Pre-made dough requires a shorter preparation time. Pre-made dough requires a shorter preparation time than home-made dough.
- Place a baking pan or baking dish in the air-fryer's basket if you want to bake a cake or quiche or if you want to fry fragile or stuffed foods.
- You can also use the device to reheat food. To reheat food, set the temperature to 150°C for 10 minutes.
Oil level
This device has a new technology capable of spraying oil into the basket during operation. For this purpose, the device switches off the heating element and the fan and sprays the oil after 5 seconds, then resumes normal operation after a few seconds. The tank has a total capacity of 30 mL of oil.
The operation of the programme is set by ranges, each spraying level has two ranges:
- Range 1: starts from minute 20 to minute 12, counting down. During this range, spraying is performed every 4 minutes or every 2 minutes, depending on the selected oil level.
- Range 2: starts from minute 12 until the end of the process. During this range, spraying is performed every 4 minutes or every minute, depending on the selected oil level.
- In each range the duration of spraying is different.
The following table shows the spraying ranges, the number of total sprays and the amount of oil used in each programme.
| Oil level | Time (min) | Range 1 (20-12 min) | Range 2 (11-0 min) | Number of sprays | Total amount of oil used (ml) |
| 0 | 20 | - | - | - | - |
| 1 | 20 | Spraying every 4 min | Spraying every 2 min | 8 | 3 |
| 2 | 20 | Spraying every 4 min | Spraying every 2 min | 8 | 6 |
| 3 | 20 | Spraying every 4 min | Spraying every 2 min | 8 | 9 |
| 4 | 20 | Spraying every 2 min | Spraying every minute | 15 | 12 |
| 5 | 20 | Spraying every 2 min | Spraying every minute | 15 | 18 |
| 6 | 20 | Spraying every 2 min | Spraying every minute | 15 | 23 |
| 7 | 20 | Spraying every 2 min | Spraying every minute | 15 | 27 |
Note:
- The data shown in the table are measured for a 20-minute cycle.
- The data obtained have been calculated with Virgin Olive Oil and at an ambient temperature of 25ºC. If you get different results it may be due to the use of different types of oils and their different densities.
- Do not use oils and fats that are solid at room temperature. Note that very low temperatures can solidify the oil. Clean the tank and internal oil tubes after each use.
- If you change the cooking time to more than 20 minutes, the device will spray every 2 minutes for all levels with the amount of oil per spray corresponding to each level.
- If you decrease the program time to 15 minutes, the air fryer will perform the first full range and 3 more minutes of the next full range
Programme DIY: MANUAL.
The DIY or manual program is a special program that allows you to spray oil whenever you want. To do this, select this program and oil level 0. Oil levels can be used with this program and you can spray manually.
CLEANING AND MAINTENANCE
Cleaning
- Clean the appliance after every use.
- The protective grille, the basket and the basket grille have a non-stick coating. Do not use metal utensils or abrasive products to clean them, as this may damage their non-stick surface.
- Unplug the appliance and allow it to cool down before cleaning.
Tip:
Remove the basket to let the appliance cool down more quickly. - Clean the inside and outside of the appliance with a damp cloth.
Tips:
- We recommend the use of liquid degreaser for food use to remove any remaining dirt.
- If the basket and grille are very dirty, soak them in hot water and cleaning solution for 10 minutes.
- Clean the inside of the appliance with hot water and a non-abrasive sponge, taking care not to damage the resistance.
- Clean the spray nozzle with hot water and a non-abrasive sponge.
- Remove the protection grille and clean the grease with hot water, detergent and a non-abrasive sponge.
- To clean the tank and internal oil tubes, you can enter the DIY mode and at oil level 0 you can press the DIY button until the tank and internal tubes are empty, the device will indicate that there is no more oil left by means of the "Add Oil" notice.
Storage
- The power cable can be stored inside the appliance.
- Make sure all components are clean and dry.
- Be sure to clean the sprayer and the removable protective grille.
TROUBLESHOOTING
| Problem | Possible causes | Possible solutions |
E1 | Temperature sensor not working | Contact the official Cecotec Technical Support Service. |
E2 | Temperature sensor not working | Contact the official Cecotec Technical Support Service. |
The air fryer does not work | The appliance is not plugged in. | Connect the power cable to an earthed plug socket. |
Cooked foods are raw | The food is too big. | Put smaller batches of food in the basket. Smaller batches are cooked more evenly. |
| The temperature used is too low. | Select a higher temperature (see the "Operation" section). | |
| The preparation time is too short. | Select a longer time (see the "Operation" section). | |
The ingredients are cooked unevenly in the air fryer | Some types of food need to be shaken during the cooking process. | Ingredients that lie on top of or across each other (e.g. chips) need to be shaken halfway through the preparation time. See the 'Operation' section. |
The ingredients are not crunchy | Increase temperature | Increase the cooking temperature to generate greater dehydration in the superficial layer of the same and obtain more crunch. |
| Increase the oil level | Turn up the oil level for crispier results. | |
The basket does not slide into the appliance properly | There are too many ingredients in the basket. | Do not fill the basket beyond the max. indication. |
| The basket is not placed correctly. | Push the basket following the guides down into the air fryer until you hear a click. | |
| White smoke comes out of the appliance | You are preparing greasy ingredients. | When you use fatty ingredients, a large amount of oil seeps into the basket. The oil produces white smoke and the basket may become hotter than normal. This does not affect the appliance or the result. |
| The basket contains grease from previous uses | The white smoke is due to the fat heating up in the basket. Make sure you clean the device properly after each use. | |
| Fresh chips are fried unevenly | You did not use the right potato type. | Use fresh potatoes of the baking and frying varieties and make sure they hold firm during frying. |
| You did not rinse the potato sticks properly before you fried them. | Rinse the potato sticks properly to remove the starch. | |
| Fresh chips are not crispy | The right kind of potato is not being used. | Be sure to dry the potatoes before starting the process. |
| Cut the potato sticks on smaller pieces for crispier results. | ||
| Turn up the oil level for crispier results. |
TECHNICAL SPECIFICATIONS
Product reference: 03305
Product: Cecofry Rain Pack Air fryer
Power: 1550 W
Voltage: 220 - 240 V
Frequency: 50/60 Hz
Oil tank capacity 30 ml
The power consumption in "standby" mode is 0.4 W using the guidelines of the EN 50564:2011 standard and the European regulations 1275/2008/EC and 801/2013/EC. To do this, the device is connected to the electrical network without performing any function. The switch/ controller of the appliance was set to the Standby position.
Technical specifications may change without prior notice to improve product quality. Made in China | Designed in Spain
TECHNICAL SUPPORT
If at any moment you detect any problem with your product or have any doubt, do not hesitate to contact the official Cecotec Technical Support Service at +34 963 210 728.

Documents / ResourcesDownload manual
Here you can download full pdf version of manual, it may contain additional safety instructions, warranty information, FCC rules, etc.
Advertisement


Need help?
Do you have a question about the CECOFRY RAIN PACK and is the answer not in the manual?
Questions and answers