Cecotec CECOFRY ADVANCE INOX - 3.5-L Air Fryer with Stainless Steel Finish Manual
- Instruction manual (104 pages) ,
- Instruction manual (39 pages)
Advertisement
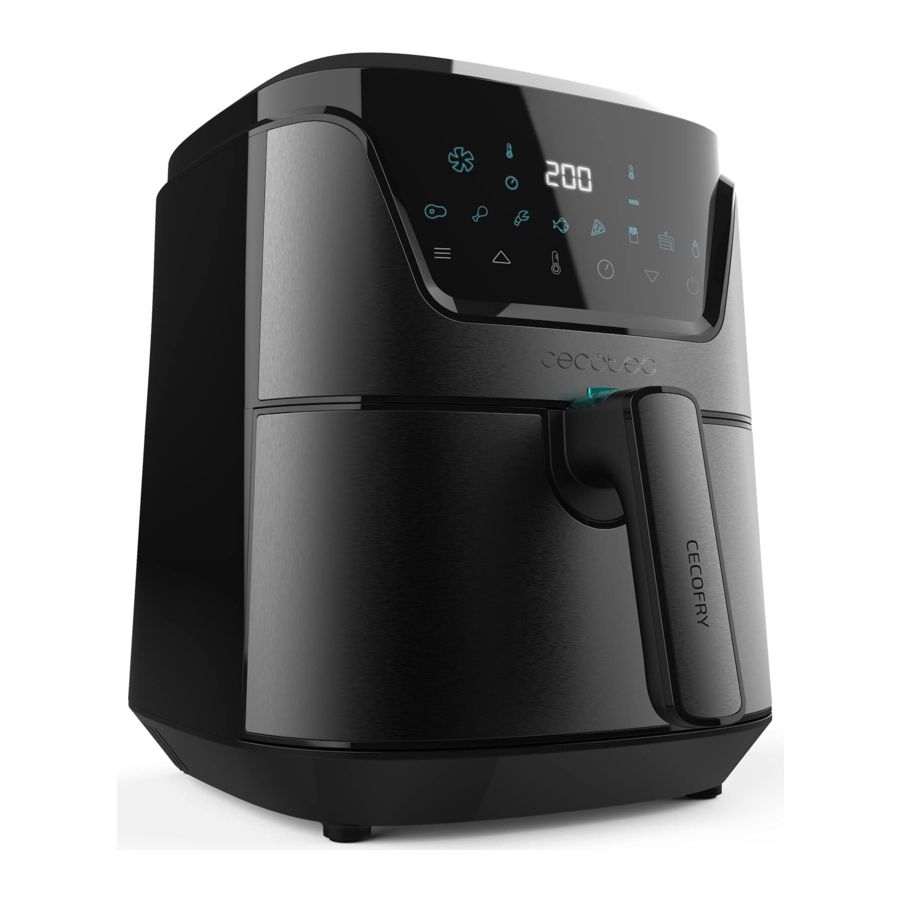
PARTS AND COMPONENTS

Fig. 1.
- Control panel
- Basket
- Basket release button
- Basket handle
- Housing
- Tray
- Air outlet
- Power cord
BEFORE USE
- Take the product out of the box.
- Check for any visible damage. If any is observed, contact as soon as possible the Technical Support Service of Cecotec for advice or reparation.
- Clean the basket and container thoroughly with hot water, washing-up liquid and a non-abrasive sponge.
- Clean the inside and the outside of the device with a damp cloth.
- Place the fryer on an even, heat-resistant surface.
- Place the basket in the container.

Fig. 2.


- Do not wet the heating element.
- Do not fill the device with oil or any other liquid.
- Do not place the device on any surface that it is not heat-resistant.
OPERATION
- Plug the device into a power supply.
- Take the container and the basket out from the device carefully.

Fig. 3. - Put the ingredients in the basket.
![]()
Fig. 4. - Slide the container back into the device by aligning it with the guides in the body of the device.
![]()
Fig. 5. - Set the required preparation time for the ingredient.
Note
Some ingredients require shaking halfway through the preparation time. To shake the ingredients, pull the container out of the appliance by the handle and shake it. Then slide the container back into the air fryer. Do not press the basket release button during shaking.
Tips
To reduce the weight, remove the basket from the container and shake the basket only. To do so, pull the container out of the appliance, place it on a heat-resistant surface and press the button of the handle. Lift the basket out of the container. - When the timer buzzer is heard, pull the container out of the appliance. If you want to turn the device off before the set time has elapsed, turn the set time to 1 minute or hold down the power button for 3 seconds. Off will appear on the control panel.
- Check if ingredients are ready.
- If the ingredients are not ready yet, simply slide the container back into the appliance and set the timer to a few extra minutes.
- To remove ingredients, pull the container out of the device, place it on a heatproof surface.
Press the basket release button and lift the basket out of the container. - Empty the basket into a bowl or onto a plate.
- When a batch of ingredients is ready, the device is instantly ready for preparing another batch.


- Never use the container without the basket in it.
- Do not touch the container during and immediately after use, as it gets very hot. Only hold the container by the handle.
- Do not turn the basket upside down with the container still attached to it, as any excess oil that has collected on the bottom of the container will leak onto the ingredients.
- The container and the ingredients are hot. Depending on the type of the ingredients in the air fryer, steam may escape from the pot.
Control panel

Fig. 6.
Power (1)
Once the basket and the grill are properly placed in the main unit housing, the power button will light up. Hold down the power button for 3 seconds to set the preset frying temperature and time, 180 ºC and 15 minutes. Press the power button again to start the frying process.
Press the power button again for 3 seconds to turn the device off.
Note
While the device is operating, you can still touch the power button for pausing and resuming the frying process.
Mode (2)
Press the Mode button to choose between the 8 most popular food choices. All the modes have preset cooking temperature and time. Press the mode button to start one of the 8 modes.
Then, press the power button to activate it.
Time and temperature increase and decrease (3) (4)
- Use these buttons to increase or decrease the cooking time and temperature (from 80 ºC to 200 ºC).
- To adjust temperature, first press the temperature symbol and then + or -.
- To adjust time, first press the time symbol (6) and then + or -.
- Hold down the symbol to increase or decrease rapidly.
- Once settings are selected, the display will light up showing the settings.
Preset modes
| Mode | Steak | Chicken wings | Shrimp | Fish | Pizza | Frozen chips | Baking | Vegetables |
| Temperature (ºF) | 400 | 400 | 360 | 360 | 380 | 400 | 320 | 320 |
| Temperature (ºC) | 200 | 200 | 180 | 180 | 190 | 200 | 160 | 160 |
| Default time (min) | 8 | 25 | 8 | 18 | 5 | 22 | 27 | 27 |
| Min. And Max. amount (g) | 100-600 | 100-500 | 100-500 | 100-500 | 100-500 | 100-500 | 100-500 | 100-500 |
Note
Keep in mind that these are just indications. As ingredients differ in origin, size, shape and brand, we cannot guarantee the best setting for the ingredients that you are using.
Tips
- Smaller ingredients require shorter preparation time than the larger ones.
- A larger amount of ingredients only requires a slightly longer preparation time, and a smaller amount of ingredients only requires a slightly shorter preparation time.
- Shaking small ingredients during the frying process optimises the result and can help preventing unevenly fried ingredients.
- Add some oil to the fresh potatoes for a crispier result.
- Do not use the device to fry greasy food (such as sausages).
- Food that can be cooked in an oven can also be cooked with the device.
- The optimal amount for preparing crispy fries is 500 grams.
- Pre-made dough requires a shorter preparation time than home-made dough.
- You can also use the device to re-heat ingredients. To do so, set the temperature to 150 ºC for 10 minutes.
CLEANING AND MAINTENANCE
Cleaning
- Always clean the appliance after each use.
- Disconnect the appliance from the power supply and allow it to cool down before cleaning.
- Do not use metallic tools or abrasive products to clean the basket and grill. Use a soft, damp cloth to clean the device's surface.
- Do not immerse the appliance in water or other liquid.
- Do not use abrasive cleaners or scouring pads to clean the product.
- Remove the basket to let the device to cool down more quickly.
- Clean the device thoroughly with hot water, washing-up liquid and a non-abrasive sponge.
- We recommend the use of a degreasing liquid to remove any remaining dirt.
- If dirt is stuck inside the basket or the bottom of the container, we recommend filling the basket with hot water mixed with washing-up liquid, and then letting the basket and container dry for approximately 10 minutes.
- Clean the inside of the device with hot water and a non-abrasive sponge.
- Clean the heating element with a soft cleaning brush to remove any food residue. Be careful not to damage the heating element.
Storage
- Unplug the device and let it cool down.
- Make sure all its parts are clean and dry when you store it.
TROUBLESHOOTING
| Problem | Possible cause | Solution |
The device does not work | The product is not plugged in. | Plug the device in. |
| You have not set the timer. | Set the timer using the timer knob to switch on the appliance. | |
The ingredients inside the device are not fried | There are too many ingredients inside the basket. | Put smaller pieces inside the basket so they are fried more evenly. |
| The temperature used is too low. | Use the temperature knob to set a higher temperature setting. | |
| The preparation time is not enough. | Use the timer knob to set a longer preparation time. | |
The ingredients are fried unevenly in the air fryer | Some types of food need to be sautéed during the cooking process. | Ingredients that lie on top of or across each other (e.g. fries) need to be shaken during the preparation time. |
| Fried foodstuff is not crispy when they come out the device. | You used a type of foodstuff that is meant to be prepared in a traditional deep fryer. | Oil the foodstuff a little bit to get a crispier result. |
| The container cannot be placed inside the device properly. | There are too many ingredients inside the basket. | Do not fill the basket beyond the Max mark. |
| The basket is not placed in the container correctly. | Push the basket down into the container until you hear a "click" sound. | |
White smoke comes out of the appliance | You are preparing greasy ingredients. | When greasy foodstuff are fried, a large amount of oil will leak into the container. Frying oil produces white smoke, and the container may heat up more than usual. This does not affect the appliance or the result. |
| The container is still greasy from previous uses. | White smoke is caused by heating up oil in the container. Make sure you clean the container properly after each use. | |
French fries are fried unevenly in the device | The right kind of potato is not being used. | Use fresh potatoes and make sure they stay consistent while being fried. |
| You did not rinse the potato sticks properly before you fried them. | Rinse the potato sticks properly to remove the starch. | |
French fries are fried unevenly in the device | The right kind of potato is not being used. | Make sure you dry the potato sticks properly before adding the oil. |
| Cut the potato sticks on smaller pieces for crispier results. | ||
| Add a little bit more of oil for a crispier result. |
TECHNICAL SPECIFICATIONS
04999 Cecofry Advance Inox
05000 Cecofry Advance InoxDark
220-240 V~, 50-60 Hz
1500 W
Capacity: 3.5L
Made in China | Designed in Spain
TECHNICAL SUPPORT
If at any moment you detect any problem with your product or have any doubt, do not hesitate to contact Cecotec Technical Support Service at +34 963 210 728.

Documents / ResourcesDownload manual
Here you can download full pdf version of manual, it may contain additional safety instructions, warranty information, FCC rules, etc.
Download Cecotec CECOFRY ADVANCE INOX - 3.5-L Air Fryer with Stainless Steel Finish Manual
Advertisement
Thank you! Your question has been received!


Need Assistance?
Do you have a question about the CECOFRY ADVANCE INOX that isn't answered in the manual? Leave your question here.