
Related Manuals for Akuvox IT82


Summary of Contents for Akuvox IT82
- Page 1 IT82 Indoor Monitor User Manual...
-
Page 2: Table Of Contents
Content 1 Production Overview ..............4 1.1 Production Description ..................4 1.2 Technical Specification ..................4 1.3 Button Instruction ..................... 5 1.4 Dimension ......................5 1.5 Equipment Appearance And Interface Description .......... 7 1.6 Installation......................8 1.7 Installation Considerations ................9 1.8 Equipment Packaging .................. - Page 3 3.5 Contacts ......................26 3.5.1 New contacts ..................26 3.5.2 Modify the contact ................26 3.5.3 Delete the contact ................. 27 3.6 Call log ......................27 3.6.1 Modify the call log ................28 3.6.2 Delete the log ..................29 3.7 Capture ......................29 3.8 DND .........................
-
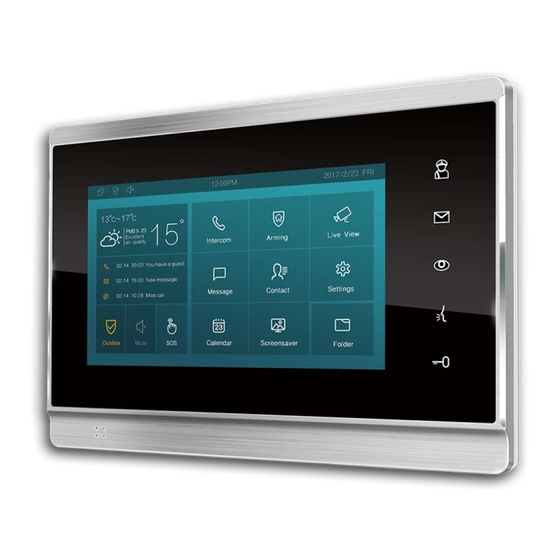
Page 4: Production Overview
It is more convenient and safe for residents to check the visitor identity through its video preview function. IT82 is often applicable in villas , apartments, building and so on 1.2 Technical Specification... -
Page 5: Button Instruction
Memory RAM:2GB, Flash:4GB Management LCD Menu Configuration, WebUI Dimension 232x160x21mm Album Storage External SD device 1.3 Button Instruction Interface Description Manage center button. Click to make a call with manage center. Message button. Click to direct access to message interface. Monitor button. -
Page 7: Equipment Appearance And Interface Description
1.5 Equipment Appearance And Interface Description Interface Description 8 PIN connector For power supply and 485 connector 10PINconnect For 8 security connector Ethernet 1 Network interface can be connected to a hub, switch or other network access devices. Ethernet 2 Share the network access from ethernet 1 port, and for PC and other equipment connection. -
Page 8: Installation
1.6 Installation Use a 5mm hand Use the pencil to drill to make the 4 mark 4 fixation holes fixation holes on through wall bracket the wall on the wall Once the fixation Use 4 ST4X20 screws holes are made, wall insert the four bracket in the wall... -
Page 9: Installation Considerations
Place the device away from traffic areas to prevent collisions. Please use the equipment with the matching power adapter or POE. 1.8 Equipment Packaging Name Quantity IT82 Wall bracket Quick Start Guide 10 Pin cable 8 Pin cable... -
Page 10: Setting
2 Setting 2.1 Main interface instruction It82 supports two pages of main interface. Click the corresponding area to operate. -
Page 11: Network
2.2 Network 2.2.1 DHCP IT82 use DHCP mode to get IP address by default. Please go to Setting-Advanced(password:123456)-Network Choose DHCP,press CONFIRM, the phone will get IP address automatically. 2.2.2 Static IP Select Static IP in LAN Type. Enter the IP address parameters in the corresponding... -
Page 12: Register Account
Parameter Specification IP address set the IP address of the device Subnet Mask set the subnet mask of the device Gateway set the default gateway DNS 1 set the DNS address DNS 2 set the backup DNS address 2.3 Register Account SIP account is provided by SIP server. - Page 13 Fill the parameters in the corresponding area. Click CONFIRM to save. Parameter Specification Register Name SIP Account ID provided by ISP User Name SIP User Name provided by ISP Password SIP Password provided by ISP Display Name SIP Display name SIP Register Server, format: domain/IP, for example: Reg Server IP 194.168.1.2...
-
Page 14: Display
Slide the point left or right to adjust the screen brightness, click CONFIRM to save. 2.4.2 Sleep Choose the sleep time from 15 seconds to Never. IT82 setup 1minute by default. After the sleep time without any operation, the phone will black screen. Touch it to wake up. -
Page 15: Call Ringtone Vibrate
2.5.2 Call Ringtone Vibrate To setup the Pone Ringtone and Default Notification Sound from the list. 2.5.3 System Enable or disable the Touch Sounds. 2.6 Time Setup the date and time in the corresponding area. Enable Automatic Date Time , the phone will get the Date and Time automatically. If you uncheck Automatic Date Time, users need to setup the Date and Time manually. -
Page 16: Dnd Setting
2.7 DND Setting This function is used to prevent the phone from disturbing. Go to Setting-DND. if open DND, external phone call is unable to call in, turned off by default. 1. Select the desired account 2. Enable/Disable DND function 3. -
Page 17: Language
2.8 Language Choose the suitable phone language. IT82 use English by default. -
Page 18: System
2.9 System 2.9.1 Reboot To reboot the device ,click OK when you see the prompt. The phone will reboot. 2.9.2 Screen clean This function is used to protect the device from being pressed any keys when users clean the screen. 2.9.3 Format The SD Card Click it to format the internal SD Card. -
Page 20: Function
3 Function 3.1 Make a call User can directly dial from the soft keypad, select from the contact list or from call log to call out the number. User can choose one of the following steps to enter the dialing interface. Mode 1: Click Call icon on the main screen. -
Page 21: Call Resident
3.1.2 Call resident If you want to call room number, you can select Call Resident label. For example, if you want to call community 1, Building 1, Unit 1, Floor 1, Room1, you can input digits “001001010101”. Shown as below. 3.1.3 Call from Call Log User can enter the call log page to make a call. -
Page 22: Call From Contacts
3.1.4 Call from Contacts User can enter phonebook interface to make a call. Mode 1: Directly click Contact icon Mode 2: Click Call icon -> click PhoneBook label. If you want to make an audio call, click Audio Call icon . -
Page 23: Call Doorphone
After setup the door phone number, users can call out the Door Phone directly. Click Cancel -o end the call. 3.1.6 Call Center If you want to call management center (SDMC system), you can press to make a call out. This function only can be used when IT82 has registered from SDMC... -
Page 24: Receive A Call
Incoming calls include audio and video calls. If the caller has been stored in the contacts, it will show the contact name, otherwise the caller number will be displayed. When IT82 received the video call, it can automatically get a screenshot and save it in the Album. - Page 25 2) Answer a video call When receiving an video call, the phone will automatically open the video preview so that resident can view the visitors identity. Press Answer o answer the call. As shown below:...
-
Page 26: Reject A Call
3.4 Reject a call If user want to reject a call, click Reject label in incoming interface. 3.5 Contacts 3.5.1 New contacts 1.Click Add button 2.Enter the name 3.Select the number type, and enter the parameters in the corresponding area. 4.Click CONFIRM to save. -
Page 27: Delete The Contact
3.5.3 Delete the contact 1. Hold the exited contacts, it will show up a prompt box 2. If you choose Delete and Confirm, you will delete the current contact. 3. If you choose Delete All, all exited contacts will be removed. 3.6 Call log Missed call: click Missed call icon, to check all missed call All Call: to check all missed call, dialed call. -
Page 28: Modify The Call Log
3.6.1 Modify the call log 1. Click the call log, users can make the new contact from the log or add the call log into the exited contact. 2. Click the call log, and press SMS button, edit the message and send out. 3. -
Page 29: Delete The Log
,then choose which log you want to delete. Click COMFIRM to remove it. 3.7 Capture IT82 supports capture the visitor photo when incoming preview. IT82 can auto capture if the phone can not be answered after 3 seconds. Or user can capture manually via press capture icon 3.8 DND... -
Page 30: Message
3.10 Message Note:This function only can be used when IT82 registered from SDMC(Management center) 3.10.1 Alarm When the alarm is triggered , users can check the alarm message in this area. 3.10.2 Message Users can receive and send the message in the message interface 3.10.3 Maintenance... -
Page 31: Live View
Open Lobby label to open the door during the call. Note: IT82 default DTMF code is #. Users need to predefine the same DTMF code of door phone and IT82. Configuration DTMF code,please consult your administrator. 3.13 SOS... -
Page 32: Security
5. Click CONFIRM to save 3.14 Security IT82 support connect 10 alarm area via using RS485 contacts. Up to 5 Alarm Type - Infrared, Drmagnet, Smoke,Gas and Urgency and two trigger mode - NC(normal close) and NO(normal open) . Setup alarm delay, the alarm will ringing after the alarm has... -
Page 33: System Advanced
When the alarm is triggered, click Cancel and input “0000” to disable it. 3.15 System Advanced 3.15.1 SSH console This function is used to connect SSH to debug the device configuration. Only tick this... -
Page 34: Upgrade
IT82 supports two types to update the new firmware. 1. Upgrade by SD card Copy the firmware to SD card. Insert the card into IT82. Go to the path: Setting-System Advanced-System update . Click SELECT OTHER UPGRADE PACKAGE, then find the firmware in SD card, click OK then begin to upgrade.
Need help?
Do you have a question about the IT82 and is the answer not in the manual?
Questions and answers