Advertisement
Available languages
Available languages
Quick Links
Advertisement

Subscribe to Our Youtube Channel
Related Manuals for Ronix 7103


Summary of Contents for Ronix 7103
- Page 1 ELEKTRISCHER TRIMMER 7103 www.ronixtools.com...
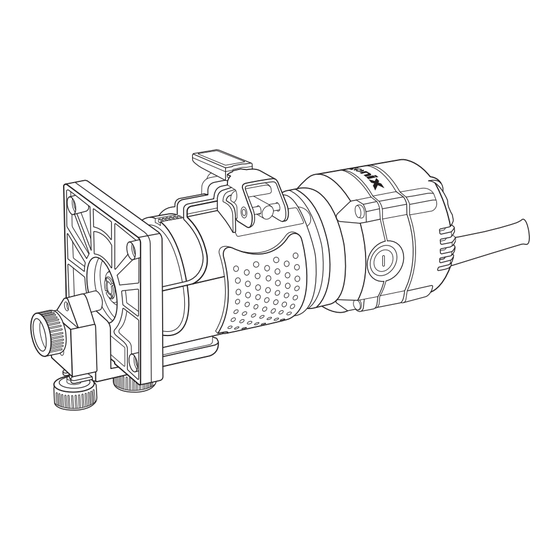
- Page 3 SPEZIFIKATIONEN Modell 7103 Leistung 550W Voltzahl 220-240V Frequenz 50-60Hz No Load Speed 30000RPM Leerlaufgeschwindigkeit Gewicht 1.8Kg Parallelanschlag: 1 Stück Schlüssel: 2 Stück Zubehör Führungsbuchse: 1 Stück Befestigungswinkel: 1 Stück Führungsgrundplatte: 1 Stück WERKZEUG TEILE Grundplatte Sperrhebel Bürstenabdeckung Lager- führungssitz Einstellschraube...
- Page 4 ALLGEMEINE SICHERHEITSWARNUNGEN FÜR ELEKTROWERKZEUGE WARNUNG! - Lesen Sie alle Sicherheitswarnungen und Anweisungen. Das Nichtbeachten der Warnungen und Anweisungen kann zu elektrischem Schlag, Feuer und/ oder schweren Verletzungen führen. - Bewahren Sie alle Warnungen und Anweisungen für die zukünftige Verwendung auf. - Der Begriff „Elektrowerkzeug“...
- Page 5 - Setzen Sie Elektrowerkzeuge nicht Regen oder nassen Bedingungen aus. Wasser, das in ein Elektrowerkzeug eindringt, erhöht das Risiko eines elektrischen Schlages. - Missbrauchen Sie das Kabel nicht. Verwenden Sie das Kabel niemals zum Tragen, Ziehen oder Abziehen des Elektrowerkzeugs. Halten Sie das Kabel fern von Hitze, Öl, scharfen Kanten oder beweglichen Teilen.
- Page 6 der Schalter vor dem Anschließen an die Stromquelle und/oder den Akkupack, dem Aufheben oder Tragen des Werkzeugs in der Aus Position ist. Elektrowerkzeuge mit dem Finger am Schalter zu tragen oder Elektrowerkzeuge zu betreiben, die den Schalter eingeschaltet haben, lädt zu Unfällen ein. - Entfernen Sie vor dem Einschalten des Elektrowerkzeugs alle Einstellschlüssel oder Schraubenschlüssel.
- Page 7 wechseln oder Elektrowerkzeuge lagern. Solche vorbeugenden Sich- erheitsmaßnahmen verringern das Risiko, das Elektrowerkzeug ver- sehentlich zu starten. - Lagern Sie unbenutzte Elektrowerkzeuge außerhalb der Reichweite von Kindern und lassen Sie keine Personen, die mit dem Elektrowerkzeug oder diesen Anweisungen nicht vertraut sind, das Elektrowerkzeug bedienen.
- Page 8 SICHERHEITSHINWEISE FÜR ELEKTRISCHE TRIMMER - Halten Sie das Elektrowerkzeug an den isolierten Griffen fest, da der Schneidkopf sein eigenes Kabel berühren kann. Das Schneiden eines “lebenden” Drahtes kann dazu führen, dass freiliegende Metallteile des Elektrowerkzeugs “unter Strom stehen” und den Bediener schockieren. - Verwenden Sie Klemmen oder eine andere praktische Methode, um das Werkstück auf einer stabilen Plattform zu sichern und zu stützen.
- Page 9 Schlitze zu verstopfen beginnen. ACHTUNG: Um die SICHERHEIT und ZUVERLÄSSIGKEIT des Produkts zu gewährleisten, sollten Reparaturen, Kohlebürsteninspektion und ersatz, jede andere Wartung oder Einstellung von RONIX SERVICE Authorized oder RONIX SERVICE Centers durchgeführt werden, immer unter Verwendung von RONIX SERVICE Ersatzteilen. Bedienungsanleitung...
- Page 11 ELECTRIC TRIMER 7103...
- Page 12 SPECIFICATION Model 7103 Power 550W Voltage 220-240V Frequency 50-60Hz No Load Speed 30000RPM Collet Capacity Weight 1.8Kg Parallel guide Accessories Spanner: 2PCs - Guide bush: 1PC Fixing Bracket: 1PC - Guide Base: 1PC PART LIST Base Plate Lock Lever Brush Cover...
- Page 13 GENERAL POWER TOOL SAFETY WARNINGS WARNING! - Read all safety warnings and all instructions. Failure to follow the warnings and instructions may result in electric shock, fire and or serious injury. - Save all warnings and instructions for future reference. - The term “power tool”...
- Page 14 - If operating a power tool in a damp location is unavoidable, use a residual current device (RCD) protected supply. Use of an RCD reduces the risk of electric shock. - Use of power supply via a RCD with a rated residual current of 30mA or less is always recommended.
- Page 15 POWER TOOL USE AND CARE - Don’t force the power tool. Use the correct power tool for your application. The correct power tool will do the job better and safer at the rate for which it was designed. - Don’t use the power tool if the switch doesn’t turn it on and off. Any power tool that cannot be controlled with the switch is dangerous and must be repaired.
- Page 16 ELECTRIC TRIMMER SAFETY WARNINGS - Hold power tool by insulated gripping surfaces, because the cutter may contact its own cord. Cutting a “live” wire may make exposed metal parts of the power tool “live” and shock the operator. - Use clamps or another practical way to secure and support the workpiece to a stable platform.
- Page 17 FUNCTIONAL DESCRIPTION SWITCH ACTION Switch Button CAUTION Before plugging in the tool, always check to see that the tool is switched off. - To start the tool, press the “ON ( I )” side of the switch. - To stop the tool, press the “OFF (O)” side of the switch. ASSEMBLY CAUTION Always be sure that the tool is switched off and unplugged before carrying...
- Page 18 - Use only the wrenches provided with the tool. OPERATION Set the tool base on the workpiece to be cut without the bit making any contact. Then turn the tool on and wait until the bit attains full speed. Move the tool forward over the workpiece surface, keeping the tool base flush and advancing smoothly until the cutting is complete.
- Page 19 body until the bit just touches the flat surface. Tighten the lock lever to lock the tool body. Always firmly hold the tool by both grip during operation. Set the tool base on the workpiece to be cut without the bit making any contact.
- Page 20 the wing nut. At the desired distance, tighten the wing nut to secure the straight guide in place. NOTE The straight guide is effectively used for straight cuts when chamfering 1- Height adjustment screw 2- Length adjustment screw 3- Lock screw 4- Baseplate To install the straight guide, insert the guide bars into the holes in the plunge base.
- Page 21 Regularly clean the tool’s air vents or whenever the vents start to become obstructed. ATTENTION: To maintain product SAFETY and RELIABILITY, repairs, carbon brush inspection and replacement, any other maintenance or adjustment should be performed by RONIX SERVICE Authorized or RONIX SERVICE Centers, always using RONIX SERVICE replacement parts. User Manual...
- Page 24 www.ronixtools.com...
Need help?
Do you have a question about the 7103 and is the answer not in the manual?
Questions and answers