Table of Contents
Advertisement
Available languages
Available languages
Quick Links
Advertisement
Table of Contents

Subscribe to Our Youtube Channel
Related Manuals for Ronix 9211


Summary of Contents for Ronix 9211
- Page 1 ELEKTRISCHER HOBEL 710 W 9211 www.ronixtools.com...
-
Page 3: Technische Spezifikationen
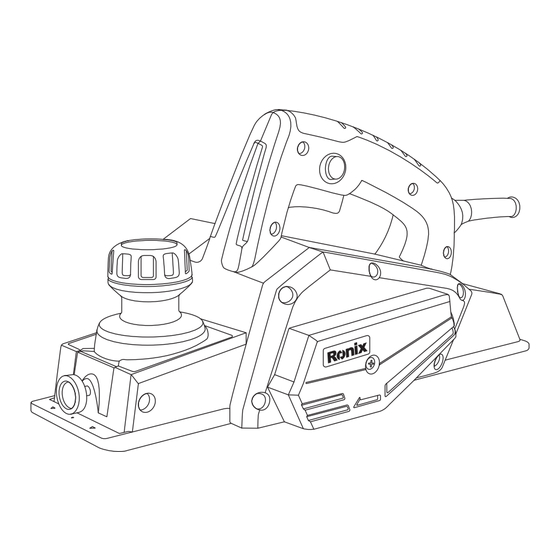
TECHNISCHE SPEZIFIKATIONEN 9211 Modell Spannung 220-240V Frequenz 50-60Hz Eingangsleistung 710W Leerlaufdrehzahl 16500U/min Max. Schnittleistung 82×2mm GERÄTEKOMPONENTEN Schalterauslöser D-Typ Griff Tiefeneinstellung Ein-/ Aus-Schalter Führungseinstellung Fuß Klingengehäuse Hobelblatt SICHERHEITSREGELN WARNUNG! Read all safety warnings and all instructions. Failure to follow the warnings... -
Page 4: Allgemeine Sicherheit
Lesen Sie alle Sicherheitswarnungen und alle Anweisungen. Das Nichtein- halten der Warnungen und Anweisungen kann zu elektrischem Schlag, Brand und/oder schweren Verletzungen führen. Bewahren Sie alle Warnungen und Anweisungen für zukünftige Referen- zen auf. Der Begriff „Elektrowerkzeug“ in den Warnungen bezieht sich auf Ihr netzgebundenes (mit Kabel) Elektrowerkzeug oder Ihr batteriebetriebenes (kabelloses) Elektrowerkzeug ALLGEMEINE SICHERHEIT... -
Page 5: Persönliche Sicherheit
Setzen Sie Elektrowerkzeuge nicht Regen oder nassen Bedingungen aus. Das Eindringen von Wasser in ein Elektrowerkzeug erhöht das Risiko eines elektrischen Schlags. Missbrauchen Sie das Kabel nicht. Verwenden Sie das Kabel niemals zum Tragen, Ziehen oder Abziehen des Elektrowerkzeugs. Halten Sie das Kabel von Wärme, Öl, scharfen Kanten oder beweglichen Teilen fern. - Page 6 kann zu Verletzungen führen. Halten Sie jederzeit einen stabilen Stand und das Gleichgewicht. Dies ermöglicht eine bessere Kontrolle über das Werkzeug. Kleiden Sie sich angemessen. Vermeiden Sie das Tragen von locker- er Kleidung oder Schmuck. Achten Sie darauf, dass Ihre Haare, Kleidung und Handschuhe von beweglichen Teilen ferngehalten werden.
- Page 7 des Elektrowerkzeugs beeinträchtigen könnten. Wenn beschädigt, lassen Sie das Elektrowerkzeug vor der Verwendung reparieren. Viele Unfälle werden durch schlecht gewartete Elektrowerkzeuge verur- sacht. - Halten Sie Schneidwerkzeuge scharf und sauber. Richtig gewartete Schneidwerkzeuge mit scharfen Schneidkanten neigen weniger dazu, zu klemmen, und sind einfacher zu kontrollieren. - Verwenden Sie das Elektrowerkzeug, Zubehör und Werkzeugbits usw.
- Page 8 SICHERHEITSWARNUNGEN FÜR DEN HOBEL - Warten Sie, bis der Cutter stoppt, bevor Sie das Werkzeug ablegen. Ein exponierter Cutter kann mit der Oberfläche in Kontakt kommen, was zu einem möglichen Verlust der Kontrolle und schweren Verletzungen führen kann. - Verwenden Sie Klemmen oder eine andere praktische Möglichkeit, um das Werkstück auf einer stabilen Plattform zu sichern und zu stüt- zen.
-
Page 9: Wartung
- Wechseln Sie immer beide Klingen oder Abdeckungen auf der Trommel, da sonst die daraus resultierende Unwucht Vibrationen verursacht und die Lebensdauer des Werkzeugs verkürzt. - Verwenden Sie immer die richtige Staubmaske/Respirator für das Material und die Anwendung, mit der Sie arbeiten. BEWAHREN SIE DIESE ANWEISUNGEN AUF WARNUNG! Lassen Sie nicht zu, dass der Komfort oder die Vertrautheit mit dem... - Page 10 Halten Sie Ihre Klingen immer scharf, um die bestmögliche Leistung zu erzielen. Verwenden Sie den Schärfhalter (optional) zum Entfernen von Kerben und zum Erzeugen einer feinen Kante. 1- Flügelmutter 2- Klinge (A) 3- Klinge (B) 4- Seite (D) 5- Seite (C) Zuerst die beiden Flügelmuttern am Halter lösen und die Klingen (A) und (B) einsetzen, sodass sie die Seiten (C) und (D) berühren.
-
Page 11: Austausch Der Kohlebürsten
AUSTAUSCH DER KOHLEBÜRSTEN Begrenzungsmarke Verwenden Sie einen Schraubendreher, um die Späneabdeckung zu entfernen. Bürstenhalterkappe Schraubendreher Überprüfen Sie die Kohlebürsten regelmäßig und entfernen Sie sie. Ersetzen Sie sie, wenn sie die Begrenzungsmarke erreichen. Halten Sie die Kohlebürsten sauber und sorgen Sie dafür, dass sie in den Haltern frei gleiten können. - Page 12 ELECTRIC PLANER 710W 9211...
-
Page 13: Technical Specifications
TECHNICAL SPECIFICATIONS 9211 Model Voltage 220-240V Frequency 50-60Hz Input power 710W No load speed 16500r/min Max. cutting capacity 82×2mm PART LIST Switch Trigger D-type handle Depth adjustment Lock ON/OFF button Guide adjustment Foot Blade housing Planer blade SAFETY RULES WARNING! Read all safety warnings and all instructions. -
Page 14: General Safety
and instructions may result in electric shock, fire and/or serious injury. Save all warnings and instructions for future reference The term “power tool” in the warnings refers to your mains-operated (corded) power tool or battery-operated (cordless) power tool. GENERAL SAFETY WORK AREA SAFETY - Keep work area clean and well lit. -
Page 15: Personal Safety
ground fault circuit interrupter (GFCI) protected supply. Use of an GFCI reduces the risk of electric shock. PERSONAL SAFETY - Stay alert, watch what you are doing and use common sense when operating a power tool. Do not use a power tool while you are tired or under the influence of drugs, alcohol or medication. -
Page 16: Use Proper Extension Cord
- Do not use the power tool if the switch does not turn it on and off. Any power tool that cannot be controlled with the switch is dangerous and must be repaired - Disconnect the plug from the power source and/or the battery pack from the power tool before making any adjustment ,changing accessoriesor storing power tools. -
Page 17: Planer Safety Warnings
voltage resulting in loss of power and overheating. Table 1 shows the correct Size to use depending on cord length and nameplate ampere rating. If in doubt, use the next heavier gage. The smaller the gage number, the heavier the cord. PLANER SAFETY WARNINGS - Wait for the cutter to stop before setting the tool down. -
Page 18: Functional Description
resulting imbalance will cause vibration and shorten tool life. - Always use the correct dust mask/respirator for the material and application you are working with. SAVE THESEINSTRUCTIONS WARNING! Do not let comfort or familiarity with the product (gained from repeated use) replace strict adherence to the safety rules for the subject product. - Page 19 SWITCH ACTION Switch trigger Lock button CAUTION! - Before plugging in the tool, always check to see that the switch trigger actuates properly and returns to the “OFF” position when released. - The switch can be locked in the “ON” position for the operator’s comfort during extended use.
- Page 20 ASSEMBLY CAUTION! - Always be sure that the tool is switched of and unplugged before carrying out any work on the tool. - Removing or installing mini planer blades - Tighten the blade installation bolts carefully when attaching the blades to the tool. A loose installation bolt can be dangerous. Always check to see they are tightened securely.
- Page 21 1- Pan head screw 2- Adjusting plate 3- Planer blade locating lugs 4- Gauge plate 5- Heel of adjusting plate 6- Set plate 7- Inside flank of gauge plate 8- Gauge base 9- Back side of gauge base 10- Mini cleaner blade - To install the blades, loosely attach the adjusting plate to the set plate with the pan head screws and set the mini planer blade on the gauge base so that the cutting edge of the blade is perfectly flush with the...
- Page 22 1- Mini planer blade 2- Groove 3- Set plate 4- Hex flange head bolt 5- Drum cover 6- Drum 7- Adjusting plate - Set the drum cover over the adjusting plate/set plate and screw in the three hex flange head bolts so that a gap exists between the drum and the set plate to slide the mini planer blade into position.
- Page 23 1- Blot 2- Drum 3- Planer 4- Drum cover 5- Adjusting plat Place the blade on the gauge base so that the blade edge is perfectly flush with the inside edge of the gauge plate. Place the adjusting plate on the blade. then simply pressing the heel of the adjusting plate flush with the back side of the gauge base and tighten two screws on the adjusting plate.
- Page 24 For the correct planer blade setting Your planing surface will end up rough. unless the blade is set properly and securely. The blade must be mounted so that the cutting edge is absolutely level, that is, parallel to the surface of the rear base. Below are some examples of proper and improper settings.
-
Page 25: Operation
NICKS IN SURFACE Cause: One or both blade edges protrude too far in relation to rear base line. (A)Front base (Movable shoe) (B)Rear base (Stationary shoe) OPERATION Hold the tool firmly with one hand on the knob and the other hand on the switch handle While operating the tool. - Page 26 jamming by chips. For rough cutting, the depth of cut can be increased, while for a good finish you should reduce the depth of cut and advance the tool more slowly. SHIP LAPPING (RABBETING) To make a stepped cut as shown in the figure, use the edge fence (guide rule).
-
Page 27: Maintenance
You may wish to add to the length of the fence by attaching an extra piece of wood. Convenient holes are provided in the fence for this purpose, and also for attaching and When planing, move the tool with the edge fence flush with the side of the work piece. Otherwise, uneven planing may result. - Page 28 Sharpeningholder Always keep your blades sharp for the best performance possible. Use the sharpening holder (optional accessory) to remove nicks and produce a fine edge. 1- Wing nut 2- Blade(A) 3- Blade(B) 4- Side(D) 5- Side(C) First loosen the two wing nuts on the holder and insert the blades (A) and (B), so that they contact the sides (C)and (D).
-
Page 29: Replacing Carbon Brushes
REPLACING CARBON BRUSHES Limit mark Use a screwdriver to remove the chip cover. Brush holder cap Screwdriver Remove and check the carbon brushes regularly Replace them when they wear down to the limit mark. Keep the carbon brushes clean and free to slip in the holders. - Page 30 Chip cover Screwdriver Use a screwdriver to remove the brush holder caps. Take out the worn carbon brushes, insert the new ones, sand secure the brush holder caps. ELECTRIC PLANER 710W...
- Page 32 www.ronixtools.com...
Need help?
Do you have a question about the 9211 and is the answer not in the manual?
Questions and answers