Table of Contents
Advertisement
Quick Links
Advertisement
Table of Contents

Related Manuals for Ronix 4110


Summary of Contents for Ronix 4110
- Page 1 INSTRUCTION MANUAL 4110 JIG SAW...
-
Page 3: Specifications
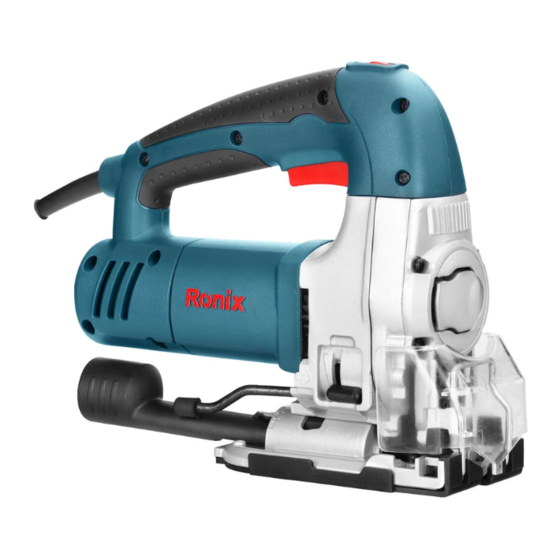
USER MANUAL SPECIFICATIONS Cutting capacity Wood: 130mm, Steel: 10mm Voltage 220V Frequency 50HZ/60HZ Rated power 600W No- load speed 500-2500RPM Net Weight 3.0kg PARTS LIST... -
Page 4: Safety Instructions
JIG SAW SAFETY INSTRUCTIONS WARNING! WHEN USING ELECTRIC TOOLS, ALL THE SAFETY INSTRUC- TIONS SHOULD ALWAYS BE OBSERVED TO REDUCE THE RISK OF FIRE, ELECTRIC SHOCK AND PERSONAL INJURY BEFORE ATTEMPTING TO OPERATE THE TOOL, PLEASE READ ALL THE INSTRUCTIONS AND SAVE IT FOR FURTHER REFERENCE. - Page 5 USER MANUAL 7) Use right tool Don’t force small tools and attachment to do the job of a heavy duty tool. Don’t use tools for purpose not intended, for example, don’t use electric circular saw for cutting logs or tree limbs. 8) Dress properly Don’t wear loose clothes or jewelry.
- Page 6 JIG SAW switch is off when connecting the plug to the socket. 16) Use extension cord If an extension cord is required, always check that its cross- section measurement is equal to or greater then that of the tool capabilities and so marked. 17) Stay alert Watch what you are doing.
- Page 7 USER MANUAL JIG SAW USE This jig saw is intended for the cutting of wood pieces, steel, aluminum, plastic with different types of cutting blade. ADDITIONAL SAFETY REGULATIONS 1) BEFORE USING THE TOOL, PLEASE CHECK THE SWITCH IS OFF AND THE PLUG IS NOT CONNECTED TO ELECTRICITY SOCKET.
-
Page 8: Operation Regulations
JIG SAW dust, please use an circuit- cut device to assure the safety of operator. OPERATION REGULATIONS FITTING AND REMOVING A SAW BLADE NOTE: Prior to assembly and adjustment, always unplug the tool. This tool has SDS system for quick and easy changing of saw blade. FITTING THE BLADE - Open the blade holder by fully retracting the blade latch. -
Page 9: Setting The Pendulum Action
USER MANUAL SAW BLADES INSTRUCTION Blade type Application Fine- toothed cutting blade For smooth straight cuts Coarse - toothed cutting blade For fast straight cuts Metal cutting blade For ferrous and non - ferrous metals Flush cutting blade For finishing off cuts up to a wall or edge The blade is supplied with customers’... -
Page 10: Setting The Bevel Angle
JIG SAW Position Cutting method example Cutting mild steel, stainless steel or plastic, no pendulum action wood, and plywood Small pendulum action Cutting mild steel, Aluminum and hard wood Cutting wood and plywood, fast Cutting Medium pendulum action aluminum and mild steel Large pendulum action fast Cutting wood, and plywood SETTING THE BEVEL ANGLE... - Page 11 USER MANUAL 2) For continuous operation , press and hold down the switch, press the lock- on button and release the switch. 3) To stop the tool, release the switch. 4) To stop the tool in continuous operation, press the switch briefly and release it.
- Page 12 JIG SAW EFFECTIVE AND SAFE CUTTING NOTE: Please lubricate the guide rather frequently. - If necessary . draw a cutting line. - Drill a hole (¢ Min.12mm) and introduce the saw blade. Switch the tool on. FOLLOW THE LINE WHEN CUTTING STRAIGHTLY. .For pendulum cutting.
-
Page 13: Dust Extraction
USER MANUAL - Set the sawdust blower using the lever - Low For working with metals, when using coolants and lubricants and for use with dust extraction. - Intermediate For working with wood and similar materials in low speed. - High For working with wood and similar materials in high speed. 4) DUST EXTRACTION When the tool is used indoor for extended periods of time, use a suitable dust extractor designed in compliant with applicable... -
Page 14: Service And Maintenance
5mm) have to be replaced by new ones. - Always replace both carbon brushes at the same time and use the brush by RONIX SERVICE - The brushes have to fall in the holders easily. - After placing the new carbon brushes, let the tool run for some... - Page 15 REPAIRS Please only use accessories and spare part recommended by the Ronix. If the tool get malfunction, please hand over the tool to our dealer or appointed maintenance station. Don’t disassemble the tool by yourself or replace the parts supplied by other factories.
Need help?
Do you have a question about the 4110 and is the answer not in the manual?
Questions and answers