Segway eKickScooter Manual
- User manual (46 pages) ,
- User manual (32 pages) ,
- Important information manual (82 pages)
Advertisement
- 1 Welcome
- 2 Packing List
- 3 Diagram
- 4 Handlebar Functions
- 5 Dashboard
- 6 Assembly
- 7 Activation
- 8 App Features
- 9 Apple Find My Network
- 10 CodeLock
- 11 AirLock
- 12 Abnormal Movement Alert*
- 13 Charging
- 14 How to Ride
- 15 Folding
- 16 Carrying
- 17 Unfolding
- 18 Inflate the Tires
- 19 Specifications
- 20 Phone Holder Installation
- 21 Documents / Resources
Welcome
 Always wear a helmet, elbow pads and knee pads when riding.

Packing List

7/64'' (3mm) Allen Wrench
Important Information
Accessories
7/64'' (3mm) Allen Wrench

Battery Charger

Screw x 4

* Separately Sold Accessories
Phone Holder

Storage Kit

Front Basket Kit

Rear-view Mirror

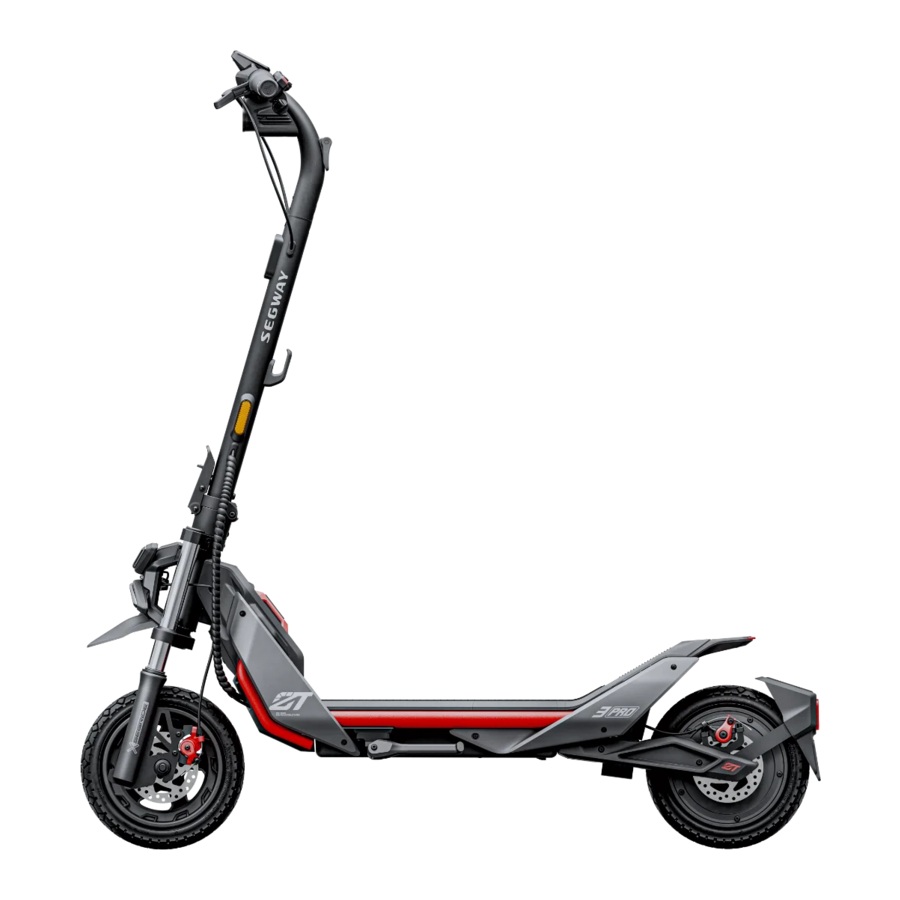
Diagram

- Left Direction Indicator
- Brake Lever
- Handlebar
- Headlight
- Front Reflector
- Folding Latch
- Quick-release Lever
- Folding Mechanism
- Front Position Lamp (For 051801E Only)
- Front Mudguard
- Front Shock Absorber
- Front Disc Brake
- Front Wheel
- Kickstand
- Battery Compartment
- Main Frame
- Right Direction Indicator
- Throttle
- Dashboard
- Snap Hook
- Stem
- Hanging Hook with Locking Ring
- Side Reflector
- Charging Port
- Footboard
- Buckle
- Rear Mudguard
- Rear Shock Absorber
- Rear Disc Brake
- Taillight & Rear Reflector
- License Plate Holder
- Wheel Motor
- Rear Wheel
Handlebar Functions

- Mode switching: Press the button to switch the speed mode.
- Direction Indicator Button: Press the button to light up left/right signal, then the signal flashes, and press the button again to turn it off. Press and hold the left or right direction indicator button to turn on/off emergency flashers.
- Custom Button: Default Automatic Hill Hold*. Customize Quick Features through the Segway-Ninebot APP. After setting, you can press the custom button to use it.
- Bell: Press the button to use bell.
- Power Button/Headlight: Press the Power Button to power on the scooter. Press and hold to power it off. After powering on, press the button to turn on the headlight. Press again to turn it off.
- Throttle: Twist/Press the throttle to speed up.
* Automatic Hill Hold: After enabling this function in the Segway-Ninebot App, press the custom button to quickly activate the Automatic Hill Hold when the vehicle is at complete stop. At this time, the driving wheel will be locked and the vehicle will not move forward when using the throttle. Press the custom button again to exit and the driving wheel will be unlocked. In addition, you can also activate Automatic Hill Hold by squeezing and holding the brake lever for 3 seconds, and squeeze again to exit.
Dashboard

- Tire Pressure Reminder: The icon lights up regularly to remind user to check tire pressure.
- Bluetooth: When the icon lights up, it indicates that the scooter has been successfully connected to the mobile device.
- Left/Right Direction Indicator: When this icon blinks, it indicates that the direction indicators on the left/right side are turned on.
- Locking Reminder: When the icon lights up, it indicates that the scooter is locked.
- Headlight: It indicates that the headlight is on.
* When entering Walk Mode, the headlight and tail light are always on and can't be turned off. - Boost Function: When the icon lights up, it indicates that the Boost Function is activated.
- Walk Mode:
![]() When the icon lights up, it indicates that the scooter is in Walk Mode with a max. speed of 5 km/h.
When the icon lights up, it indicates that the scooter is in Walk Mode with a max. speed of 5 km/h. - Warning: When the icon lights up, it indicates that the scooter has detected errors.
- Speedometer: It indicates the current speed of the scooter during riding, and indicates the battery power during charging.
- Battery Level: The total battery power equals 10 bars.
* The battery power is very low when the first battery bar is red. Please charge your scooter immediately. - Traction Control System (TCS): When the icon lights up, it indicates that the Traction Control System (TCS) is enabled.
- Speed Modes:
Mode\Model Speed Limit Ranges* 051801E 051801D 051801E 051801D E (ECO Mode) 15 km/h (9.3 mph) 15 km/h (9.3 mph) 70 km (43.5 miles) 70 km (43.5 miles) D (Drive Mode) 20 km/h (12.4 mph) 20 km/h (12.4 mph) 56 km (34.8 miles) 56 km (34.8 miles) S (Sport Mode) 25 km/h (15.5 mph) 20 km/h (12.4 mph) 50 km (31.1 miles) 56 km (34.8 miles) * Ranges of Speed Modes: Tested while riding with a full battery, 75 ± 5 kg (165 ± 11 lbs) load, 25 ±5°C (77 ± 9°F), at the max. speed of each speed mode on pavement.
 When the icon lights up, it indicates that the scooter is in Walk Mode with a max. speed of 5 km/h.
Assembly
- Unfold the stem and close the quick-release lever until the folding latch reaches the bottom.

- Make sure the quick release lever is locked firmly when you push the quick release lever down without lifting folding latch.

- Slide the handlebar and the wires into the stem with the headlight facing forward.

- Install the four screws in order with the Allen wrench.

- Lift the vehicle out of the box, place it on the ground, and unfold the kickstand.
![]()


Power off the scooter before assembly. The brake cable should not wrap around the stem.
Activation
Additional and/or supplemental warnings and instructions on how to use the product are also in the Segway-Ninebot app, and such information and/or notice is part of the user materials that an user shall know and learn.
* An non-activated eKickScooter will keep beeping when turned on, and its speed is limited to 10 km/h (6.2 mph). Please follow the steps to activate your eKickScooter.

- Charge the eKickScooter for three seconds to activate the battery.

- Power on the eKickScooter.
![]()
- Scan the QR code to download the Segway-Ninebot app to register or log in.
![]()


- Tap "Search vehicle" and pair with your eKickScooter.
![]()
- Follow the instructions and watch the Riding Safety video.
![]()
- Tap to activate the eKickScooter.
![]()
* When the scooter is activated, the speed mode is set to D mode by default.


App Features
 | Light Effect |
 | Start Speed |
 | Energy Recovery1 |
 | Imperial/Metric System |
 | Locking Function |
 | Customize Mode Speed |
 | Traction Control System (TCS) |
 | Charging Limit and Scheduled Charging |
 | Function Tone |
* As different versions of App/firmware may vary, please refer to the actual vehicle.
Please customize these features via the Segway-Ninebot app.
- Notes on Energy Recovery Function:
Function Introduction: Set the "Energy Recovery" level in the "Segway-Ninebot" App: Off/Strong/Weak- By default, the vehicle's Energy Recovery feature is set to "off." Users can enable or disable the Energy Recovery function in the "Segway-Ninebot" App.
- Once Energy Recovery is enabled, releasing the throttle while riding will automatically activate this feature. The motor will then produce a reverse electromotive force, causing the vehicle to slow down and create a noticeable sensation of deceleration (akin to the feeling of pulling the brake lever). The intensity of Energy Recovery can be adjusted to "strong" or "weak." When set to "strong," the deceleration is more evident.
Safety Tips:
- Before using the Energy Recovery feature during rides, practice in a secure environment until you are familiar with its operation and effects. Please be aware that this feature can provide additional resistance to decelerate the vehicle when the throttle is released, complementing the standard friction and braking mechanisms. Therefore, users need to control the vehicle properly and maintain the balance well for a safe ride.
- Energy Recovery is designed to assist, not replace, the braking system. When you need to stop or slow down safely, please use the brake by pulling the brake lever.
- Please exercise increased caution when using the Energy Recovery feature on downhill paths or under special riding conditions to prevent falls. Releasing the throttle on a decline may still result in acceleration due to gravity and inertia. Because of the acceleration, Energy Recovery will engage simultaneously, providing decelerative force, which necessitates careful balance maintenance.
- The Energy Recovery feature does not engage while the vehicle is in cruise control mode. Once you disengage cruise control, releasing the throttle will initiate Energy Recovery (if already enabled in the App), creating a distinct reduction in speed.
- Once the Energy Recovery is enabled, it will remain on until the function is manually turned off via the "Segway-Ninebot" App. The feature is not automatically disabled in the event of the vehicle shutting down or running out of battery. The vehicle's dashboard does not display Energy Recovery status, which can only be verified and adjusted (Off/Strong/Weak) in the App.
- Please inform any borrower of the vehicle about the current Energy Recovery settings to ensure they are aware of how the feature affects vehicle operation.
- If you have any questions about this function, please contact Technical Support
Apple Find My Network
- Add vehicle to Find My (Use Method A or B)
Method A: Connect vehicle with Segway-Ninebot app, and enable Find My at homepage > More Functions > Ninebot Laboratory > Locating vehicle (Beta version) > Enable, then it will automatically switch to the Find My app. Tap "+"and tap "Add Other Item", then choose your vehicle and follow the instructions to pair it with Find My.
![]()
Method B: Launch Find My app on a iPhone or iPad, Tap + then tap Add Other Item![]() . Power on the vehicle, and pair vehicle (unlocked) with Apple Find My by squeezing the brake lever three times, pressing the power button once, then choosing the vehicle in the Find My app and following the on-screen instructions to pair it with Find My.
. Power on the vehicle, and pair vehicle (unlocked) with Apple Find My by squeezing the brake lever three times, pressing the power button once, then choosing the vehicle in the Find My app and following the on-screen instructions to pair it with Find My.

- RESET (Use Method A or B)
Method A: Connect vehicle with Segway-Ninebot app, and disable Find My at homepage > More Functions > Ninebot Laboratory > Locating vehicle (Beta version) > Disable, then manually remove your vehicle from Find My app.
![]()
Method B: After powering on the vehicle, owner can complete RESET by squeezing brake lever by 5 times and pressing power button once in unlocked status, then manually remove your vehicle from Find My app. After these steps, the owner can not use Find My to find this vehicle.


 . Power on the vehicle, and pair vehicle (unlocked) with Apple Find My by squeezing the brake lever three times, pressing the power button once, then choosing the vehicle in the Find My app and following the on-screen instructions to pair it with Find My.


- Max. Quantity of Connected Devices
A eKickScooter can be connected to maximum 3 iOS devices (with same account).
![]()
- SN Look up (Only for special conditions)
Any iOS user can connect to the vehicle by Apple Find My app, and then check vehicle's S/N by squeezing brake lever for 8 times and pressing power button once. The S/N will display on the Apple Find My app. - Enable & Disable Find My Beacon
Owner can enable & disable Find My Beacon by squeezing brake lever by 9 times and pressing power button once in unlocked status (position information). - Nearby Status and Separated Status
If the vehicle has been paired with Find My, when the owner leaves away from the vehicle or turns off the Bluetooth of his or her mobile device after a riding, the vehicle will automatically enter Nearby status after a short period of time. After a long period of time, the vehicle will enter Separated status. When owner gets close to the vehicle with the mobile device, the Bluetooth of the device will automatically connect with the vehicle and the vehicle will enter Connected status. If the vehicle is in Separated status, non-owner can connect to this vehicle via Find My app, and use the method mentioned above to check the SN. Owners can still use Find My to find the vehicle.

Firmware Update
Owner can update the firmware after connecting the eKickScooter to Segway-Ninebot App. Non-owner is not allowed to update the firmware.
Only users of Apple devices need to read this Apple Find My app instruction.
* Use of the Works with Apple badge means that a product has been designed to work specifically with the technology identified in the badge and has been certified by the product manufacturer to meet Apple Find My network product specifications and requirements. Apple is not responsible for the operation of this device or use of this product or its compliance with safety and regulatory standards.
App Store, Apple Logo, Apple, Apple Find My, Apple Watch, Find My, iPhone, iPad, iPadOS, Mac, macOS and watchOS are trademarks of Apple Inc. IOS is a trademark of Cisco and is used under license.
CodeLock
* Enable/Disable CodeLock via Segway-Ninebot App, at homepage > More Functions > Locking Function, and choose DigitalCodeLock or Pattern CodeLock.
DIgital CodeLock
- Enable Digital CodeLock via the App. Set a four-digit password (e.g. 1234).
![]()
- Press the Power Button and use Mode Switching Button and Power Button to enter the password. The number increases by one for each pressing of Mode Switching Button and decreases by one for each pressing of Power Button. Squeeze any brake lever or press Custom Button to confirm each password entered.

- Rider can also press the left and right buttons to check each password entered and use Mode Switching Button and Power Button to change the password. After successfully entering the digital password, the buzzer will send out two short beeps and the vehicle power on.
![]()


Pattern CodeLock
- Enable Pattern CodeLock via the App. Set a 4~8 password (e.g. ↑↓←→).
![]()
- Press the Power Button and use the up, down, left, and right directional buttons to enter the password. Each time a direction button is entered, the button flashes once and the corresponding direction is displayed on the dashboard. The buzzer will also send out a short beep. After successfully entering the pattern password, the buzzer will send out two short beeps and the vehicle power on.
![]()


Note: You can enter the digital/pattern password up to 3 times. After entering the wrong number 3 times, the screen will automatically power off. You can try to power it on again for the fourth time. If you still enter the wrong password, it will trigger a alert.
AirLock
- Set digital or key unlocking passcode first via the App.
![]()
- Enable AirLock via the App. Turn on Bluetooth on your mobile phone and connect to the vehicle.
![]()
- Vehicle's Bluetooth will automatically connect when the mobile phone is close to the vehicle, and the Bluetooth icon on the dashboard lights up. Press the Power Button to power on the vehicle.
![]()


Note: If encountering a situation where AirLock is enabled but unlocking fails, you can press the power button to enter the digital password to unlock the vehicle. So that it can ensure that your vehicle can ride normally in special circumstances.
Abnormal Movement Alert*
Abnormal Movement Alert can be turned on/off via Segway-Ninebot App.
After setting, if the vehicle detects abnormal movement in a powered off state, the buzzer will send out an alert for 5 seconds (a short alert every 0.5 second), and the driving wheel will be locked. The alert will stop if there is no abnormal movement after 5 seconds, or all the lights will flash with the alert for 5 seconds. If there is still abnormal movement, the alert will last.
Charging

Your eKickScooter is fully charged when the LED on the charger changes from red (charging) to green (trickle charge).

- Open the charging port rubber plug.
![]()
- Insert the charge plug.
![]()
- Fasten the rubber plug when finished.
![]()


When the battery power is under 30% and the scooter is not powered on for about 7 consecutive days, the battery will enter into sleep mode. If this happens, your scooter cannot be powered on. Please charge it for three seconds to activate the battery.

How to Ride
- Power on the eKickScooter.
![]()
- Fold the kickstand up. Stand on the footboard with one foot and push off with the other foot to start gliding.
![]()
- Slow down by releasing the throttle and squeezing the brake lever.
![]()
- Put both feet on the footboard and stand stably. Press the throttle to speed up when you are balanced.
Note: For your safety, the motor will not engage until the eKickScooter reaches 3 km/h (1.9 mph). The Start Speed (3-5 km/h) can be adjusted via Segway-Ninebot APP.
![]()
- Toggle the direction indicator switch to the left/right when turning left/right. Toggle the switch back to the middle position to turn off the direction indicators.

- Slightly turn the handlebar to turn left/right.

- Put down the kickstand when you are getting off the eKickScooter.
![]()


DO NOT ride on public roads, motorways, or highways unless the local laws or regulations have exceptions.

 DO NOT use a mobile phone or wear earphones when riding the eKickScooter.

DO NOT ride up and down stairs or jump over obstacles.

DO NOT ride the scooter with only one foot or one hand.

DO NOT carry any passengers.

DO NOT overtake.

Watch your head when passing through doorways.

Avoid contacting obstacles with the tire/wheel.

DO NOT carry heavy objects on the handlebar.

Keep your speed between 3.1–6.2 mph (5–10 km/h) when you ride through speed bumps or other uneven surfaces.

DO NOT ride the scooter in the rain. DO NOT ride through puddles or other obstacles.

DO NOT wear high heels when riding.

DO NOT touch the brake after riding.

DO NOT touch the hub motor after riding because it can get hot.

DO NOT park in the open space or outdoors for a long time.

Folding
- Lift the snap hook on the stem. Lift the folding latch and open the quick-release lever.

- Fold the stem.
![]()
- Align the snap hook with the illustrated area at the rear of the pedal and press it down to hook onto the buckle.


Carrying
Lift by the stem to carry.

Unfolding
Disengage the snap hook from the buckle.

Unfold the stem and close the quick-release lever. Make sure the folding latch reaches the bottom.

Press the quick release lever firmly to make sure the folding mechanism is tightened.
* The scooter will make a "click" sound when the folding mechanism is tightened.

Make sure the folding latch is in the locked position before riding!
* Stop riding immediately if the folding latch somehow cannot be locked. Serious danger may occur!

Inflate the Tires
- Unscrew the valve cap.

- Connect the pump to inflate the tires.
![]()


Specifications
| Item | Parameter | ||
| Product Info | Name | Segway eKickScooter ZT3 Pro | |
| Model | 051801E | 051801D | |
| L × W × H | Approx. 1245 x 638 x 1340 mm (49 x 25.1 x 52.8 in) | ||
| L × W × H (folded) | Approx. 1245 x 638 x 645 mm (49 x 25.1 x 25.4 in) | ||
| Net Weight | Approx. 29.7 kg (65.5 lbs) | ||
| Rider | Max. Payload | 120 kg( 265 lbs) | |
| Recommended Age | 16—60 years | ||
| Required Height | 160-200 cm (5'25''—6'56'') | ||
| Machine | Max. Speed | Approx. 25 km/h (15.5 mph) | Approx. 20 km/h (12.4 mph) |
| Range at Max. Speed [1] | Approx. 50 km (31.1 miles) | Approx. 56 km (34.8 miles) | |
| Max. Slope[2] | Approx. 25% | ||
| Traversable Terrain | Partial unpaved roads, and mostly smooth roads or normal asphalt, tarmac roads | ||
| Operating Temperature | -10–40°C (14–104°F) | ||
| Storage Temperature | -10–50°C (14–122°F) | ||
| IP Rating | IPX5 | ||
| Duration of Charging | Approx. 4±1 h (Ambient Temperature: 20—25℃/68—77℉) | ||
| Battery | Nominal Voltage | 46.8 V ⎓ | |
| Max. Charging Voltage | 54.6 V ⎓ | ||
| Nominal Energy | 597Wh | ||
| Nominal Capacity | 12.75 Ah | ||
| Charging Ambient Temperature | 0–55°C (32–131°F) | ||
| Battery Management System | Protection against overvoltage/undervoltage/short circuit/overcurrent/over temperature | ||
| Motor | Nominal Power | 0.65 kW, 650 W | 0.5 kW, 500 W |
| Max. power | 1.6 kW, 1600 W | ||
| Charger | Model | NBW54D601D3D01 | |
| Input Voltage | 100~240 V | ||
| Nominal Output | 53.6 V ⎓ 3.9 A Max. | ||
| Rated Output Power | 70 W | ||
| Tire | Tire Pressure | 42—48 psi | |
| Tire Type | 11-inch Off-Road Tubeless Tires | ||
| Others | Suspension System | Front Dual Telescopic Suspension | |
| Rear Spring Suspension | |||
| Brake System | Front Disc Brake | ||
| Rear Disc Brake + Electronic Brake | |||
- Range at Max. Speed: tested while riding with a full battery, 75 kg (165 lbs) load, 25°C (77°F), at the max. speed on average on pavement.
* Some of the factors that affect range include speed, load, number of starts and stops, ambient temperature, etc. - Max. Slope: tested while riding with 70% (±10%) battery, 75 kg (165 lbs) load, at a speed of 15 km/h (9.3 mph) climbing up a 10 m long slope (the speed greater than 6 km/h (3.7 mph) when passing through the slope).
Phone Holder Installation
- Use the allen wrench to unscrew the screws counterclockwise, and then you can remove the Removable Part.
![]()
- Install the phone holder in the place of the original Removable Part. (For specific installation steps, please refer to the phone holder manual).
![]()


The pictures shown are for illustration purposes only. The actual product or app interface may vary.
Documents / Resources
References
Download manual
Here you can download full pdf version of manual, it may contain additional safety instructions, warranty information, FCC rules, etc.
Advertisement


Need help?
Do you have a question about the eKickScooter and is the answer not in the manual?
Questions and answers