Profitec PRO 600 (10600, 10610) Manual
- Instruction manual (33 pages) ,
- User manual (39 pages)
Advertisement
- 1 Used symbols
- 2 INCLUDED WITH DELIVERY
- 3 MACHINE DESCRIPTION
- 4 MACHINE INSTALLATION
- 5 FIRST USE
- 6 USE OF THE MACHINE
- 7 CLEANING AND MAINTENANCE
- 8 TRANSPORT AND WAREHOUSING
- 9 TROUBLESHOOTING
- 10 GENERAL ADVICE
- 11 Documents / Resources
Used symbols
 | Caution! Important notices on safety for the user. Pay attention to these notices to avoid injuries. |
 | Attention! Important notice for the correct use of the machine. |
INCLUDED WITH DELIVERY
1 portafilter 1 spout
1 portafilter 2 spouts
1 filter 1 cup
1 filter 2 cups
1 blind filter
1 tamper
1 cleaning brush
1 user manual
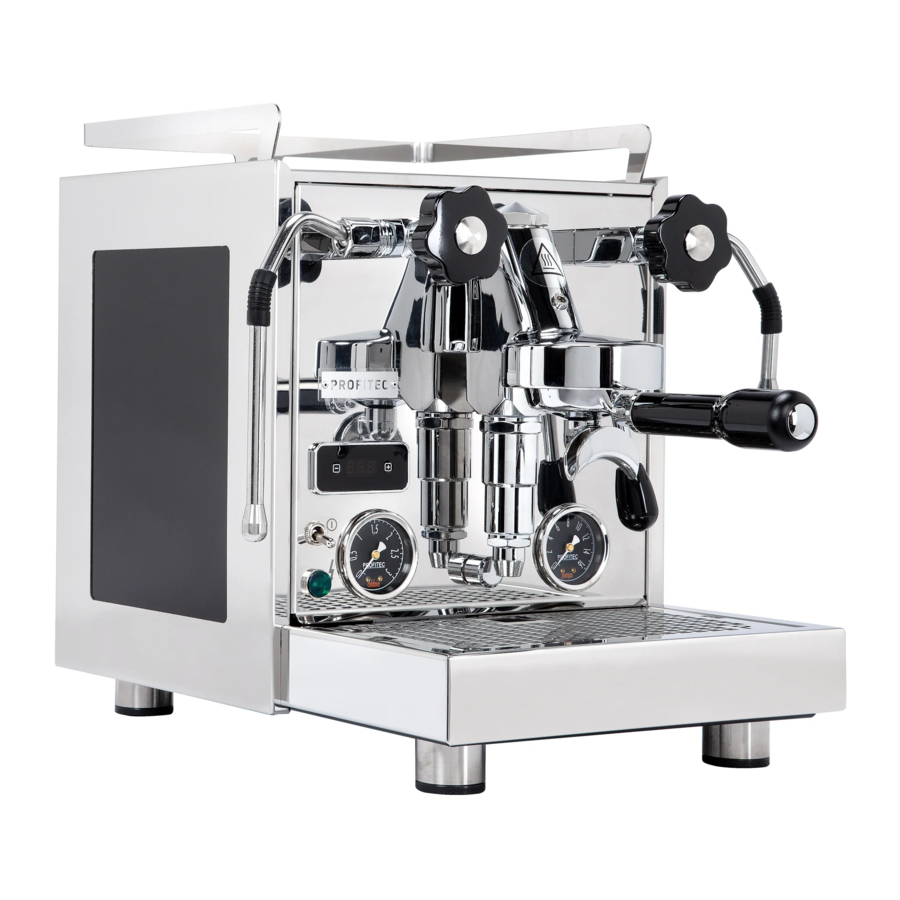
MACHINE DESCRIPTION
Machine parts
PRO 600

- Cup warming tray & water tank underneath
- Steam valve
- Steam wand
- Brew Group
- PID-Display
- On/off switch
- Control lamp green on/off
- Boiler pressure gauge
- Hot water valve
- Hot water wand
- Portafilter
- Brew lever
- Pump pressure gauge
- Drip tray
Technical data
| Voltages: | EU: 230 V UK: 230 V New Zealand: 240 V Australia: 240 V US: 115 V Japan: 100 V |
| Power: | 2.000 W |
| Water tank: | ca. 2.8 l |
| Measurements: | w x d x h/305 mm x 450 mm x 395 mm |
| Measurements with portafilter and steam/hot water wands: | w x d x h/365 mm x 555 mm x 395 mm |
| Weight: | 24 kg |
PID-Temperature Control
The function of a PID-Temperature Control is to regulate the temperature of both boilers. The temperature of the boilers are programmable and controlable independently from each other. You have the possibility to extract coffee at varying temperatures and steaming with different pressure. PID stands for "proportional-integral-derivative" The temperature plays an integral role in coffee preparation.
The PID-control shows the temperature of the coffee boiler and the steam boiler alternately. The position of the period indicates which boiler´s temperature is currently being displayed.


Danger of injury: The following parts are hot or may become hot:
- Area of the valves
- Steam wand and hot water wand
- Brew group
- Portafilter
- Body (upper part and side frames)
MACHINE INSTALLATION
The installation is to be carried out exclusively by qualified specialists, according to the following instructions and in compliance with valid laws and local regulations.
Preparation for installation
- Place the machine on an even and stable surface.
- Never place the machine on hot surfaces.
- Place the machine on a water-proof surface, as the machine may at some point leak water.
Electrical connection
- Make sure that the local main voltage supply corresponds to the information given on the type plate on the front panel of the espresso machine.
- Make sure that you use the correct power plug for your country.
- Plug the machine into a grounded socket only and do not leave it unattended.
- Do not roll or bend the power cord.
- Do not use an extension cord/do not use a multiple socket.
FIRST USE
Read the instruction manual carefully prior to operating the machine.
Prior to starting the machine, check if:
- the steam and hot water valves are closed.
- the machine is switched off. (Power switch in the vertical position.)
- the power cord is disconnected.
- the drip tray is inserted accurately.
- the machine is placed on a water-resistant surface.
Now you can start up your machine:
- Take down the cup warming tray. Take out the water tank and rinse it thoroughly.
- Fill the water tank with fresh water deficient in lime, place it back into the machine and put back the cup warming tray.
- Plug the machine into an electrical outlet.
- Turn the machine on by placing the metal switch in the upper position. The green control lamp and the PID display will come on and a pump noise will be heard. If there is still a pump noise, the filling of the steam/ hot water boiler is still being completed.
Fill mode
The PID-display indicates "FIL". Now position the brew lever upwards for at least 30 seconds at a time to fill the coffee boiler. The display indicates the time in seconds. Move the lever back into the lower position. The "FIL" display turns off.
- If the pump stops and the PID display turns off while the boilers are filled, you have to refill fresh water in the water tank. If there is enough water in the water tank again, the pump starts to operate again.
- As soon as both boilers are filled with water, the pump will become quiet. Both boilers are now being heated in succession whereby the coffee boiler has priority.
If the boiler temperature is below 40°C, the PID display will show "UP". Please continue reading under chapter "Preparation of the machine". If the boiler and steam temperatures are displayed alternately instead, wait until the target temperature has been reached and the system has heated through for a few minutes. The steam boiler is heated as soon as the boiler pressure is between 1 and 1.5 bar.
Manual boiler venting is not necessary because the PRO 600 contains a professional anti-vacuum valve, which automatically vents the boiler during the heat-up phase. This venting process is done by way of the brew group, directly into the drip tray.
Steam forms!
- Please consider that the procedure described in the steps above is the same if the steam/ hot water boiler is deactivated: also in this case the steam/ hot water boiler will be filled and the PID display indicates the temperature in the steam/ hot water boiler.
- The machine is now ready for use.
Before preparing the first coffee, please rinse the machine by extracting about 2-3 water tank fillings from the brew group and the hot water wand. When the machine is switched off, more hot water can be dispensed. See also chapter "Dispensing of hot water".
The PRO 600 has a fuse to prevent the machine from overfilling.
It is possible that the machine does not heat up when using it for the first time or when dispensing large amount of water through the hot water valve. In this case, please switch the machine off and on again.
Portafilter, drip tray and water tank are not suitable for the dish washer.
USE OF THE MACHINE
Preparation of the machine
The switched off machine is to be placed into operation as follows:
- Make sure that there is sufficient water in the water tank. Refill water if necessary.
- Turn on the on.
- If the boiler temperature is below 40°C when the machine is switched on, the display will show "UP" and the machine will start in Fast Heat Up mode.
- The heating period depends on the ambient temperature and is approx. 10 minutes. The indicator of the pump pressure gauge may move slightly during the heating-up phase.
- The machine is heated up as soon as the desired preset temperature appears on the PID display or the display shows FLU. While 'FLU' is shown on the display, the user should perform a flush until 'rdY/Go' is shown on the display. To do this, keep the portafilter clamped and place a tall cup under the portafilter spout.
- When the message 'rdY/Go' appears, the machine is ready to brew the first cup of coffee.
- If the user does not perform a flush within the one-minute period (step 4), the display will show the message 'FLU' alternating with the current temperature. In this case, the flush should be started and stopped based on visual characteristics.
- If the user does not perform a flush, the boiler temperature will cool down to the desired brewing temperature after a short time.
To use the steam function, set the steamboiler in the PID-display "ON".
It is recommended to leave the portafilter in the brew group, keeping it warm for optimum coffee extraction temperature.
As soon as you start a withdrawal while the machine is heating up ('UP' is shown in the display), the Fast Heat Up is interrupted; in this case, the brewing group needs a little longer to reach the desired temperature.
If you do not want to use the Fast Heat Up, you can set the function to 'off' under the FH entry by calling up the menu (hold down both buttons on the display).
- Now the machine is ready for use again.
Manual adjustment of the brewing pressure
You can individually adjust and change the brewing pressure by turning the adjusting screw, choosing a value between approx. 8.5 and 12 bar.
To adjust the brewing pressure, proceed as follows:
- Remove the drip tray.
- Place the portafilter with the blind filter (filter without holes) into the brew group.
- Operate the group lever and read pressure at the pump pressure gauge.
- Choose the desired brewing pressure by turning the adjusting screw with a coin or a flat screwdriver. You can reduce the brewing pressure by turning the screw anti-clockwise and increase it by turning it clockwise.
- You can read the programmed pump pressure on the pump pressure gauge.
- Replace the Drip tray. Now place the group lever back into the lower position to stop brewing. Unclamp the portafilter and replace the blind filter with a coffee filter.
- Now the machine is ready for use again.
PID-display functions
The following explains the different programming options of PID control.
Programming the temperature of both boilers
During normal operations, the temperatures of the coffee boiler (t1, period in the 1st position) and the steam boiler (t2, period in the 2nd position) are indicated alternately.
The controls are factory pre-set so that both boilers are heated consecutively, whereby the coffee boiler (t1) has priority. This means that the steam boiler (t2) is activated only after the programmed temperature of the coffee boiler has been reached.
Please take the following steps to program the temperature of both boilers:
- Switch the machine on in order to activate both boilers (switch in position "2"). The temperature of either boiler is of no importance in programming. Both heaters are inactive during programming.
- Press + and – at the same time until 't1' (coffee boiler) appears on the display,
![]()
- Press + in order to progress to the submenu of 't1' and to change the temperature value. The nominal temperature value is displayed.
![]()
- Quickly press
![]()
– to decrease
+ to increase
the nominal temperature value. - Please wait a short while after having set the nominal temperature value;
't1' will be displayed. - Press – in order to display 't2' (steam boiler).
If you would like to change just 't2' and leave 't1' unchanged, press – after step 2 in order to progress directly to 't2' and skip 't1'. Continue with step 7.
![]()
- Press + in order to progress to the submenu of 't2' and to change the temperature value. The nominal temperature value is displayed.
![]()
- Quickly press
![]()
– to decrease
+ to increase
the nominal temperature value. - Please wait a short while after having set the nominal temperature value; 't1' will be displayed.
- Please wait a short while after having set the nominal temperature value; The menu will be left automatically. The newly programmed nominal temperatures are now saved. Both heaters are now activated successively.
![]()


Switching ON/OFF the Steamboiler
- Turn on the machine (to turn on the PID display)
- Press + and – at the same time and "t1" (coffee boiler) will appear on the display.
![]()
- Press the – button until you reach "o2".
![]()
- Press + quickly and "On" or "Off" appears on the display This shows you the current status of the boiler.
![]()
- Now you can set the boiler on or off by pressing +.
- In order to leave the programming mode, wait a short time and the menu will be left automatically. The steam boiler setting has been saved. When the steam boiler has been switched off, the PID display shows only the coffee boiler temperature. When the steam boiler is switched on, the PID display shows the steam boiler temperature and the coffee boiler temperature alternately.


Programming the Temperature Mode "o"
You can also set whether the temperature values of t1 and t2 should be displayed in °C or °F.
To adjust this setting, proceed as follows:
- Press + and – at the same time and "t1" will appear on the display.
![]()
- Press the button – until "o" appears on the display.
Press + to enter the menu.
![]()
- Now you can choose between C for Celsius and F for Fahrenheit by pressing –. This will also set t2.
![]()
- Wait a short time and you will exit the menu automatically.


Programming the CLN group cleaning mode
With the PRO 600 you have the option to program a reminder for next the group cleaning at the PID display. The machine is set to 0 at the time of delivery, so no reminder is programmed yet.
Please take the following steps to program the cleaning reminder:
Press + and – at the same time and "t1" will appear on the display. Press the – button until you reach "CLn". Press + to enter the CLN menu.
Now you can carry out the programming in steps of 10 (0-200) by pressing + and –. In order to leave the programming mode, wait until "CLn" appears and then press the – button.

For example, if you have programmed 90, then you will be prompted with a "CLn" on the display to clean the brew group after 90 brewing cycles. Clean the brew group in such a manner that the brew group is flushed with at least 10 brewing cycles until the temperature indication reappears on the display (see "Brew group cleaning").
We recommend a cleaning of the brew group after about 90 to 140 brewing cycles. As a brew cycle only a brew over 15 seconds is counted.
Programming the ECO mode
The ECO mode gives you the opportunity to set an automatic switch off after a preset time.
The factory setting is 90 min. The Eco mode activates a countdown after the last brewing operation, which will be running in the background and switches the machine off after 90 minutes.
To reactivate the Machine, move the brew lever into the upper position and the Machine will heat-up again. You can also switch the main switch Off and On again.
To program the ECO Mode, proceed as follows:
- Switch on the machine.
- Press + and – at the same time and "t1" will appear on the display.
![]()
- Press the – button until you reach "Eco". Press + to enter the Eco menu.
![]()
- Now you can carry out the programming in steps of 30 min by pressing + and –. In order to leave the programming mode, wait a short time and the menu will be left automatically.
- After a short period, the setting will be adapted and saved.


Programming the Fast Heat Up Mode
Your machine is equipped with a fast heat-up function (Fast Heat UP), which ensures that the desired brewing temperature is reached within a few minutes. This function can be deactivated in the menu.
- Press + and – at the same time and "t1" will appear on the display.
![]()
- Use the "–" key to navigate through the menu. As soon as "FH" appears on the display, confirm with the "+" button.
![]()
- Now you can choose between "on" for activation and "oFF" for deactivation by pressing the "+" button.
![]()


Wait a short time and you will automatically exit the menu.
Turn off PID display feature
There is the option to turn the PID display off: Press the + button until the display turns off. A dot will appear on the display, which indicates that the machine is still turned on. The display will be turned on again by pressing the + button once more.
Preparing coffee
Use the portafilter with 1 spout and the corresponding filter (1 cup) for the preparation of 1 cup. Use the portafilter with 2 spouts and the big filter (2 cups) for the preparation of 2 cups. Make sure that the filter is firmly locked into the portafilter. Fill the finely ground coffee into the filter.
Fill the ground coffee with the respective grind for espresso into the filter. (The marking inside the filter basket can help you find the right amount of coffee.)
Compress the ground coffee with the tamper. A tamping pressure of approx. 20 kg is recommended. Thus the ground coffee is evenly compacted. Clamp the portafilter firmly into the brew group.
Place the cup under the spout of the portafilter (for the preparation of 2 cups, put 1 cup under each spout). Now move the brew lever into the upper position to start the brewing process. The timer on the PIDdisplay indicates the brewing time in seconds. In general, the brewing time should be around 20 to 25 seconds.
The volume for a single espresso is circa 20 to 30 ml. Place the brew lever back into the original position once the desired volume is reached.
The remaining pressure/water will be discharged into the drip tray by the lower part of the brew groupe cylinder.
If the group lever is not moved into the lower position properly, hot water and grounds will squirt out of the brew group while taking out the portafilter. This may cause injuries.
Only freshly ground coffee allows for an optimal coffee result. Therefore, use a professional coffee grinder. In our assortment you will find several professional and compact coffee grinders.
We recommend to use a stainless steel tamper with a diameter of 58 mm for optimum tamping.
Dispensing of hot water
- To dispense hot water the steam boiler has to be switched on. Set the steamboiler"ON" in the PID-display. Please wait until the desired steam temperature has been reached.
- Place a suitable vessel (with heat-insulated grip) underneath the hot water wand. Now you can dispense hot water (e.g. for tea). When dispensing large amounts of water, it is advisable to turn the machine off so that no cold water is pumped anymore.
- After having dispensed hot water, turn the machine back on. The boiler is automatically refilled with fresh water.
When the machine is switched off, more hot water can be dispensed.
However, one does not necessarily have to switch off the machine for dispensing hot water.
Risk of injury
Always keep the hot water nozzle underneath the surface of the water while heating in order to avoid splashing.
Dispensing of steam
The PRO 600 makes it possible to generate large amounts of steam in order to heat or froth beverages, e. g. milk or punch. It is a professional and compact espresso coffee machine with an enormous steam volume. Therefore, within a few seconds, you can prepare milk froth. Please pay attention to the instructions below. Do not bring the milk to a boil, otherwise frothing milk will not be possible.
- To dispense steam the steam boiler has to be switched on. Set the steamboiler "ON" in the PID-display. Please wait until the desired steam temperature has been reached.
![]()
In order to get the best results when frothing milk, open the steam valve for approx. 5. seconds to release the condensation water in the pipe. This also prevents milk from getting into the boiler.- Immerse the steam nozzle (at the end of the steam dispenser) into the liquid.
- Re-open the steam handle.
- Heat and/or froth the liquid.
- After frothing or heating, release some steam to keep the holes of the steam nozzle clean.
Risk of injury
Always keep the steam nozzle underneath the surface of the liquid while heating or frothing in order to avoid splashing.
Avoid skin contact with the steam dispenser while cleaning!

After every application, clean the steam nozzle and the steam dispenser with a nonabrasive, damp cloth; This removes possible liquid residues.
CLEANING AND MAINTENANCE
A regular and accurate care is very important for the performance, the longevity and the safety of your machine.
Always switch off the machine (power switch in lower position), disconnect the power cord and let the machine cool down to room temperature before cleaning.
General cleaning
Daily cleaning:
Portafilter, filters, water tank, drip tray, drip plate of the drip tray require daily cleaning. Clean with warm water and/or with a food safe detergent.
Portafilter, drip tray, drip grid and water tank are not suitable for the dish washer.
Clean the shower screen and the group gasket in the lower part of the group and remove visible dirt without dissasembling the parts.
Cleaning as necessary:
Clean the steam and hot water valve after every use.
Clean the body when the machine is switched off and cold.
Depending on usage, please refresh the steamboiler water every 1–2 weeks by hot water dispense.
Use a soft, damp cloth for cleaning.
Never use abrasive or chloric detergents!
Brew group cleaning and degreasing
A brew group cleaner (in powder or tablet form) is available at your specialised dealer. A cleaning should be done after about 90 - 140 times. The cleaning is carried out by using the blind filter included with delivery.
Follow the instructions as noted below:
- Heat up the machine. It is not necessary to switch on the steam boiler.
- Place the blind filter into the portafilter.
- Put a cleaner (in powder or tablet form) into the portafilter.
- Clamp the portafilter into the brew group.
- Operate the group lever for approx. 20 seconds. The blind filter will fill with water.
- Let the detergent react, moving the group lever into the middle position, approx. 45°. (Do not move it into the lower position.)
- Move the lever into the lower position after approx. half a minute. This way, the fats and oils can be discharged by the infusion cylinder.
- Repeat points 5-7 until only clear water is discharged by the infusion cylinder.
- Rinse the porta filter and the blind filter with fresh water. Then replace the blind filter with the filter for coffee.
- Operate the group lever for approx. 20-30 seconds. Then move it back into the lower position.
- Rinse the portafilter again and repeat point 10. After this, the brew group is ready for use.
- Exchange the blind filter for the coffee-filter
In case you programmed the cleaning mode, the"CLn" will disappear on the display after having operated the brew group lever 10 times. The counter will then restart until the next cleaning advice.
If you clean the brew group to often with cleaner, it may start squeaking. Don´t clean it to often with cleaner, you will degrease all the moving parts and they will wear out quickly. It´s better if you clean the brew group from time to time without cleaner.
Please find more information about how to program the group cleaning mode in chapter "Programming the Temperature Mode "o"".
Beware of hot water splashing while cleaning the group.
Empty the water drip tray regularly and do not wait until it is full in case the machine is not directly hooked up to a water drainage.
Maintenance
Replacing the group gasket and the shower screen
Switch off the machine, disconnect the power cord and let the machine cool down.
Follow the steps as indicated below:
- Brew group in the beginning, lower view.
![]()
- Use a flat screwdriver to pry out the shower screen and the group gasket.
![]()
- The shower screen and the gasket are now nearly removed.
![]()
- Remove the shower screen and the gasket completely.
![]()
- Keep the new spare parts ready at hand (the rounded side of the group gasket with ECM print faced upwards to the brewing group).
![]()
- Clean the group with a brush. Lock the shower screen firmly into the gasket.
![]()
- Insert the shower screen into the brew group.
![]()
- Take the portafilter without filter.
![]()
- Clamp the portafilter into the brew group.
![]()
- Then, move the portafilter until the shower screen is locked firmly into the gasket.
![]()
- Now you can easily lock the portafilter with filter into place.
![]()
- The group is ready for use.
![]()


The machine can be used again, as described in chapter "USE OF THE MACHINE" of the instruction manual.
The steam nozzle is blocked
Clean the holes of the steam nozzle carefully with a needle or with a paper clip.
For this purpose, the steam nozzle may be unscrewed as well.
Afterwards replace the steam nozzle.
TRANSPORT AND WAREHOUSING
Packing
The PRO 600 is delivered in a special carton and protected by a plastic cover and foam.
Keep packing out of the reach of children!
Keep packing and packing material for possibile transport! Do not throw it away!
Transport
- Transport the machine only upright, if possible on a pallet.
- Do not tilt or turn the machine over.
- Do not stack more than three units on top of each other.
- Do not place other heavy items on the packing.
- Do not expose the machine to inclement weather (frost, snow, rain)
Warehousing
- Keep the machine packed in a dry place.
- Do not stack more than three units on top of each other.
- Do not place other heavy items on the packing.
TROUBLESHOOTING
| Problem | Possible Cause | Troubleshooting |
| First use: The machine does not heat up. | The Fill Mode could not be carried out or could not be finished. | Make sure that there is enough water in the water tank |
| Position the brew lever upwards for at least 30 seconds at a time (see chapter "First Use") | ||
| The machine is switched on, but the machine does not work. | Water has been refilled; PID-display is off | Switch the machine off and on. Make sure that the floater in the water tank is in the correct position. The side of the floater with the magnet point must face towards the inside of the machine. The floater itself must be inserted with the magnet point on the upper part of the floater side. |
| PID-display is turned off: There is not enough water in the fresh water tank | Refill water. | |
| The water tank is not fixed properly. | Fix the water tank properly. | |
| Portafilter/brew group is dripping. | Portafilter is not fixed properly. | Fix the portafilter properly. |
| Group gasket is broken. | Change group gasket and shower screen. | |
| "CLn" is shown on the display. | The cleaning mode is programmed | Clean the brew group. After having operated the brew lever 10 times, the "CLn" will disappear. |
| There is a dot on the display. | The display is switched off. | Press + to turn it on. |
| No Steam | The Steamboiler ist switches off | Go in to the PID-Menu and set the steamboiler ON |
| The Machine is cold qickly | The Eco-Mode is ON | Turn the Eco-Mode in the PIDMenu OFF ore set the switch off countdown longer |
| Little or no crema on the top of the coffee | The grind is not fine enough | Use a finer grind. Tamp the ground coffee more firmly. Reduce the brewing pressure. |
| The coffee is too old. | Use fresh coffee | |
| The amount of ground coffee is not enough. | Use the right coffee amount: Approx. 7 g – 9 g of coffee for each cup. | |
| The shower screen is dirty. | Clean the brew group. | |
| Sparse coffee dispensing, only drop by drop | The grind is too fine. | Set a coarser grind. Tamp ground coffee only slightly. Increase the brewingpressure. |
| There is too much ground coffee. | Use approx. 7 g – 9 g of coffee for every cup. | |
| Weak "body" | The grind is not fine enough. | Set a finer grind.. |
| The coffee is old. | Use fresh coffee. | |
| The amount of ground coffee is not enough. | Use approx. 7 g – 9 g of coffee for each cup. | |
| The shower screen is dirty. | Clean the shower screen. | |
| Foam instead of crema | The beans are improper. | Use another type of coffee bean. |
| The setting of the coffee grinder is not suited for the coffee beans in use. | Adjust the coffee grinder (When changing the coffee beans, changing the grind may also be necessary.) |
If the machine will not to be used for a long period of time, it is recommended to
- clean the brew group (see instructions in chapter "Brew group cleaning and degreasing"). Afterwards, please do not clamp the portafilter back into the group.
- to empty the steam boiler. Turn the switch of the operational machine to position off. Open the hot water valve and the boiler water is now discharged by the remaining pressure through the hot water release. Close the hot water valve after the water has been released. The coffee boiler is emptied out via the brew group. Activate the brew group lever and release the water into the drip tray. Please make sure some water remains in the coffee boiler. Start-up of the machine is the same as initial startup.
How to froth
- If possible, use cold, fresh milk with a fat content of approx. 1.5% or 3%. Even homogenized milk is suitable - if you prefer.
- Use a pitcher (made of metal) with a minimum volume of 0.5 litres. The diameter of the pitcher should not be too wide. A narrow and high container is perfect.
- Open the steam valve for approx. 5 seconds to release the condensation water and to create dry steam.
- Fill 1/3 of the frothing container with milk and place it under the steam nozzle. The nozzle should be immersed in the middle of the frothing container, just below the surface.
- Slowly open the steam handle or the steam valve. Steam pervades the milk.
- Keep the pitcher still.
- After a few seconds you will notice a light suction in the milk jug. Proper frothing begins. Move the milk jug downwards while the milk level increases. The steam nozzle must be kept under the surface of the frothed milk.
- After frothing the milk, release the steam into the drip tray to avoid blockage of the steam nozzle.
![caution]() Attention: When the desired amount of milk froth is reached, immerse the entire steam nozzle in the frothing container for a short time and close the steam lever or the steam valve.
Attention: When the desired amount of milk froth is reached, immerse the entire steam nozzle in the frothing container for a short time and close the steam lever or the steam valve.- Advice: When milk frothing is finished, just shake the frothing container a little bit in order to make the milk bubbles ascend to the surface and to get a compact milk froth.
- If you haven´t used up all the milk, you can froth the remaining milk in the pitcher afterwards.
 Attention: When the desired amount of milk froth is reached, immerse the entire steam nozzle in the frothing container for a short time and close the steam lever or the steam valve.
 Milk proteins "froth" with a temperature up to 77°C.
Once this temperature is exceeded, the milk does not froth any further.
In addition to the standard built-in 2-hole steam nozzle, there is a 4-hole steam nozzle in the Profitec product range which are available at your specialised dealer.
GENERAL ADVICE
General safety notes
- Make sure that the local main supply voltage corresponds to the information given on the type plate on the front panel of the espresso machine.
- The installation of the machine should be carried out by authorised specialists according to the instructions in chapter "MACHINE INSTALLATION".
- Plug the machine into a grounded socket only and do not leave it unattended.
- Make sure the machine is disconnected from the power supply during service and when replacing parts.
- Do not roll or bend the power cord.
- If the supply cord is damaged, it must be replaced by a service agent or similarly qualified persons, in order to avoid a hazard.
- Do not use an extension cord/ do not use a multiple socket.
- Place the machine on an even and stable surface. Only use the machine on a waterresistant surface.
- Never place the machine on hot surfaces.
- Never submerse the machine in water; do not operate the machine with wet hands.
- Make sure that no liquid gets on the power plug of the machine or on the socket.
- Do not turn the steam nozzle or hot water outlet upwards in an angle exceeding 45° degrees from the vertical downward position.
- Do not open the steam- or hotwateroutlet if it is not facing down within an angle of 45°.
- Make sure, that the nozzle is not facing towards heat- or watersensitive objects and surfaces, even if there is no steam or hotwater drawn from the machine.
- Beware to avoid electrical aplliances which do not feature the matching protection class (IP65) in proximity to your espresso coffee machine, in particular above your espresso coffee machine.
- The machine should only be used by experienced adult persons.
- The machine is not intended for use by persons (including children) with reduced physical, sensory or mental capabilities, or lack of experience and knowledge, unless they have been given supervision or instruction concerning use of the appliance by a person responsible for their safety.
- Children should be supervised to ensure that they do not play with the appliance.
- Do not expose the machine to inclement weather (frost, snow, rain) and do not use it outdoors.
- Keep the packing out of reach of children.
- Only use original spare parts.
- Water tank machines or machines in water tank use: Do not operate the machine with carbonated water, but with soft, potable water.
- Do not operate the machine without water.
- Please note that the surface of the machine, in particular the brew group and the steam wand, become hot during operation and there is a risk of injury.
If you have any further questions or if you require any further information, please contact your specialised dealer before starting up the espresso coffee machine.
Our machines comply with the relevant safety regulations.
Any repairs or changes of single components must be carried out by an authorised specialty dealer. In case of non-observance, the manufacturer does not assume liability and is not liable for recourse.
Ask for authorised service points outside of Europe. If the supply cord is damaged, it must be replaced by a service agent or similarly qualified persons, in order to avoid a hazard.
You should use water with a hardness of max. 4° dH in order to protect your machine from lime scale damage. When necessary, make use of a water softener in order to reach an adequate hardness level.
Contact your specialised dealer before undertaking this measure.
An already calcified machine may only be descaled by your specialised dealer because a partial disassembly of the boiler and the tubing will be necessary to prevent the system from being blocked by lime residues.
A late descaling can cause substantial damage to the machine.
Proper use
The PRO 600 has to be used for the preparation of coffee, hot water and steam only.
Use of the machine other than for the above-mentioned purpose is prohibited. The manufacturer cannot be held responsible for damages due to unsuitable use of the machine and is not liable for recourse.
Commercial use
This machine is intended to be used by experts or trained users in shops, light industry and on farms.
There is a risk of injury if the steam or hot water wand is positioned incorrectly!

PROFITEC GmbH
Industriestraße 57 - 61
69245 Bammental/Heidelberg
Deutschland/Germany
Tel.: +49 (0) 6223 9205-0
E-Mail: info@profitec-espresso.com
Internet: www.profitec-espresso.com
Documents / Resources
References
Download manual
Here you can download full pdf version of manual, it may contain additional safety instructions, warranty information, FCC rules, etc.
Advertisement


Need help?
Do you have a question about the PRO 600 and is the answer not in the manual?
Questions and answers