Advertisement
Instructions Manual
- Turn on the vehicle ignition;
- Locate the vehicle's 16-pin Data Link Connector (DLC);
- Connect the device to the vehicle's 16-pin Data Link Connector, do not use USB to power devices;
- Start using your device.
Product Descriptions
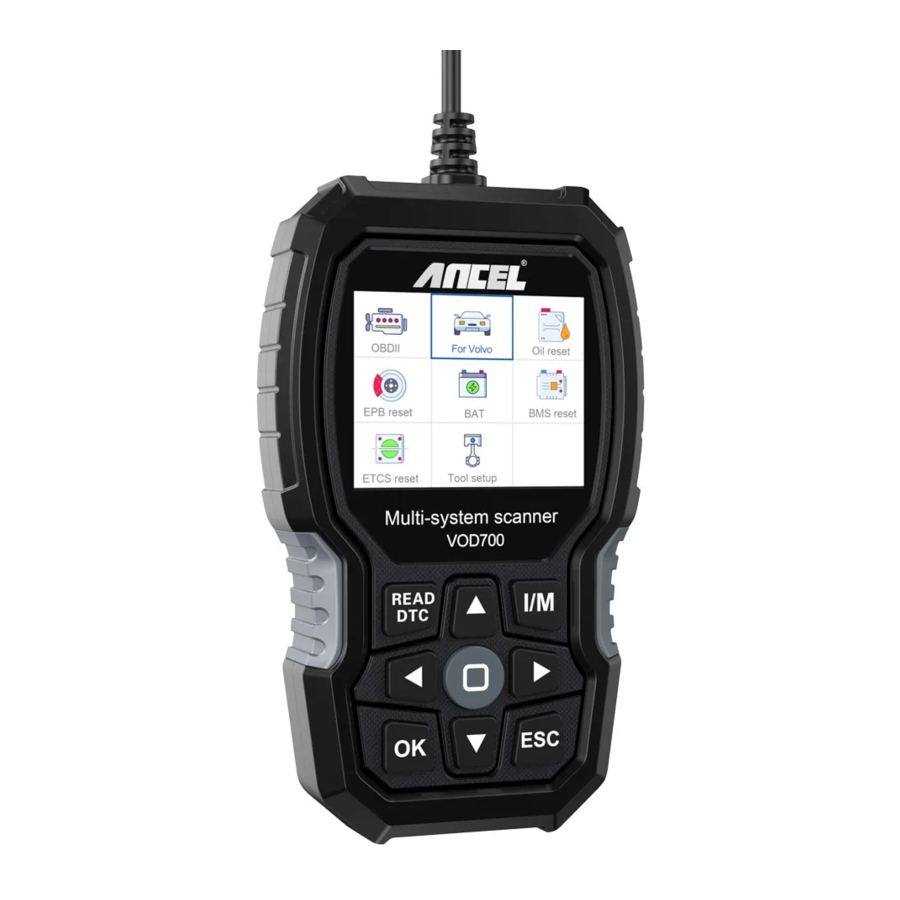
ANCEL VOD700 is a professional diagnostic tool for Volvo vehicles. It is convenient to carry, connect and use, one-button operation, and supports vehicle systems: engine, brake, airbag, automatic transmission, instrumentation and other control systems.
It supports the following protocols and vehicles:
Supports the protocols: KWP,CAN,UDS.
Supports all OBDII/EOBD protocols: VPW, PWM, SO, KWP 2000 and CAN.
850 (1992-1997)
960 (1991-1997)
C30 (2007-2013)
C70 Conv (1998-2005)
C70 Coupe(1998-2002)
C70 (2006-2013)
S40 (1996-2012)
S60 (2001--2019)
S60L (2019.)
S70 (1997-200)
S80 (1999-2016)
S90 (1997-1998)
S90 (2017-2019)
S90L (2018-2019)
V40 (1996-2004)
V40 (2013-2018)
V50 (2004-2012)
V60 (2011-2019)
V60 (2019-)
V70 XC (1997-2000)
V70 XC/XC70 (1997-2007)
V70 XC/XC70 (2001-2007)
V70 (1997-2016)
V90 Cross Country (2017-2019)
V90 (1997-1998)
V90 (2017-2019)
XC40(2018-2019)
XC60(2009-2019)
XC70(2008-2016)
XC90(2003-2019)
Product specification
2.8'LCD,320 X 240 pixels color screen.
Operating Voltage: 8V-18V.
Operating Temperature: 0°C-60°C(32-140°F)
Storage Temperature: -20°C-70°C(-4-158°F)
Description of appearance and buttons

- LCD DISPLAY - Displays test results. Display with backlight, 320 x 240 pixels
- [OK] BUTTON - Confirms a selection (or action)froma menu.
- [ESC] BUTTON - Cancels a selection (or action) from a menu or returns to the menu.
- [LEFT] SCROLL BUTTON- move left through menu and submenu in menu mode, when scrolling in a data interface the left key can be used to move to the last screen.
- [RIGHT]SCROLL BUTTON - in menumodemovethrough the menu and submenu items to the right, when scrolling in a data interface the right key can be used to move to the next screen.
- [UP] SCROLL BUTTON - in menu mode, move up through the menu and submenu items. When retrieving data for more than one screen, by moving the screen up to the previous screen for more data.
- [DOWN] SCROLL BUTTON - inmenumode, usingthe menu and submenu items to move down. If retrieving data for more than one screen, move down the screen to the next screen for more data.
- OBD-16PlN CONNECTOR - Connects the scan tool to the vehicle's Data Link Connector (DLC)
- [I/M] BUTTON - Quick State Emissions Readiness Check and Drive Cycle Check.


Remarks:
MIL Yellow- Dashboard MIL ON
MIL Gray Dashboard MIL OFF
 -not support
 -complete
 -not complete
- [READ DTC] BUTTON - Quick readout of the vehicle's fault code.
Diagnosis
Job Menu
| OBDII | This option provides a quick way to check the codes of the engine light. |
| For Volvo | Professional diagnostic tool for Volvo. |
| Reset Oil | Hotkey: after changing the oil, you need to reset the oil indicator. |
| Reset EPB | Hotkey: Electronic brakes must perform this action, but conventional mechanical brakes do not. |
| BAT | Measures the current voltage of the vehicle's battery. |
| BMS reset | Hotkey: Replace the battery and battery registration. |
| ETC reset | Hotkey: after changing the oil, you need to reset the oil indicator. |
| Tool setup | To make some settings, including language, beeper, instructions, etc. |
Identify the Vehicle for Volvo

Press the OK [For Volvo] button, then select [Identify the Vehicle]. As above:

Press [Identify the Vehicle], the screen will be displayed as above:

Press [System Scan], the screen will be displayed as above:
NOTE: with [System Scan], you can check faulty systems and display the number of errors.
With [Manual Selection], you can scan all supported systems.
System Scan
Select [System Scan], select [ECM (Engine Control Module)], the screen is displayed as follows:

- Select [version information]. The screen is displayed as follows:

- Select [Read Fault Codes]. The screen is displayed as follows:

- Select [Erase fault codes], and then press the [OK] button. The screen is displayed as follows:

- Select [Read Datastream], then press the [OK] button. The screen is displayed as follows:


Select [View All Items], and then press the [OK] button. The screen is displayed as above:

Select [Select Items], and then press the [OK] button. The screen is displayed as above:
Manual Selection for Volvo
- Select [Manual Select], the screen will display all supported systems, and then select a system to test.
Select the year of your vehicle and press OK to enter the menu.


In this interface, there are [System Scan], [Manual Selection] and [Special Functions]. System Scan allows you to perform a system scan for your vehicle. With the manual selection, you can select the system to be scanned yourself. Under [Special functions], you can find out which special functions the productsupports for your vehicle.

Special Functions for Volvo
Special functions include oil reset, BMS reset, EPB reset, and ETC reset. Using the examples of oil reset and ETC reset, we will describe the operation of the special functions in detail.

Reset Oil
Select [Oil Reset] function step by step and will be displayed as follows:


Reset ETC
Select [ETC reset] function step by step and will be displayed as follow:
To perform the throttle matching function, the following conditions must be met:
Please turn the ignition ON with the engine OFF.
Make sure there are NO fault codes in the engine control unit.
Turn off all electrical loads.
The temperature of the coolant must be above 85°C
The accelerator pedal must not be depressed.


Press [Adaptation Of The Throttle Unit] and it displays as above:
OBDII System
Read Codes
Select [OBDII] and select [Read Codes], it will be displayed as follows:


Erase Codes

Select [OBDII] and select [Erase Codes], it will be displayed as above:
A warning message comes up asking for your confirmation.


I/M Readiness

Select [OBDII] and select [I/M Readiness], it will be displayed as above:
Data Stream

Select [OBDII] and select [Data Stream], it will be displayed as above:
EVAP System Test
Select [OBDII] and select [EVAP System Test], it will be displayed as follows:


Vehicle Information

Select [OBDII] and select [Vehicle Information], it will be displayed as above:
BAT Check

This function allows you to read the battery voltage in real time. From the main menu, use the navigation button LEFT/RIGHT to select the menu BAT and press the button OK. The screen will display the interface shown above:

Please turn off the engine.
When you press the [OK] button and start the detection, the interface is displayed:

Tool setup
Language

Select the [Language] and it will be displayed as follows: Supports only the multilingual "menu interface"
Beeper

Select [Beeper] and it will be displayed as above:
Instructions(DispIay at start up)

Select [Instructions (Display at start up)] and it will be displayed as above:
Unit of Measure

Select [Unit of Measure] and it will be displayed as above:
Skin style

Select [Skin Style] and it will be displayed as above:
Feedback of the test result
- If the device indicates a connection error with the vehicle or any other problem during use, please use the feedback function. Select [Feedback the test result] and it will be displayed as follows:


For example: Register battery change enter [Register battery change], and execute register battery change again (This step is very important).
Note: keep the unit connected to the vehicle during the above steps.
- After you have registered the battery change, disconnect the device from the vehicle.
- Transfer the data to your computer and create a feedback file. (You will need to download the upgrade file from the ANCEL website to your computer).

The device is connected to the computer via a USB cable.

Select the file "Update" and it will be displayed as above:

Click on "Feedback" and it will be displayed as above:
Please send the feedback.bin file to support@anceltech.com
Device Information

Select [Device Information] and it will be displayed as above:
Update
- Download the update software and unzip the file.
- Connect the device to the computer via USB cable.
- The update software is only supported by 7/8/10. In Windows 7, you need to install the driver, in Windows 8/10, you can run the update software directly.
Note:
Windows XP and Apple computers do not support upgrades.
If you do not understand the upgrade steps in the instructions, please contact ANCEL customer service.
Safety Precautions and Warnings
To avoid injury or damage to the vehicle and/or scan tool, first read this manual and observe the following safety precautions when working on a vehicle:
- First, turn off the ignition. Connect the 16-pin connector, and then turn on the ignition.
- Always perform vehicle tests in a safe environment.
- Do not attempt to operate or observe the device while driving a vehicle.
- Operating or observing the device distracts the driver and may result in a fatal accident.
- Wear safety glasses that meet the standards of ANSI.
- Keep clothing, hair, hands, tools, test equipment, etc. away from all moving or hot engine parts.
- Operate the vehicle in a well-ventilated area: exhaust fumes are toxic.
- Place blocks in front of the drive wheels and never leave the vehicle unattended while performing tests.
- Use extreme caution when working near the ignition coil, distributor cap, ignition wires and spark plugs. These components generate dangerous voltages when the engine is running.
- Keep a fire extinguisher nearby that is suitable for gasoline, chemical, and electrical fires.
- Keep the scan tool dry, clean, and free of oil/water or grease. If necessary, use a mild detergent on a clean cloth to clean the outside of the scan tool.
Documents / ResourcesDownload manual
Here you can download full pdf version of manual, it may contain additional safety instructions, warranty information, FCC rules, etc.
Advertisement


Need help?
Do you have a question about the VOD700 and is the answer not in the manual?
Questions and answers