Table of Contents
Advertisement
Advertisement
Table of Contents

Related Manuals for ANCEL X6


Summary of Contents for ANCEL X6
-
Page 2: Table Of Contents
1.4.1 Inspection Precautions ............. 3 2 Product description ................6 2.1 Product Overview ................ 6 2.2 Ancel X6 VCI box structure description ........7 2.3 Ancel X7 VCI box structure description ........9 Product menu introduction ..............11 3.1 Diagnosis ..................12 3.2 Special function ................. - Page 3 4.2 Data download and product connection ........29 4.3 Vehicle diagnosis ............... 33 5 Software upgrade ................34 6 Cleaning and maintenance and warranty ........36 6.1 Cleaning and maintenance ............36 6.2 Warranty ..................37...
-
Page 4: Statement
1 Statement You must carefully read the instruction manual, especially the safety instructions, before you can connect, commission and operate the products of OBDSPACE TECHNOLOGY CO., LTD., Ltd. (hereinafter referred to as “OBDSPACE”). 1.1 Agreement Once the product is used, it is an endorsement of the following: (1) Please refer to the packing list of the random distribution for the configuration equipment of this product, whichever is the actual product;... -
Page 5: Disclaimer
1.3 Disclaimer (1) This manual only provides the operation and operation methods for Ancel X6/X7. The company does not assume any responsibility for the consequences caused by using the operation methods for other equipment operations. (2) The company shall not accept any responsibility for accidents... -
Page 6: Inspection Precautions
1.4.1 Inspection Precautions (1) Ancel X6/X7 can only be connected to a safety outlet that is grounded. Before connecting, check and confirm that the diagnostic circuit is in good condition. Otherwise, it is not necessary to test to avoid damage to the main unit. If necessary, use a multimeter to measure the diagnostic seat voltage. - Page 7 with high temperature components such as the water tank and the exhaust pipe. At the same time, be careful of the voltage generated by the components such as the ignition coil, the distributor cover, the ignition circuit and the ignition plug during engine operation. 1.4.2 Notes on the use of the instrument (1) This instrument is a precision electronic instrument.
- Page 8 a computer control system, the following should be noted: (1) Do not place magnetic objects such as radio speakers close to the computer, as the magnetic properties of the speakers can damage the circuits and components in the ECU. (2) When the ignition switch is turned on, the internal electrical equipment of the car must not be disconnected.
-
Page 9: Product Description
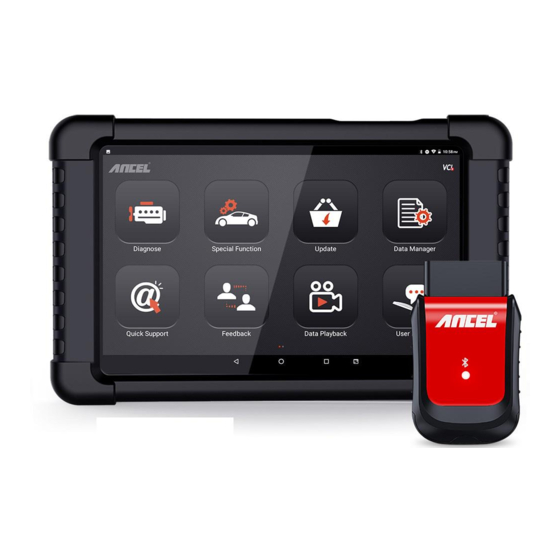
2 Product description 2.1 Product Overview Ancel X6/X7 Android-based multifunctional diagnostic tool with 8 inch Android tablet developed by OBDSPACE. It has an extensive vehicle coverage for over 70 car makers from America, Asia, Europe, Australia and China to meet your basic vehicle diagnostic... -
Page 10: Ancel X6 Vci Box Structure Description
2.2 Ancel X6 VCI box structure description Name Description Power and Lights on red when powered(connected to connection the car) ① Indicator Lights on blue when the buletoot connected Lights flashing when the the communication in process ② Certification CE, FCC,RoHS certification... - Page 11 VCI Box Parameters Processor ARM 32-bit Cortex processor Input Voltage DC 8-16V -10 to 70℃ ( 14-158℉ ) , relative Operating Temperature Humidity:<90% -30 to 120℃ ( -22-248℉ ) , relative Storage Temperature Humidity:<90% Communication model Bluetooth 9141, ISO14230, ISO15765, ISO11898, SAE-J1850 VPW, SAE-1850 Protocols PWM, UDS, K/L lines, High speed CAN,...
-
Page 12: Ancel X7 Vci Box Structure Description
2.3 Ancel X7 VCI box structure description 2.3-1 VCI Front Name Description Power Indicator Lights up when powered(connected ① to the car) Vehicle ② communication Vehicle communication data indicator ③ Bluetooth indicator Lights up when connected to tablet ④ USB indicator... - Page 13 2.3-2 VCI Left Name Description Used for wired communication with ⑤ USB interface tablets ⑥ DC interface Power supply 2.3-3 VCI Right Name Description...
-
Page 14: Product Menu Introduction
Connect to the main testing line, ⑦ DB15 interface connect to the vehicle through the diagnostic connector VCI Box Parameters Processor ARM 32-bit Cortex processor Input Voltage DC 8-16V -10 to 70℃ ( 14-158℉ ) , relative Operating Temperature Humidity:<90% -30 to 120℃... -
Page 15: Diagnosis
3.1 Diagnosis Vehicle diagnosis, different car systems, systems, etc., based on the actual display menu. -
Page 17: Special Function
3.2 Special function Including ABS BLEEDING, BATTERY, DPF ,EPB, IMMOKEYS, INJECTOR, OILRESET, SAS, THROTTLE, TPMS, etc. 3.3 Update After logging in, you can view the model/system data. • Support WIFI automatic upgrade and one-click upgrade, easy to... - Page 18 operate • Provides version information, software release time, and software upgrades, so users can quickly learn about updates.
-
Page 19: Data Manager
3.4 Data Manager The storage location of vehicle applications, test pictures, videos, reports and for user reference. -
Page 20: Quick Support
3.5 Quick Support The function allows OBDSPACE technical staff to connect to your host through the network remotely to help you diagnose the vehicle. -
Page 21: Dtc Query
3.6 DTC Query The fault information corresponding to the fault code can be quickly retrieved to help the repairer locate the component fault. -
Page 22: Feedback
3.7 Feedback This function allows you upload vehicle diagnostics problems encountered by users during the use of the software. It can help engineers repair software errors. -
Page 23: Data Playback
3.8 Data Playback Users can play back data and quickly analyze the communication data between the vehicle and the diagnostic tool to find out the problem. -
Page 24: Dictionary
3.9 Dictionary Support online search for words. Use a third-party tool to provide a dictionary query. -
Page 25: User Manual
3.10 User Manual Users can view the different systems and corresponding functions supported by the data packet. -
Page 26: Settings
3.11 Settings View or set the operating mode, unit, search engine, VCI information, OS version, about us, etc. • Language: The product supports multiple languages, please set it according to the language supported by the model you purchased. • Run mode: Diagnostic mode or Demo mode. In demo mode, you can view the test flow and display page of the model without connecting the vehicle. - Page 27 • Search engine: Set the search engine, you can choose BAIDU or GOOGLE. • VCI Info: You can view VCI related information. • OS version: You can check the current software version and manually check if there is a new version. The software itself can automatically prompt for updates.
-
Page 28: User
3.12 User You can edit and save company, address, mobile number, fuel tank, fax and other information. -
Page 29: Vehicle Diagnosis
4 Vehicle Diagnosis 4.1 First login activation (1) Press and hold the power switch to start the host. Click the software icon. (2) Click the 【Update】button. - Page 30 (3) Enter the account number and password on the password envelope, click 【Login】, and a prompt box will pop up. (4) Click 【Yes】 to fill in the activation information.
- Page 31 (5) After the information is filled out, click 【ACTIVATION】.
-
Page 32: Data Download And Product Connection
(6) Log in to the mailbox where you just filled in the activation information and click the activation link to complete the activation. 4.2 Data download and product connection 4.2.1 Download data (1) Click 【App Store】 on the main screen of the software and log... - Page 33 (2) After checking the check box before the data, click the Download icon to download the vehicle type data for the vehicle to be diagnosed.
- Page 34 Note: • Diagnostic vehicles must download [Common Data] and other vehicle model data required; • Click the 【 】 button after the data to view its data coverage and download instructions. 4.2.2 VCI and vehicle connection Connect the VCI box to the vehicle to be diagnosed through the main test leads and diagnostic connector.
- Page 35 flashing. 4.2.3 Tablet and VCI Bluetooth connection Software support Bluetooth automatic matching and connection. It will take you several seconds to wait for Bluetooth automatic matching. Or you can connect by following steps: (1) Turn on the tablet Bluetooth.
-
Page 36: Vehicle Diagnosis
(2) Wait a moment, you can search for the ID of the VCI box connected to the vehicle. Click to pair. (3) After the pairing is successful, the Bluetooth indicator of the VCI device is steadily displaying blue.The VCI icon at the top of the screen is switched on green. -
Page 37: Software Upgrade
vehicle brands and systems. 5 Software upgrade The system will automatically prompt for updates, or you can manually detect updates by: (1) Click the 【Settings】 button from the main screen of the software. - Page 38 (2) Click【OS version】-【Check update】.
-
Page 39: Cleaning And Maintenance And Warranty
(3) If there is a new version, download and then install it. 6 Cleaning and maintenance and warranty 6.1 Cleaning and maintenance (1) Do not disassemble it, try to handle it gently to avoid impact. Place fault diagnosis device flat, dry, temperature-friendly dust-free... -
Page 40: Warranty
temperature and humidity, excessive smoke, easy vibration, direct sunlight, and strong magnetic field storage environment. (3) If the vehicle test operation is not performed for a long time, please run the main machine regularly to avoid moisture. (4) Unplug the power plug when not in use to avoid aging of electrical components caused by long-term power. - Page 41 from OBDSPACE . (1) Product acceptance When you receive the product, please be sure to open the package check. Please carefully check the product category and quantity according to the attached list. If there are any shortages, errors, damages and other unpredictable abnormal conditions, please keep all the documents of the product and notify us immediately.
- Page 42 A. Failures, defects or flaws not directly related to the quality of the OBDSPACE products, including but not limited to failing to use the product according to the user manual’s instructions, crash, fall, disassemble by anyone other than a OBDSPACE approved service person, connecting improper accessories, damage owing to impact because of improper transport or storage of the product, etc.
- Page 43 name, model number, serial number and purchase date of the product should be clearly stated on the invoice. It is covered with the official seal of the dealer. (6) Over-warranty product maintenance regulations If the product needs to be repaired by our company after the maintenance period, we will charge the maintenance fee appropriately, and the freight will be borne by the user.
Need help?
Do you have a question about the X6 and is the answer not in the manual?
Questions and answers
Как перевести программу на Русский
The ANCEL X6 supports multiple languages, including Russian. To change the language to Russian, follow these general steps:
1. Turn on the device by pressing and holding the power switch.
2. Open the software by clicking the software icon.
3. Navigate to the system settings or language settings menu.
4. Select "Russian" from the list of available languages.
5. Confirm the selection if prompted.
The interface should now display in Russian.
This answer is automatically generated
Здравствуйте, сканер не перестал видеть карту памяти, после того как потребовались обновления, что делать, лицензия закончилась