Advertisement
Quick Links
AD410
Safety Precautions and Warnings
To avoid injury or damage to the vehicle and/or scan tool, first read this manual
and observe the following safety precautions when working on a vehicle:
First, turn off the ignition. Connect the 16-pin connector, and then turn on the
ignition.
Always perform vehicle tests in a safe environment.
Do not attempt to operate or observe the unit while driving a vehicle.
Operating or observing the device distracts to the driver and may result in a
fatal accident.
Wear safety glasses that meet the standards of ANSI.
Keep clothing, hair, hands, tools, test equipment, etc. away from all moving or
hot engine parts.
Operate the vehicle in a well-ventilated area: Exhaust fumes are toxic.
Place blocks in front of the drive wheels and never leave the vehicle
unattended while performing tests.
Use extreme caution when working near the ignition coil, distributor cap,
ignition wires and spark plugs. These components generate dangerous
voltages when the engine is running.
Keep a fire extinguisher nearby that is suitable for gasoline, chemical, and
electrical fires.
Keep the scan tool dry, clean, and free of oil/water or grease. If necessary,
use a mild detergent on a clean cloth to clean the outside of the scan tool.
Advertisement

Related Manuals for ANCEL AD410


Summary of Contents for ANCEL AD410
- Page 1 AD410 Safety Precautions and Warnings To avoid injury or damage to the vehicle and/or scan tool, first read this manual and observe the following safety precautions when working on a vehicle: First, turn off the ignition. Connect the 16-pin connector, and then turn on the ...
- Page 2 2. General Information 2.1 On-Board Diagnostics (OBD) II The first generation of on-board diagnostics (called OBD I) was developed by the California Air Resources Board (CARB) and introduced in 1988 to monitor some components of vehicle emission control. With the advancement of technology and the desire to improve the on-board diagnostic system, a new generation of on-board diagnostic system was developed.
- Page 3 Figure 1-2: Explanation of a diagnostic trouble code. 2.3 Location of the Data Link Connector (DLC) The DLC (Data Link Connector or Diagnostic Link Connector) is the standardized 16-pin connector used to connect diagnostic tools to the vehicle's on-board computer. The DLC is typically located 12 inches from the center of the instrument panel (dashboard), under or on the driver's side of most vehicles.
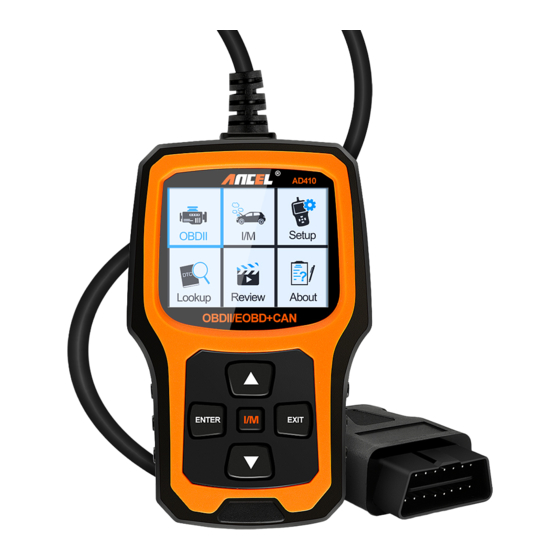
- Page 4 Figure 1-3: The DLC connector (left) is located in the area of the vehicle interior you see on the right (black arrow). 3. Using the Scan Tool 3.1 Tool Description - ANCEL AD410 1. LCD DISPLAY - Displays test results. 2.4" TFT 262K true color,320*240 QVGA LCD display.
- Page 5 4. UP SCROLL BUTTON -Scroll up an item by item menu. 5. DOWN SCROLL BUTTON -Scroll down an item-by-item menu. 6 . "I/M"BUTTON - Quick State Emissions Readiness Check and Drive Cycle Check. Comments: MIL Yellow- Dashboard MIL ON MIL Grey-Dashboard MIL OFF -no support -complete -not complete 7.
- Page 6 To query the error code, press enter + up, cursor to the left; press enter + down, the cursor to the right. For manufacturer specific codes, you must select a vehicle make in an additional screen to search for DTC definitions. If no definition is found (SAE or manufacturer specific), the scan tool will display "DTC definition not found!".
- Page 7 3.7 Reviewing and printing diagnostic reports 1. Download the upgrade file from the ANCEL website. 2. the device is connected to the computer via a USB cable. . 3. open the "Update" application. 4. Click " Review & Print " and automatically generate diagnostic reports.
- Page 8 3.8 About Select [About] and the following is displayed: 3.9 I/M Select [I/M] and the following is displayed:...
- Page 9 4. OBD II Diagnostics CAUTION: Do not connect or disconnect test equipment while the ignitionis on or the engine is running. 1) Turn off the ignition. 2) Locate the vehicle's 16-pin Data Link Connector (DLC). 3) Plug the scan tool cable connector into the vehicle's DLC. 4) Turn on the ignition.
- Page 10 2) According to the above figure, select another item by pressing UP or DOWN and press ENTER to confirm. 3) After viewing all codes, you can press EXIT to return to the previous menu. 4.2 Delete Codes 1) Select [Delete Codes], the screen will display the interface shown below.
- Page 11 2) Press ENTER according to the figure above. The screen will display the interface shown on the next page: Notes: Before performing this function, be sure to retrieve and record the error codes. After clearing, retrieve the error codes again or turn on the ignition and retrieve the codes again.
- Page 12 I/M readiness is to test misfire/fuel system/comprehensive component, you can use UP or DOWN to select and press ENTER as follows: N/A means not available for this vehicle, INC means incomplete or not ready, OK means completed or monitor is ready. 4.4 Data stream Press the UP or DOWN key to select Data Stream from the main menu, then press ENTER to confirm.
- Page 13 Select [Show all items ] and press the ENTER key. The screen displays the interface shown below: Scroll the page, press up to the last page or down to the next page. Select one and press [ ENTER ] to view the details. Select [ Select item ] and press Enter.
- Page 14 Scroll, press up to go to the last page, or press down to go to the next page. If you want to know the meaning of the abbreviation data, you can press the ENTER key. The screen will display the interface shown below. Select [Show Graphical Elements] from the Data Stream menu and press ENTER.
- Page 15 Scroll, press enter + up, to previous page, press enter + down, to next page. Press enter again to select. Press EXIT to return to the display: Maximum number of lines is 3. Press EXIT to return to the previous menu. You can view all elements of the data stream or select a specific element of the live data with a graph.
- Page 16 OBD II regulations established by SAE require that applicable vehicles monitor and test oxygen (O2) sensors to detect problems related to fuel efficiency and vehicle emissions. These tests are not demand tests and are performed automatically when engine operating conditions are within specified limits. These test results are stored in the on-board computer memory.
- Page 17 You can use the UP or DOWN keys to select an item and press ENTER. The screen will then be displayed as shown below (the data is different each time): Press EXIT to return to the diagnostics menu. 4.8 EVAP System Test The EVAP function allows you to initiate a leak test for the vehicle's EVAP system.
- Page 18 Windows 8/10, you can run the update software directly. Note: Windows XP and Apple computers do not support upgrades. If you do not understand the upgrade steps in the instructions, please contact ANCEL customer service. 6. Feedback...
- Page 19 Select the [OBDII] menu to restart the detection and record the data. Transfer the data to your computer and generate the feedback file. Download the upgrade file from the ANCEL website to your computer. The device is connected to the computer via a USB cable.
- Page 20 Click on "Feedback" and the following will be displayed: 7.Warranty 1) This warranty is limited to the person who purchases ANCEL products. 2) ANCEL products are warranted against defects in materials and workmanship for a period of one year (12 months) from the date of shipment to the user.
- Page 21 E-mail: support@anceltech.com Website: www.anceltech.com...
Need help?
Do you have a question about the AD410 and is the answer not in the manual?
Questions and answers
Does the ad410 need to be fully charged the first time in use?
why is my MIL off?
The MIL (Malfunction Indicator Light) on your ANCEL AD410 is off because the scan tool indicates that there are no active fault codes in the vehicle's system. According to the manual, when the MIL status is shown as gray on the dashboard, it means the MIL is off, indicating no detected issues.
This answer is automatically generated