Advertisement
Available languages
Available languages
Quick Links
* KEEP THIS MANUAL
FOR FUTURE REFERENCE.
USER MANUAL
2 Zone WiFi Water Timer
with WiFi Hub
Model No. TTV203WRF
Model No. TWG004WRF
Web: www.rainpointonline.com
Email: service@rainpointonline.com
WhatsApp: +1 626-780-5952
US toll free(English): +1 833-381-5659
(Mon-Fri: 9�30 AM-5�30 PM PST)
DE toll free(English Deutsch): +49 800-182-0576 (Mon-Fri: 9�00 AM-5�00 PM CET)
UK toll free(English): +44 800-808-5337 (Mon-Fri: 9�00 AM-5�00 PM CET)
Advertisement
Chapters

Subscribe to Our Youtube Channel
Related Manuals for RainPoint TTV203WRF


Summary of Contents for RainPoint TTV203WRF
- Page 1 * KEEP THIS MANUAL FOR FUTURE REFERENCE. USER MANUAL 2 Zone WiFi Water Timer with WiFi Hub Model No. TTV203WRF Model No. TWG004WRF Web: www.rainpointonline.com Email: service@rainpointonline.com WhatsApp: +1 626-780-5952 US toll free(English): +1 833-381-5659 (Mon-Fri: 9�30 AM-5�30 PM PST) DE toll free(English Deutsch): +49 800-182-0576 (Mon-Fri: 9�00 AM-5�00 PM CET)
- Page 2 WELCOME TO RAINPOINT RainPoint is pleased to present the 2 Zone WiFi Water Timer with WiFi Hub (Model: TTV203WRF + TWG004WRF)-a smart sub-zone watering timer system for residential applications. Designed with the needs of the customer in mind, the model offers 2 high flow valves to water separate areas, simplified APP procramming and an impressive range of features typically found in WiFi water timers costing twice as much.
-
Page 3: Table Of Contents
CONTENTS INTRODUCTION CONTENTS IN THE BOX PRODUCTS OVERVIEW TTV203WRF 2 Zone WiFi Water Timer TWG004WRF WiFi Hub FEATURES OVERVIEW CONNECTION AND INSTALLATION STEP 1. INSTALL APP ON YOUR PHONE STEP 2. CONNECT THE WIFI HUB STEP 3. CONNECT THE WIFI TIMER STEP 4. -
Page 4: Introduction
INTRODUCTION CONTENTS IN THE BOX 1 x TTV203WRF 2 Zone WiFi Water Timer 1 x TWG004WRF WiFi Hub 1 x User Manual 1 x Quick Guide -01-... -
Page 5: Products Overview
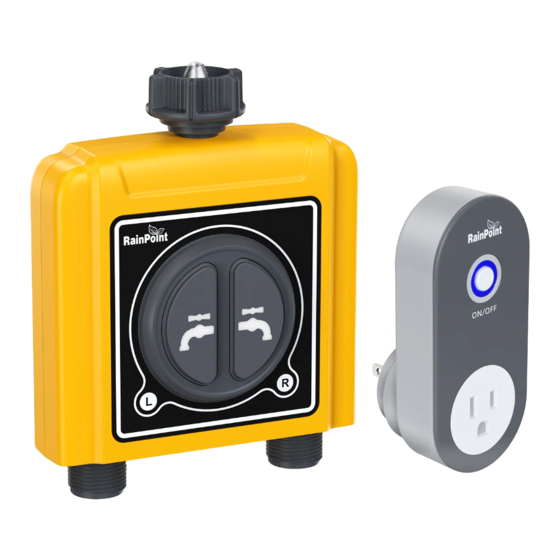
PRODUCT OVERVIEW TTV203WRF 2 ZONE WIFI WATER TIMER INLET FILTER WATER INLET LEFT ZONE RIGHT ZONE BUTTON BUTTON LEFT ZONE RIGHT ZONE WATERING WATERING INDICATOR INDICATOR LEFT WATER RIGHT WATER OUTLET OUTLET BATTERY COMPARTMENT ITEMS SPECIFICATION Range Between WiFi Hub and Timer... -
Page 6: Twg004Wrf Wifi Hub
TWG004WRF WIFI HUB HUB BUTTON POWER INDICATOR WiFi SOCKET POWER PLUG WITH POWER SUPPLY ITEMS SPECIFICATION Range Between WiFi Hub and Route 160 ft in the open area without interference Temperature Operating Range 3℃-40℃ (37℉-104℉) WiFi Frequency Band 2.4GHz Input 100-240V 50Hz 16A For indoor use only. -
Page 7: Features Overview
One WiFi hub can pair with maximum 4 WiFi water timers. One WiFi water timer can pair with 2 WiFi soil sensor. Only compatible with Rainpoint TCS005FRF Wi-Fi soil sensor (not included). Only compatible with TTV103WRF 1-zone WiFi water timer and TTV203WRF 2-zone WiFi water timer. Only applicable to 2.4GHz WiFi. -
Page 8: Connection And Installation
Register your RainPoint account Open your RainPoint-Tuya APP, select Set Up. Follow the prompts to register a RainPoint account with your email or mobile number. Note: Ensure your country/region details are correct at this stage. You may be prompted to allow access to your location. This allows the app to show weather information, and can still function if you choose to opt out. -
Page 9: Step 2. Connect The Wifi Hub
Plug your WiFi Hub to an indoor power source near your WiFi router and the outdoor location of your timer. Open RainPoint App and tap "Add device" or " " to add a new device. Tap "Smart Irrigation" then select "lrrigation Hub". -
Page 10: Step 3. Connect The Wifi Timer
Press and hold the WiFi hub button until the power indicator blink rapidly (2 times per second). Then select "Confirm indicator rapidly blink" and tap "Next". The APP will search and pair your WiFi hub automatically. Note: If the indicator doesn't blink rapidly (2 times per second), please tap "Resetting Devices" and follow the prompts (Or refer to the "RESET THE DEVICE"... - Page 11 After the connection is successful, the color icons of WiFi timer and WiFi socket will be displayed on the APP home screen. Tips: lf necessary, three additional WiFi timers can be added to the RainPoint APP through a WiFi hub. A separate WiFi timer is available on Amazon.
-
Page 12: Step 4. Install The Wifi Timer
STEP 4: INSTALL THE WIFI TIMER Less than160 feets (No bushes, walls blocking) Inlet Attach the timer inlet to the outdoor faucet/spigot (hand tighten only). From the timer outlet connect a drip irrigation system or a garden hose. Outlet Warning: The WiFi timer can only be used for cold water. -
Page 13: App Programming
Add Devices AlI Devices You can add multiple RainPoint A check list of all the devices you devices on the APP to create a have connected. Tap to enter the smart home irrigation system. -
Page 14: Device Parameter
The WiFi water timer has built-in water fow meters, it will display the last water usage on the screen. Soil Temperature & Moisture Paired with the RAINPOINT WiFi soil sensor, it can also display soil temperature and moisture. Note: WiFi soil sensor is sold separately. -
Page 15: Manual Watering
How to get third-party control / voice control? If you have an Amazon Alexa or Google Assistant, please tap the icon " " in the upper right corner of the device page, select a third-party voice control device you own, then tap the operation guide, and follow the instructions to connect your WiFi water timer to the voice control device. -
Page 16: Watering Plan & Manual Rain Delay
WATERING PLAN & MANUAL RAIN DELAY Zone 1 / Zone 2 Watering Day of the Week Select Zone 1 or Zone 2 for Each plan has a specific color manual watering. Zone 1 punctuation. The punctuation controls the left valve of the in a specific color on the day of timer. - Page 17 Irrigation Mode (lrrigation on time) Tap lrrigation Mode. Use the 24H time switch to toggle between 24hr and AM/PM time. Click to select lrrigation on time. Tap Start time to open the clock and set a start time. Tap Duration (H:M) to set a watering duration (from 0 hour 0 minute to 11 hours to 59 minutes).
-
Page 18: Wifi Soil Sensor & Water Flow Meter
WIFI SOIL SENSOR & WATER FLOW METER WiFi Soil Sensor (Sold separately, not included) If you have a Rainpoint WiFi soil sensor, you can pair it with your Rainpoint WiFi water timer and WiFi hub. Each zone can be paired with one WiFi soil sensor. And the soil temperature and moisture data monitored by the soil sensor will be displayed on your Rainpoint APP. -
Page 19: Wifi Socket
Tap the Power to toggle the WiFi socket power on or off. Note: Each RainPoint WiFi hub can be used as a WiFi socket. But only when the WiFi timer is successfully paired with the WiFi hub, the WiFi socket device can be added to the App. -
Page 20: Power On/Off By Schedule
Automation means the devices can execute automatically according to the set conditions such as the local weather, device status and time. For example, RAINPOINT APP can obtain the weather forecast information of your home location. When you set the conditions for immediately delaying the watering plan when it rains, the timer will automatically execute the watering delay when it rains in your local area. - Page 21 3 Steps To Set Automation Or Tap-To-Run Create scene: According to your needs, set the conditions for automation or tap-to-run. Add tasks: Set the tasks that the device needs to perform when the conditions are met. Save the settings: Please remember to save all the settings. The device will automatically execute according to what you set.
-
Page 22: How To Set The Automatic Rain Delay
How to set the automatic rain delay? Tap Scene at the bottom of the APP home screen. Select "Automation" and tap "Create Scene". Tap"When weather changes",then select"Weather"; locate the city, then select "Rainy"and tap"Next" to continue. Note: Please accurately locate the city where your home is located. The APP will automatically obtain weather forecast data based on the city you locate. -
Page 23: Home Management
2-Zone WiFi irrigation timer will be automatically closed, and watering will be delayed for 24 hours. HOME MANAGEMENT Rainpoint supports adding family members and sharing your home device to achieve co-man- agement the home irrigation system with your family. Tap Me at the bottom of the APP home screen. -
Page 24: Reset The Device
Set your Home name, Room management and Home location. Note: Home location is related to the weather forecast informa- tion obtained by the system. Add Home Member and set the corresponding usage permissions for the members. RESET THE DEVICE How to reset the WiFi Hub ? Step 1. -
Page 25: Troubleshooting
This means that pairing has been entered. If your Rainpoint product does not operate properly after trying the troubleshooting steps, please contact us by phone or email: US:+1-833-381-5659 | UK: +44-800-808-5337 | DE:+49-800-182-0576 | service@rainpointonline.com -22-... - Page 26 THE MEANING OF LED LIGHT LED indicator color of TTV203WRF WiFi water timer 1) Power-on reset: The red and white lights flash alternately 4 times when the machine is turned on. 2) Restore factory settings: Press and hold the timer button while turing on the timer, release the button after the red light flashes, and the timer will enter the factory reset state.
-
Page 27: Warranty
WARRANTY RainPoint provides a 1-year warranty against manufacturing defects in materials and workman- ship from the date of purchase. During the warranty period , we'll replace free of charge the product found to be defective under reasonable use and service as determined solely by RainPoint. -
Page 28: Fcc Notice
FCC NOTICE FCC Statement: (FCC ID: 2AWDBTTV203WRF, 2AWDBTWG004WRF) This device complies with Part 15 of the FCC Rules. Operation is subject to the following two conditions: This device may not cause harmful interference. This device must accept any interference received, including interference that may cause undesired operation. - Page 29 *BEWAHREN SIE DIESES HANDBUCH ZUM SPÄTEREN NACHSCHLAGEN AUF. BENUTZERHANDBUCH 2-Zonen-WLAN-Wasseruhr mit WLAN-Hub Modell Nr. TTV203WRF Modell Nr. TWG004WRF Internet: www.rainpointonline.com E-Mail: service@rainpointonline.com WhatsApp:+1626-780-5952 Gebührenfrei in den USA (Englisch): +1 833-381-5659 (Mo-Fr: 9�30 Uhr bis 17�30 Uhr PST) DE gebührenfrei (Englisch Deutsch): +49 800-182-0576 (Mo-Fr: 9 : 00-17 : 00 Uhr MEZ) Gebührenfrei in Großbritannien (Englisch):...
- Page 30 Der WLAN-Hub Immer mehr Geräte zur Gartenbewässerung und Bewässerungss- teuerung, die über gesteuert werden können Ihr Smartphone im iOS- und Android-Format. Was auch immer Ihre Anforderungen an die Bewässerung im Freien sind, RainPoint bietet die besten Bewässerungsprodukte seiner Klasse helfen Ihnen, Ihre Bewässerung effektiver zu verwalten und zu kontrollieren.
- Page 31 INHALT EINFÜHRUNG INHALT IN DER BOX PRODUKTÜBERSICHT TTV203WRF 2-Zonen-WiFi-Bewässerungstimer TWG004WRF WLAN-Hub FUNKTIONSÜBERSICHT ANSCHLUSS UND INSTALLATION SCHRITT 1. INSTALLIEREN SIE DIE APP AUF IHREM TELEFON SCHRITT 2. VERBINDEN SIE DEN WIFI-HUB SCHRITT 3. VERBINDEN SIE DEN WIFI-TIMER SCHRITT 4. INSTALLIEREN SIE DEN WIFI-TIMER SCHRITT 5.
-
Page 32: Einführung
EINFÜHRUNG INHALT IN DER BOX 1 x TTV 2 03WRF 1-Zonen-WiFi-Bewässerungstimer 1 x Bedienungsanleitung 1 x Benutzerhandbuch 1 x Kurzanleitung -29-... -
Page 33: Produktübersicht
PRODUKTÜBERSICHT TTV 203WRF 2- ZONEN-WIFI-BEWÄSSERUNGSTIMER Einlassfilter Wasserzufluss LINKE ZONENTASTE RECHTE ZONENTASTE BEWÄSSERU BEWÄSSERUNG NGSANZEIGE SANZEIGE FÜR DIE FÜR DIE LINKE ZONE RECHTE ZONE RECHTER LINKER WASSERAUSLASS WASSERAUSLASS Batteriefach ARTIKEL Spezifikation Reichweite zwischen WiFi-Hub 160 Fuß im offenen Bereich ohne Störungen und Timer: Arbeitswasserdruck 0,5 bar bis 8 bar (7,25–116,03 PSI) -
Page 34: Twg004Wrf Wlan-Hub
TWG004WRF WLAN-HUB HUB-TASTE KRAFTMESSER WiFi-Steckdose NETZSTECKER mit Netzteil ARTIKEL Spezifikation Reichweite zwischen WiFi-Hub 160 Fuß im offenen Bereich ohne Störungen und Route Temperaturbetriebsbereich 3℃ - 50℃ (37℉-122℉) WLAN-Frequenzband 2,4 GHz Eingang 100–240 V, 50 Hz, 16 A Nur für die Verwendung in Innenräumen. Gilt nur für 2,4-GHz-WiFi. -
Page 35: Funktionsübersicht
Ein WLAN-Hub (nicht im Lieferumfang enthalten) kann mit maximal 4 WLAN-Bewässerung- suhren gekoppelt werden. Ein WiFi-Wasser Der Timer kann mit 2 WiFi-Bodensensoren gekoppelt werden. Nur kompatibel mit dem Wi-Fi-Bodensensor Rainpoint TCS005FRF (nicht im Lieferumfang enthalten). Nur kompatibel mit der 1-Zonen-WLAN-Bewässerungsuhr TTV103WRF und der 2-Zonen-WLAN-Bewässerungsuhr TTV203WRF. -
Page 36: Anschluss Und Installation
Registrieren Sie Ihr RainPoint-Konto Öffnen Sie Ihre RainPoint-Tuya-App, wählen Sie "Registrieren". Befolgen Sie die Anweisun- gen, um ein RainPoint-Konto mit Ihrer E-Mail-Adresse oder Handynummer zu registrieren. Hinweis: Stellen Sie zu diesem Zeitpunkt sicher, dass die Angaben zu Ihrem Land/Ihrer Region korrekt sind.Möglicherweise werden Sie aufgefordert, den Zugriff auf Ihren Standort zuzulassen. -
Page 37: Schritt 2. Verbinden Sie Den Wifi-Hub
SCHRITT 2: VERBINDEN SIE DEN WIFI-HUB Schließen Sie Ihren WLAN-Hub an eine Stromquelle im Innenbereich in der Nähe Ihres WLAN-Routers und im Freien anStandort Ihres Timers. Öffnen Sie die RainPoint-App und tippen Sie auf "Gerät hinzufügen" oder " ", um ein neues Gerät hinzuzufügen. -
Page 38: Schritt 3. Verbinden Sie Den Wifi-Timer
Halten Sie die WiFi-Hub-Taste gedrückt, bis die Betriebsanzeige schnell blinkt (zweimal pro Sekunde).zweite) . Wählen Sie dann " Bestätigen Sie, dass die Anzeige schnell blinkt " und tippen Sie auf " Weiter ". Die APP wird suchen und koppeln Sie Ihren WLAN-Hub automa- tisch. - Page 39 Nachdem die Verbindung erfolgreich hergestellt wurde, werden die Farbsymbole des WLAN-Timers und der WLAN-Buchse angezeigt wird auf dem APP-Startbildschirm angezeigt. Tipps: Bei Bedarf können der RainPoint APP über einen WLAN-Hub drei zusätzliche WLAN-Timer hinzugefügt werden. Bei Amazon gibt es einen separaten WLAN-Timer. -36-...
-
Page 40: Schritt 4. Installieren Sie Den Wifi-Timer
SCHRITT 4. INSTALLIEREN SIE DEN WLAN-TIMER Weniger als 160 Fuß (Keine Büsche, Wände blockieren) Einlass Befestigen Sie den Timer-Einlass parallel zum Wasser- hahn/Zapfen im Freien und ziehen Sie ihn nur von Hand fest. Schließen Sie an den Timer-Ausgang ein Tropfbe- wässerungssystem oder einen Gartenschlauch an. -
Page 41: App-Programmierung
Wohnsitze zu verwalten. Geräte hinzufügen Alle Geräte Sie können der APP mehrere Eine Checkliste aller von Ihnen RainPoint-Geräte hinzufügen, um angeschlossenen Geräte. Tippen ein Smart-Home-Bewässe- Sie auf die Symbole, um die rungssystem zu erstellen. Bedienseite aufzurufen Geräte, die Raummanagement Sie hinzugefügt haben, um den... -
Page 42: Geräteparameter
Wasserverbrauch auf dem Bildschirm an. Bodentemperatur und -feuchtigkeit In Verbindung mit dem RAINPOINT WiFi-Bodensensor (separat erhältlich) kann er auch die Bodentemperatur anzeigen und Feuchtigkeit. Wenn die Bodenfeuchtigkeit höher ist als der am Bodensensor eingestellte Wasserverbotswert, ändert sich die Hintergrundfarbe der APP auf Rot. -
Page 43: Manuelle Bewässerung
Wie erhalte ich die Steuerung/Sprachsteuerung durch Dritte? Wenn Sie über Amazon Alexa oder Google Assistant verfügen, tippen Sie bitte auf das Symbol " " in der oberen rechten Ecke der Geräteseite, wählen Sie ein Sprachsteuerungsgerät eines Drittanbieters aus, das Sie besitzen, tippen Sie dann auf die Bedienungsanleitung und befolgen Sie die Anweisungen Verbinden Sie Ihren WiFi-Wassertimer mit dem Sprachsteuerungsgerät. -
Page 44: Bewässerungsplan Und Manuelle Regenverzögerung
BEWÄSSERUNGSPLAN UND MANUELLE REGENVERZÖGERUNG Zone 1/Zone 2 Bewässerungstag der Woche Jeder Plan hat eine bestimmte Wählen Sie Zone 1 oder Zone 2 Farbinterpunktion. Die für die manuelle Bewässerung- Interpunktion in einer bestim- Zone 1 steuert das linke Ventil mten Farbe am Wochentag des Timers. - Page 45 Bewässerungsmodus ( ich bewässere pünktlich) Tippen Sie auf Bewässerungsmodus. Verwenden Sie den 24-Stunden-Zeitschalter, um zwischen 24-Stunden- und AM/PM-Zeit umzuschalten. Klicken Sie, um Bewässerung pünktlich auszuwählen. Tippen Sie auf Startzeit, um die Uhr zu öffnen und eine Startzeit einzustellen Klicken Sie auf "Bewässerung nach Menge", um die kontinuierliche Bewässerungsmenge festzulegen.
-
Page 46: Wifi-Bodensensor Und Wasserdurchflussmesser
Mittwoch, Freitag und Sonntag um 7�30 Uhr morgens . WIFI-BODENSENSOR UND WASSERDURCHFLUSSMESSER WiFi-Bodensensor (separat erhältlich, nicht im Lieferumfang enthalten) Wenn Sie einen Rainpoint WiFi-Bodensensor haben, können Sie ihn mit Ihrem Rainpoint WiFi-Bewässerungstimer und WiFi-Hub koppeln. Ein WLAN-Timer kann mit einem WLAN-Bodensensor gekoppelt werden. -
Page 47: Wifi-Anschluss
Tippen Sie auf "Power" , um die Stromversorgung der WLAN-Buchse ein- oder auszus- chalten. Hinweis: Jeder RainPoint-WLAN-Hub kann als WLAN-Steckdose verwendet werden. Aber nur, wenn der WLAN-Timer läuft Nach erfolgreicher Kopplung mit dem WLAN-Hub kann das WLAN-Steckdosengerät zur App hinzugefügt werden . -
Page 48: Ein-/Ausschalten Nach Zeitplan
Automatisierung bedeutet, dass die Geräte entsprechend den festgelegten Bedingungen wie lokalem Wetter, Gerätestatus und Uhrzeit automatisch ausgeführt werden können. Beispielsweise kann die RAINPOINT APP die Wettervorhersageinformationen für Ihren Heimat- standort abrufen. Wenn Sie die Bedingungen für eine sofortige Verzögerung des Bewässerung- splans bei Regen festlegen, führt der Timer die Bewässerungsverzögerung automatisch aus,... - Page 49 3 Schritte zum Einstellen der Automatisierung oder Tap-to-Run Szene erstellen: Legen Sie je nach Bedarf die Bedingungen für Automatisierung oder Tap-to-Run fest. Aufgabe hinzufügen: Legen Sie die Aufgaben fest, die das Gerät ausführen muss, wenn die Bedingungen erfüllt sind. Einstellungen speichern: Bitte denken Sie daran, alle Einstellungen zu speichern. Das Gerät wird automatisch entsprechend Ihren Einstellungen ausgeführt.
-
Page 50: Wie Stelle Ich Die Automatische Regenverzögerung Ein
Wie stelle ich die automatische Regenverzögerung ein? Tippen Sie unten auf dem APP-Startbildschirm auf "Szene ". Wählen Sie "Automatisierung" und tippen Sie auf "Szene erstellen" . Tippen Sie auf "Wenn sich das Wetter ändert " und wählen Sie dann "Wetter" . Suchen Sie die Stadt, wählen Sie dann "Rainy"... -
Page 51: Hausverwaltung
Zum Beispiel : Das Bild links zeigt Wenn es in New York regnet, wird das Ventil des WiFi-Be- wässerungstimers automatisch geschlossen und die Bewässerung um 24 Stunden verzögert. HAUSVERWALTUNG Rainpoint unterstützt das Hinzufügen von Familienmitgliedern und die gemeinsame Nutzung Ihres Heimgeräts, um eine gemeinsame Verwaltung des Heimbewässerungssystems mit Ihrer Familie zu erreichen. -
Page 52: Setzen Sie Das Gerät Zurück
Stellen Sie Ihre ein Heimatname , Raumverwaltung und Heimatstandort . Hinweis : Der Heimatstandort hängt von den vom System erhaltenen Wettervorhersageinformationen ab. Fügen Sie Home-Mitglied hinzu und legen Sie die entspre- chenden Nutzungsberechtigungen für die Mitglieder fest. SETZEN SIE DAS GERÄT ZURÜCK Wie setze ich den WiFi Hub zurück? Schritt 1 . -
Page 53: Fehlerbehebung
Kopplung eingegeben wurde. Wenn Ihr Rainpoint-Produkt nach dem Durchführen der Fehlerbehebungsschritte nicht ordnungsgemäß funktioniert, wenden Sie sich bitte an uns Kontaktieren Sie uns per Telefon oder E-Mail: USA:+1-833-381-5659 | Großbritannien: +44-800-808-5337 | DE:+49-800-182-0576 | service@rainpointonline.com... - Page 54 DIE BEDEUTUNG VON LED-LICHT LED-Anzeigefarbe des WiFi-Bewässerungstimers TTV 2 03WRF Einschalt-Reset: Die roten und weißen Lichter blinken abwechselnd viermal, wenn die Maschine eingeschaltet wird. Werkseinstellungen wiederherstellen: Halten Sie die Timer-Taste gedrückt, während Sie den Timer einschalten. Lassen Sie die Taste los, nachdem das rote Licht blinkt, und der Timer wechselt in den Zustand zum Zurücksetzen auf die Werkseinstellungen .
-
Page 55: Garantie
GARANTIE RainPoint gewährt ab Kaufdatum eine einjährige Garantie auf Herstellungsfehler in Material und Verarbeitung. Während der Garantiezeit ersetzen wir kostenlos das Produkt, das sich bei angemessener Nutzung und Wartung nach alleiniger Festlegung durch RainPoint als fehlerhaft herausstellt. Um Ihre Garantie zu verlängern und zu aktivieren, senden Sie uns bitte eine E-Mail mit Ihrer Bestellnummer an service@rainpointonline.com. -
Page 56: Manuel De L'utilisateur
*CONSERVEZ CE MANUEL POUR RÉFÉRENCE FUTURE. MANUEL DE L'UTILISATEUR Minuterie d'eau WiFi à 2 zones avec hub WiFi Numéro de modèle. TTV203WRF Numéro de modèle. TWG004WRF Web : www.rainpointonline.com Courriel : service@rainpointonline.com WhatsApp : +1626-780-5952 Numéro gratuit aux États-Unis (anglais) : +1 833-381-5659 (du lundi au vendredi : de 9 h 30 à 17 h 30 PST) DE sans frais (anglais allemand) : +49 800-182-0576 (du lundi au vendredi : de 9 h 00 à... - Page 57 BIENVENUE CHEZ RAINPOINT RainPoint est heureux de présenter la minuterie d'eau WiFi à 2 zones (mode : TTV203WRF) - une minuterie intelligente système de minuterie d'arrosage de sous-zone pour les applications résidentielles. Conçu avec les besoins du client à l'esprit, le modèle propose 2 vannes à haut débit pour arroser des zones séparées, application simplifiée programmation et une gamme...
- Page 58 CONTENU INTRODUCTION CONTENU DE LA BOÎTE APERÇU DES PRODUITS Minuterie d'eau WiFi 2 zones TTV203WRF Concentrateur Wi-Fi TWG004WRF APERÇU DES CARACTÉRISTIQUES RACCORDEMENT ET INSTALLATION ÉTAPE 1. INSTALLER L'APPLICATION SUR VOTRE TÉLÉPHONE ÉTAPE 2. CONNECTEZ LE HUB WIFI ÉTAPE 3. CONNECTER LA MINUTERIE WIFI ÉTAPE 4.
-
Page 59: Introduction
INTRODUCTION CONTENU DE LA BOÎTE 1 x TTV 2 03WRF Minuterie d'eau WiFi 1 zone 1 x Manuel d'instructions 1 x manuel d'utilisation 1 x Guide rapide -56-... -
Page 60: Présentation Du Produit
PRÉSENTATION DU PRODUIT MINUTERIE D'EAU WIFI 2 ZONES TTV 203WRF Filtre d'entrée Arrivée d'eau BOUTON DE LA BOUTON DE ZONE GAUCHE LA ZONE DROITE INDICATEUR INDICATEUR D' A RROSAGE D' A RROSAGE DE DE LA ZONE GAUCHE LA ZONE DROITE SORTIE D'EAU DROITE SORTIE D'EAU GAUCHE... -
Page 61: Concentrateur Wifi Twg004Wrf
CONCENTRATEUR WIFI TWG004WRF BOUTON DU MOYEU INDICATEUR DE PUISSANCE PRISE WiFi AVEC FICHE ALIMENTATION D' A LIMENTATION ARTIKEL Spezifikation Portée entre le hub WiFi et la route 160 Fuß im offenen Bereich ohne Störungen Plage de température de 3℃ - 50℃ (37℉-122℉) fonctionnement ... -
Page 62: Aperçu Des Caractéristiques
Un hub WiFi (non inclus) peut être associé à un maximum de 4 minuteries d'eau WiFi. Une eau WiFiLa minuterie peut être associée à 2 capteurs de sol WiFi. Compatible uniquement avec le capteur de sol Wi-Fi Rainpoint TCS005FRF (non inclus). Uniquement compatible avec la minuterie d'eau WiFi 1 zone TTV103WRF et la minuterie d'eau WiFi 2 zones TTV203WRF. -
Page 63: Raccordement Et Installation
Enregistrez votre compte RainPoint Ouvrez votre application RainPoint-Tuya, sélectionnez S'inscrire. Suivez les invites pour enregistrer un compte RainPoint avec votre e-mail ou votre numéro de mobile. Remarque : Assurez-vous que les informations relatives à votre pays/région sont correctes à ce stade. Vous serez peut-être invité à autoriser l’accès à votre emplacement. Cela permet à... -
Page 64: Étape 2. Connectez Le Hub Wifi
Branchez votre hub WiFi à une source d'alimentation intérieure à proximité de votre routeur WiFi et de l'extérieur.emplacement de votre minuterie. Ouvrez l'application RainPoint et appuyez sur " Ajouter un appareil " ou " " pour ajouter un nouvel appareil. -
Page 65: Étape 3. Connecter La Minuterie Wifi
Appuyez et maintenez enfoncé le bouton du hub WiFi jusqu'à ce que le voyant d'alimenta- tion clignote rapidement (2 fois pardeuxième) . Sélectionnez ensuite " Confirmer que l'indicateur clignote rapidement " et appuyez sur " Suivant ". L' A PP recherchera et associez automatiquement votre hub WiFi. Remarque : Si l'indicateur ne clignote pas rapidement (2 fois par seconde), veuillez appuyer sur "Réinitialiser les appareils". - Page 66 Une fois la connexion réussie, les icônes de couleur de la minuterie WiFi et de la prise WiFi seront affiché sur l’écran d’accueil de l’APP. Conseils : si nécessaire, trois minuteries WiFi supplémentaires peuvent être ajoutées à l'applica- tion RainPoint via un hub WiFi. Une minuterie WiFi séparée est disponible sur Amazon. -63-...
-
Page 67: Étape 4. Installer La Minuterie Wifi
ÉTAPE 4. INSTALLER LA MINUTERIE WIFI Moins de 160 pieds (Pas de buissons, murs bloquants) Entrée Fixez l’entrée de la minuterie parallèlement au robinet/robinet extérieur et serrez à la main uniquement. À partir de la sortie de la minuterie, connectez un système d'irrigation goutte à... -
Page 68: Programmation D'applications
Ajouter des appareils Tous les dispositifs Vous pouvez ajouter plusieurs Une liste de contrôle de tous les appareils RainPoint sur l'application appareils que vous avez connectés. pour créer un système d'irrigation Appuyez sur les icônes pour domestique intelligent. -
Page 69: Paramètre De L'appareil
Température et humidité du sol Associé au capteur de sol WiFi RAINPOINT (vendu séparément), il peut également afficher la température du sol et l'humidité. Si l'humidité du sol est supérieure au niveau d'interdic- tion d'eau défini sur le capteur de sol, la couleur de fond de l' A PP passera au rouge. -
Page 70: Arrosage Manuel
Comment obtenir un contrôle tiers/un contrôle vocal ? Si vous disposez d'un Amazon Alexa ou de Google Assistant, veuillez appuyer sur l'icône " " dans le coin supérieur droit de la page de l'appareil, sélectionnez un appareil de commande vocale tiers que vous possédez, puis appuyez sur le guide d'utilisation et suivez les instructions pour connectez votre minuterie d'eau WiFi au dispositif de commande vocale. -
Page 71: Plan D'arrosage Et Délai De Pluie Manuel
PLAN D'ARROSAGE ET DÉLAI DE PLUIE MANUEL Zone 1/Zone 2 Jour d'arrosage de la semaine Sélectionnez la Zone 1 ou la Chaque plan possède une Zone 2 pour l'arrosage manuel. ponctuation de couleur La zone 1 contrôle la vanne spécifique. La ponctuation gauche de la minuterie. - Page 72 Mode d'irrigation ( j'irrige à temps) Appuyez sur Mode d'irrigation. Utilisez l'interrupteur horaire 24 heures pour basculer entre l'heure 24 heures et l'heure AM/PM. Cliquez pour sélectionner Irrigation à temps. Appuyez sur Heure de début pour ouvrir l'horloge et définir une heure de début Cliquez pour sélectionner Irrigation par quantité...
-
Page 73: Capteur De Sol Wifi Et Débitmètre D'eau
CAPTEUR DE SOL WIFI ET DÉBITMÈTRE D'EAU Capteur de sol WiFi (vendu séparément, non inclus) Si vous disposez d'un capteur de sol Rainpoint WiFi, vous pouvez le coupler avec votre minuterie d'eau Rainpoint WiFi et votre hub WiFi. Une minuterie WiFi peut être associée à un capteur de sol WiFi. -
Page 74: Prise Wifi
Appuyez sur Alimentation pour activer ou désactiver la prise WiFi. Remarque : Chaque hub WiFi RainPoint peut être utilisé comme prise WiFi. Mais seulement lorsque la minuterie WiFi est Associé avec succès au hub WiFi, le périphérique de prise WiFi peut être ajouté... -
Page 75: Mise Sous/Hors Tension Selon Le Calendrier
L'automatisation signifie que les appareils peuvent s'exécuter automatiquement en fonction des conditions définies telles que la météo locale, l'état et l'heure de l'appareil. Par exemple, RAINPOINT APP peut obtenir les informations météorologiques de votre domicile. Lorsque vous définissez les conditions pour retarder immédiatement le plan d'arrosage lorsqu'il pleut, la minuterie exécutera automatiquement le délai d'arrosage lorsqu'il pleut dans votre... - Page 76 3 étapes pour définir l'automatisation ou appuyer pour exécuter Créer une scène : selon vos besoins, définissez les conditions d'automatisation ou de tap-to-run. Ajouter une tâche : définissez les tâches que l'appareil doit effectuer lorsque les conditions sont remplies. Enregistrez les paramètres : N'oubliez pas de sauvegarder tous les paramètres. L'appareil s'exécutera automatiquement en fonction de ce que vous avez défini.
-
Page 77: Comment Régler Le Délai Automatique De Pluie
Comment régler le délai automatique de pluie ? Appuyez sur " Scène " en bas de l'écran d'accueil de l' A PP. Sélectionnez " Automation " et appuyez sur " Créer une scène " . Appuyez sur " Lorsque la météo change ", puis sélectionnez " Météo " ; localisez la ville, puis sélectionnez "... -
Page 78: Gestion De La Maison
WiFi se fermera automatiquement et l'arrosage sera retardé de 24 heures. GESTION DE LA MAISON Rainpoint prend en charge l'ajout de membres de la famille et le partage de votre appareil domestique pour réaliser la cogestion du système d'irrigation domestique avec votre famille. -
Page 79: Réinitialiser L'appareil
Définissez votre Nom de la maison , gestion des chambres et emplacement de la maison . Remarque : La localisation du domicile est liée aux informations météorologiques obtenues par le système. Ajoutez un membre d'accueil et définissez les autorisations d'utilisation correspondantes pour les membres. RÉINITIALISER L'APPAREIL Comment réinitialiser le Hub WiFi ? Étape 1. -
Page 80: Dépannage
Cela signifie que le jumelage a été saisi. Si votre produit Rainpoint ne fonctionne pas correctement après avoir essayé les étapes de dépannage, veuillez contactez-nous par téléphone ou par e-mail : États-Unis : +1-833-381-5659 | Royaume-Uni : +44-800-808-5337 | DE:+49-800-182-0576 | service@rainpointonline.com... - Page 81 LA SIGNIFICATION DE LA LUMIÈRE LED la minuterie d'eau WiFi TTV 2 03WRF Réinitialisation à la mise sous tension : Les voyants rouge et blanc clignotent alternative- ment 4 fois lorsque la machine est allumée. Restaurer les paramètres d'usine : appuyez et maintenez enfoncé le bouton de la minuterie tout en allumant la minuterie, relâchez le bouton après que le voyant rouge clignote et la minuterie entrera dans l'état de réinitialisation d' usine .
-
Page 82: Garantie
GARANTIE RainPoint offre une garantie d'un an contre les défauts de fabrication des matériaux et de la fabrication à compter de la date d'achat. Pendant la période de garantie, nous remplacerons gratuitement le produit jugé défectueux dans le cadre d'une utilisation et d'un service raisonna- bles déterminés uniquement par RainPoint. - Page 83 *CONSERVARE QUESTO MANUALE PER RIFERIMENTI FUTURI. MANUALE D'USO Programmatore per irrigazione WiFi a 2 zone con hub WiFi Modello numero: TTV203WRF Modello numero: TWG004WRF Web: www.rainpointonline.com E-mail: service@rainpointonline.com WhatsApp:+1626-780-5952 Numero verde USA (inglese): +1 833-381-5659 (lunedì-venerdì: 9�30 - 17�30 PST ) Numero verde DE (tedesco inglese): +49 800-182-0576 (lunedì-venerdì: 9 : 00-17 : 00 CET)
- Page 84 BENVENUTO SU RAINPOINT RainPoint è lieta di presentare il timer per l'irrigazione WiFi a 2 zone (modalità: TTV203WRF): un dispositivo intelligente sistema temporizzato di irrigazione sottozona per applicazioni residenziali. Progettato con le esigenze del pensando al cliente, il modello offre 2 valvole ad alto flusso per irrigare aree separate, APP semplificata programmazione e una gamma impressionante di funzionalità...
- Page 85 CONTENUTI INTRODUZIONE CONTENUTO DELLA SCATOLA PANORAMICA DEI PRODOTTI TTV203WRF Programmatore acqua WiFi 2 zone Hub Wi-Fi TWG004WRF PANORAMICA DELLE CARATTERISTICHE COLLEGAMENTO E INSTALLAZIONE PASSO 1. INSTALLA L'APP SUL TUO TELEFONO PASSO 2. COLLEGA L'HUB WIFI PASSO 3. COLLEGARE IL TIMER WIFI PASSO 4.
-
Page 86: Introduzione
INTRODUZIONE CONTENUTO DELLA SCATOLA 1 x TTV 2 03WRF Programmatore idrico WiFi 1 zona 1 x Manuale di istruzioni 1 manuale utente 1 guida rapida -83-... -
Page 87: Panoramica Dei Prodotti
PANORAMICA DEL PRODOTTO TTV 203WRF PROGRAMMATORE ACQUA WIFI 2 ZONE Filtro di ingresso Ingresso acqua PULSANTE DELLA PULSANTE DELLA ZONA SINISTRA ZONA DESTRA INDICATORE DI INDICATORE DI IRRIGAZIONE IRRIGAZIONE DELLA DELLA ZONA SINISTRA ZONA DESTRA USCITA ACQUA USCITA DESTRA ACQUA SINISTRA Compartimento della batteria ELEMENTI... -
Page 88: Hub Wifi Twg004Wrf
HUB WIFI TWG004WRF PULSANTE INDICATORE DI ENERGIA PRESA WiFi CON SPINA DI ALIMENTATORE ALIMENTAZIONE ELEMENTI Specifica Portata tra hub WiFi e percorso 160 piedi in un'area aperta senza interferenze Intervallo di temperatura operativa 3 ℃ - 50 ℃ (37 ℉ -122 ℉) Banda di frequenza WiFi 2,4 GHz Ingresso... -
Page 89: Panoramica Delle Caratteristiche
WiFi. Un'acqua WiFi il timer può essere accoppiato con 2 sensori del suolo WiFi. Compatibile solo con il sensore del suolo Wi-Fi Rainpoint TCS005FRF (non incluso). Compatibile solo con il programmatore WiFi a 1 zona TTV103WRF e il programmatore WiFi a 2 zone TTV203WRF. -
Page 90: Collegamento E Installazione
A PP RainPoint-Tuya. Registra il tuo account RainPoint Apri l' A PP RainPoint-Tuya, seleziona Iscriviti. Segui le istruzioni per registrare un account RainPoint con la tua e-mail o numero di cellulare. Nota: assicurati che i dettagli del tuo paese/regione siano corretti in questa fase. -
Page 91: Passo 2. Collega L'hub Wifi
PASSO 2: COLLEGA L'HUB WIFI Collega il tuo hub WiFi a una fonte di alimentazione interna vicino al router WiFi e all'esterno posizione del timer. Apri l'app RainPoint e tocca "Aggiungi dispositivo" o " " per aggiungere un nuovo dispositivo. -
Page 92: Passo 3. Collegare Il Timer Wifi
Premere e tenere premuto il pulsante dell'hub WiFi finché l'indicatore di alimentazione non lampeggia rapidamente (2 volte al giorno).secondo) . Quindi selezionare " L'indicatore di conferma lampeggia rapidamente " e toccare " Avanti ". L' A PP effettuerà la ricerca e associa automaticamente il tuo hub WiFi. - Page 93 Una volta stabilita la connessione, le icone colorate del timer WiFi e della presa WiFi diventeranno visualizzato nella schermata iniziale dell' A PP. Suggerimenti: se necessario, è possibile aggiungere tre timer WiFi aggiuntivi all' A PP RainPoint tramite un hub WiFi. Un timer WiFi separato è disponibile su Amazon.
-
Page 94: Passo 4. Installare Il Timer Wifi
PASSO 4. INSTALLA IL TIMER WIFI Meno di 160 piedi (Nessun cespuglio o muro che blocchi) Ingresso Collegare l'ingresso del timer parallelamente al rubinet- to/rubinetto esterno e serrare solo a mano. Dall'uscita del timer collegare un sistema di irrigazione a goccia o un tubo da giardino. -
Page 95: Programmazione Dell'app
Aggiungi dispositivi Tutti i dispositivi Puoi aggiungere più dispositivi Un elenco di controllo di tutti i RainPoint sull' A PP per creare un dispositivi che hai collegato. Tocca sistema di irrigazione domestica le icone per accedere alla pagina intelligente. -
Page 96: Parametro Del Dispositivo
Temperatura e umidità del suolo Abbinato al sensore del suolo WiFi RAINPOINT (venduto separatamente), può anche visualizzare la temperatura del suolo e umidità. Se l'umidità del suolo è superiore al livello di divieto dell'acqua impostato sul sensore del suolo, il colore dello sfondo dell' A PP cambierà in rosso. -
Page 97: Irrigazione Manuale
Come ottenere il controllo/controllo vocale di terze parti? Se disponi di Amazon Alexa o Google Assistant, tocca l'icona " " nell'angolo in alto a destra della pagina del dispositivo, seleziona un dispositivo di controllo vocale di terze parti di tua proprietà, quindi tocca la guida operativa e segui le istruzioni per collega il tuo timer per l'acqua WiFi al dispositivo di controllo vocale. -
Page 98: Piano Di Irrigazione E Ritardo Manuale Per Pioggia
PIANO DI IRRIGAZIONE E RITARDO MANUALE PER PIOGGIA Zona 1/Zona 2 Giorno di irrigazione della Selezionare la Zona 1 o la Zona settimana 2 per l'irrigazione manuale. La Ogni piano ha una punteggia- zona 1 controlla la valvola tura di colore specifica. La sinistra del timer. - Page 99 Modalità di irrigazione ( irrigazione puntuale) Toccare Modalità irrigazione. Utilizzare l'interruttore orario 24 ore per alternare tra l'orario 24 ore e l'orario AM/PM. Fare clic per selezionare Irrigazione puntuale. Tocca Ora di inizio per aprire l'orologio e impostare un'ora di inizio Fare clic per selezionare Irrigazione per quantità...
-
Page 100: Sensore Del Suolo Wifi E Misuratore Di Portata Dell'acqua
Sensore del suolo WiFi (venduto separatamente, non incluso) Se disponi di un sensore del suolo WiFi Rainpoint, puoi associarlo al timer per l'acqua WiFi Rainpoint e all'hub WiFi. Un timer WiFi può essere accoppiato con un sensore del suolo WiFi. E i dati sulla temperatura e l'umidità... -
Page 101: Presa Wifi
Toccare Alimentazione per attivare o disattivare l'alimentazione della presa WiFi. Nota: ciascun hub WiFi RainPoint può essere utilizzato come presa WiFi. Ma solo quando è attivo il timer WiFi accoppiato con successo con l'hub WiFi, il dispositivo con presa WiFi può essere aggiunto all'app . -
Page 102: Accensione/Spegnimento Programmato
Ad esempio, l' A PP RAINPOINT può ottenere le informazioni sulle previsioni del tempo della tua posizione domestica. Quando si impostano le condizioni per ritardare immediatamente il piano di irrigazione quando piove, il timer eseguirà... - Page 103 3 passaggi per impostare l'automazione o il tocco per eseguire Crea scena: in base alle tue esigenze, imposta le condizioni per l'automazione o il tocco per eseguire. Aggiungi attività: imposta le attività che il dispositivo deve eseguire quando le condizioni sono soddisfatte.
-
Page 104: Come Impostare Il Ritardo Automatico Per La Pioggia
Come impostare il ritardo automatico per la pioggia? Tocca " Scena " nella parte inferiore della schermata iniziale dell' A PP. Seleziona "Automazione" e tocca "Crea scena" . Tocca " Quando il tempo cambia ", quindi seleziona "Meteo" ; individuare la città, quindi selezionare "Pioggia"... -
Page 105: Gestione Della Casa
WiFi verrà chiusa automaticamente e l'irrigazione verrà ritardata di 24 ore. GESTIONE DELLA CASA Rainpoint supporta l'aggiunta di membri della famiglia e la condivisione del dispositivo domesti- co per ottenere la cogestione del sistema di irrigazione domestico con la famiglia. -
Page 106: Resettare Il Dispositivo
Imposta il tuo Nome della casa, Gestione della stanza e Posizione della casa . Nota : la posizione della casa è correlata alle informazioni sulle previsioni del tempo ottenute dal sistema. Aggiungi membro della casa e imposta le autorizzazioni di utilizzo corrispondenti per i membri. -
Page 107: Risoluzione Dei Problemi
Ciò significa che l'abbinamento è stato effettuato. Se il tuo prodotto Rainpoint non funziona correttamente dopo aver provato i passaggi per la risoluzione dei problemi, per favore contattaci telefonicamente o tramite e-mail: USA:+1-833-381-5659 | Regno Unito: +44-800-808-5337 | DE:+49-800-182-0576 | service@rainpointonline.com... - Page 108 IL SIGNIFICATO DELLA LUCE LED Colore indicatore LED del programmatore WiFi TTV 203WRF Reset all'accensione: le luci rossa e bianca lampeggiano alternativamente 4 volte quando la macchina è accesa. Ripristinare le impostazioni di fabbrica: tenere premuto il pulsante del timer mentre si accende il timer, rilasciare il pulsante dopo che la luce rossa lampeggia e il timer entrerà...
-
Page 109: Garanzia
GARANZIA RainPoint offre una garanzia di 1 anno contro difetti di fabbricazione nei materiali e nella lavorazione a partire dalla data di acquisto. Durante il periodo di garanzia, sostituiremo gratuita- mente il prodotto ritenuto difettoso in condizioni di utilizzo e servizio ragionevoli, come stabilito esclusivamente da RainPoint. - Page 110 *GUARDE ESTE MANUAL PARA FUTURAS CONSULTAS. MANUAL DE USUARIO Temporizador de agua WiFi de 2 zonas con concentrador WiFi N º de Modelo.: TTV203WRF N º de Modelo.: TWG004WRF Web: www.rainpointonline.com Correo electrónico: service@rainpointonline.com WhatsApp:+1626-780-5952 Número gratuito en EE. UU. (inglés): +1 833-381-5659 (lunes a viernes: 9�30 a .
- Page 111 BIENVENIDO A RAINPOINT RainPoint se complace en presentar el temporizador de agua WiFi de 2 zonas (modo: TTV203WRF), un dispositivo inteligente Sistema de temporizador de riego de subzona para aplicaciones residenciales. Diseñado con las necesidades del Pensando en el cliente, el modelo ofrece 2 válvulas de alto flujo para regar áreas separadas, aplicación simplificada programación y...
- Page 112 CONTENIDO INTRODUCCIÓN CONTENIDO DE LA CAJA RESUMEN DE PRODUCTOS TTV203WRF Temporizador de agua WiFi de 2 zonas Concentrador WiFi TWG004WRF DESCRIPCIÓN DE LAS CARACTERÍSTICAS CONEXIÓN E INSTALACIÓN PASO 1. INSTALA LA APLICACIÓN EN TU TELÉFONO PASO 2. CONECTE EL HUB WIFI PASO 3.
-
Page 113: Introducción
INTRODUCCIÓN CONTENIDO DE LA CAJA 1 x TTV 2 03WRF Temporizador de agua WiFi de 1 zona 1 x Manual de instrucciones 1 manual de usuario. 1 x Guía rápida -110-... -
Page 114: Descripción Del Producto
DESCRIPCIÓN DEL PRODUCTO TTV 2 03WRF TEMPORIZADOR DE AGUA WIFI 2 ZONAS Filtro de entrada Entrada de agua BOTÓN DE ZONA BOTÓN DE IZQUIERDA ZONA DERECHA INDICADOR DE INDICADOR RIEGO DE LA DE RIEGO DE LA ZONA IZQUIERDA ZONA DERECHA SALIDA DE SALIDA AGUA DERECHA... -
Page 115: Concentrador Wifi Twg004Wrf
TWG004WRF CONCENTRADOR WIFI BOTÓN DEL CENTRO INDICADOR DE ENCENDIDO TOMA WiFi CON ENCHUFE FUENTE DE ALIMENTACIÓN ELEMENTOS Especificación Alcance entre WiFi Hub y ruta 160 pies en el área abierta sin interferencias Rango de temperatura de 3 ℃ - 50 ℃ (37 ℉-122 ℉) funcionamiento Banda de frecuencia WiFi 2,4 GHz. -
Page 116: Descripción De Las Características
WiFi. Un agua WiFi El temporizador se puede emparejar con 2 sensores de suelo WiFi. Sólo compatible con sensor de suelo Wi-Fi Rainpoint TCS005FRF (no incluido). Solo compatible con el temporizador de agua WiFi de 1 zona TTV103WRF y el temporizador de agua WiFi de 2 zonas TTV203WRF. -
Page 117: Conexión E Instalación
Registre su cuenta RainPoint Abra su aplicación RainPoint-Tuya, seleccione Registrarse. Siga las instrucciones para registrar una cuenta RainPoint con su correo electrónico o número de teléfono móvil. Nota: Asegúrese de que los detalles de su país/región sean correctos en esta etapa. -
Page 118: Paso 2. Conecte El Hub Wifi
PASO 2: CONECTE EL HUB WIFI Conecte su WiFi Hub a una fuente de alimentación interior cerca de su enrutador WiFi y al exterior. ubicación de su cronómetro. Abra la aplicación RainPoint y toque "Agregar dispositivo " o " " para agregar un nuevo dispositivo. -
Page 119: Paso 3. Conectar El Temporizador Wifi
Mantenga presionado el botón del concentrador WiFi hasta que el indicador de encendido parpadee rápidamente (2 veces por segundo) . Luego seleccione " El indicador de confirmación parpadea rápidamente " y toque " Siguiente ". La APP buscará y empareja tu concentrador WiFi automáticamente. Nota: Si el indicador no parpadea rápidamente (2 veces por segundo), toque "Restablecer dispositivos". - Page 120 WiFi aparecerán que se muestra en la pantalla de inicio de la APLICACIÓN. Consejos: si es necesario, se pueden agregar tres temporizadores WiFi adicionales a la aplicación RainPoint a través de un concentrador WiFi. Un temporizador WiFi independiente está disponible en Amazon.
-
Page 121: Paso 4. Instale El Temporizador Wifi
PASO 4. INSTALE EL TEMPORIZADOR WIFI Menos de 160 pies (Sin arbustos, paredes bloqueando) Entrada Conecte la entrada del temporizador paralela al grifo/grifo exterior y apriételo únicamente a mano. Desde la salida del temporizador conecte un sistema de riego por goteo o una manguera de jardín. Salida ADVERTENCIA: El temporizador WiFi sólo se puede utilizar para agua fría. -
Page 122: Programación De Aplicaciones
Agregar dispositivos Todos los dispositivos Puede agregar varios dispositivos Una lista de verificación de todos RainPoint en la APLICACIÓN para los dispositivos que tienes crear un sistema de riego conectados. Toque los íconos para doméstico inteligente. ingresar a la página de operación Gestión de salas... -
Page 123: Parámetro Del Dispositivo
último uso de agua en la pantalla. Temperatura y humedad del suelo Combinado con el sensor de suelo WiFi RAINPOINT (se vende por separado), también puede mostrar la temperatura del suelo y humedad. Si la humedad del suelo es superior al nivel de prohibición de agua establecido en el sensor de suelo, el color de fondo de la... -
Page 124: Riego Manual
¿Cómo obtener control de terceros/control por voz? Si tiene Amazon Alexa o Google Assistant, toque el ícono " " en la esquina superior derecha de la página del dispositivo, seleccione un dispositivo de control de voz de terceros de su propiedad, luego toque la guía de operación y siga las instrucciones para Conecte su temporiza- dor de agua WiFi al dispositivo de control por voz. -
Page 125: Plan De Riego Y Retraso Manual Por Lluvia
PLAN DE RIEGO Y RETRASO MANUAL POR LLUVIA Zona 1 /Zona 2 Día de riego de la semana Seleccione Zona 1 o Zona 2 Cada plan tiene una puntuación para riego manual. La zona 1 de color específica. La puntu- controla la válvula izquierda del ación en un color específico en temporizador. - Page 126 Modo de riego ( riego a tiempo) Toque Modo de riego. Utilice el interruptor horario de 24 horas para alternar entre el horario de 24 horas y AM/PM. Haga clic para seleccionar Riego a tiempo. Toque Hora de inicio para abrir el reloj y establecer una hora de inicio.
-
Page 127: Sensor De Suelo Wifi Y Medidor De Flujo De Agua
SENSOR DE SUELO WIFI Y MEDIDOR DE FLUJO DE AGUA Sensor de suelo WiFi (se vende por separado, no incluido) Si tiene un sensor de suelo WiFi Rainpoint, puede vincularlo con su temporizador de agua Rainpoint WiFi y su concentrador WiFi. -
Page 128: Toma Wifi
APLICACIÓN. Toque Encendido para encender o apagar la toma WiFi. Nota: Cada concentrador WiFi RainPoint se puede utilizar como toma WiFi. Pero solo cuando el temporizador WiFi esté Emparejado correctamente con el concentrador WiFi, el dispositivo de enchufe WiFi se puede agregar a la aplicación . -
Page 129: Encendido/Apagado Según Programación
APLICACIÓN RAINPOINT puede obtener la información del pronóstico del tiempo de la ubicación de su hogar. Cuando establece las condiciones para retrasar inmediatamente el plan de riego cuando llueve, el temporizador ejecutará... - Page 130 3 pasos para configurar la automatización o tocar para ejecutar Cree una escena: según sus necesidades, establezca las condiciones para la automatización o toque para ejecutar. Agregar tarea: establezca las tareas que el dispositivo debe realizar cuando se cumplan las condiciones.
-
Page 131: Cómo Configurar El Retraso Automático Por Lluvia
¿Cómo configurar el retraso automático por lluvia? Toque " Escena " en la parte inferior de la pantalla de inicio de la APLICACIÓN. Seleccione "Automatización" y toque "Crear escena" . Toque "Cuando el clima cambie ", luego seleccione "Clima" ; ubique la ciudad, luego seleccione "Lluvioso"... -
Page 132: Gestión Del Hogar
WiFi se cerrará automáticamente y el riego se retrasará 24 horas. GESTIÓN DEL HOGAR Rainpoint admite agregar miembros de la familia y compartir su dispositivo doméstico para lograr la coadministración del sistema de riego doméstico con su familia. -
Page 133: Reiniciar El Dispositivo
Configura tu Nombre de la casa, Gestión de la habitación y Ubicación de la casa . Nota : La ubicación de casa está relacionada con la información del pronóstico del tiempo obtenida por el sistema. Agregue Miembro de inicio y establezca los permisos de uso correspondientes para los miembros. -
Page 134: Solución De Problemas
Esto significa que se ha introducido el emparejamiento. Si su producto Rainpoint no funciona correctamente después de intentar los pasos de solución de problemas, por favor contáctenos por teléfono o correo electrónico: EE. UU.:+1-833-381-5659 | Reino Unido: +44-800-808-5337 | DE:+49-800-182-0576 | servicio@rainpointonline.com... - Page 135 EL SIGNIFICADO DE LA LUZ LED temporizador de agua WiFi TTV 2 03WRF Reinicio de encendido: las luces roja y blanca parpadean alternativamente 4 veces cuando la máquina está encendida. Restaurar la configuración de fábrica: Mantenga presionado el botón del temporizador mientras lo enciende, suelte el botón después de que la luz roja parpadee y el temporizador ingresará...
-
Page 136: Garantía
GARANTÍA RainPoint ofrece una garantía de 1 año contra defectos de fabricación en materiales y mano de obra a partir de la fecha de compra. Durante el período de garantía, reemplazaremos sin cargo el producto que se encuentre defectuoso bajo un uso y servicio razonables según lo determine únicamente RainPoint. - Page 137 EC REP: VIAJE ELECTRONIC COMPANY LIMITED ADDRESS: E588, 13 ADELAIDE ROAD, DUBLIN, D02 P950, IRELAND Email: VIAJEELE@OUTLOOK.COM UK REP: SUJE ELECTRONIC COMPANY LIMITED ADDRESS: S211 92A BURY OLD ROAD, MANCHESTER, ENGLAND, M45 6TQ EMAIL: SUJEELECTRONIC@OUTLOOK.COM Manufacturer/Hersteller/Fabricant/Fabricant/Fabricante: FUJIAN BALDR TECHNOLOGY CO.,LTD ADDRESS/ADRESSE/ADRESSE/INDIRIZZO/DIRECCION: Floor 3, Building 2, No.71 Yangqi Road, Fuwan Industrial Area, Cangshan District, Fuzhou, China.
- Page 138 Scan the QR code to get fast support Need Help? Please contact us US toll free: +1 833-381-5659 (Mon-Fri: 9:30 AM-5:30 PM PST) DE toll free: +49 800-182-0576 (Mon-Fri: 9:00 AM-5:00 PM CET) UK toll free: +44 800-808-5337 (Mon-Fri: 9:00 AM-5:00 PM CET) Email: service@rainpointonline.com WhatsApp: +1 626-780-5952...
Need help?
Do you have a question about the TTV203WRF and is the answer not in the manual?
Questions and answers