Table of Contents
Advertisement
Quick Links
Advertisement
Table of Contents

Subscribe to Our Youtube Channel
Related Manuals for Four E's Scientific MultiEX 096P


Summary of Contents for Four E's Scientific MultiEX 096P
- Page 1 Operating Instructions MultiEX 096P Nucleic Acid Extraction System...
-
Page 2: Table Of Contents
Contents 1. Introduction - Intended Use - Working Principles & Steps 2. Safety Instructions 3. Unpacking & Installation 4. Operating Instructions 5. User Interface 6. Consumable List 7. Troubleshooting 8. Maintenance & Care 9. Warranty... -
Page 3: Introduction
1. Introduction MultiEX 096P is an automated nucleic acid extraction and purification system which can process up to 96 samples per run. The system uses Magnetic Bead Separation technology, and has the capability of extracting and purifying nucleic acids from a variety of biological samples, such as whole blood, viruses, tissues, plants, animals, fungi, bacteria, cultured cells, swabs, feces, blood cards, etc., including for extraction... -
Page 4: Safety Instructions
MultiEX 096P Automated nucleic acid extraction system can process up to 96 samples per run. The automated system integrates lysis, binding, mixing, washing, and elution steps to extract nucleic acid of high purity. Magnetic beads, with strong affinity and adsorption force for nucleic acids, binds to the nucleic acid released on lysis. The nucleic acids bound to the magnetic beads can be transferred to different well plates using the magnetic rods. -
Page 5: Hot Surface
may lead to physical injury or even death or could cause damage to the instrument. Important! “Important” shows the important notes for usage, as well as prohibited actions. Note “Note” indicates the notes, procedures that should be obeyed and supplementary information for use. - Page 6 with a dry cloth. • When you disconnect the plug from the outlet, be sure to hold the power plug itself. Do not pull the power cable. • Do not plug or unplug the power supply with wet hands. • For maintenance, disconnect the power plug from the outlet. •...
-
Page 7: Mechanical Hazards
MECHANICAL HAZARDS WARNING! • The moving parts of this system may cause personal injury during operation. While running, the door must be closed. User shouldn’t extend hands into the working area while sample run or calibration is in progress. HOT SURFACE •... -
Page 8: Unpacking & Installation
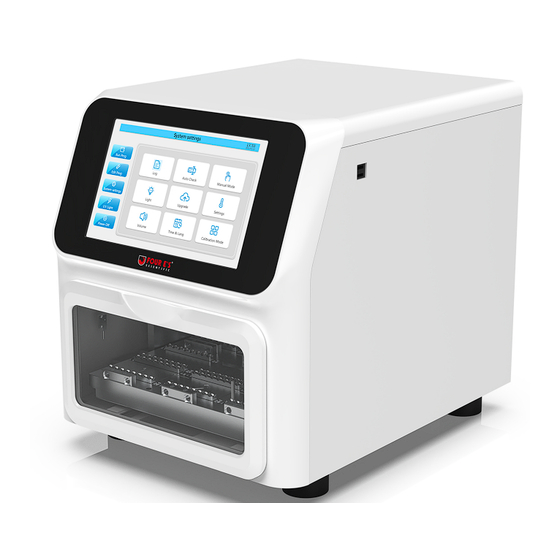
3. Unpacking & Installation 3.1 Unpacking Unpack the device carefully and check for any damages which may have arisen during transit. Please contact the manufacturer / supplier for technical support. Note: If there is any apparent damage to the device, please do not connect the power line 3.1.1 Contents of the Package Item... - Page 9 3.1.2 System Structure This automatic nucleic acid extraction system consists of main housing, mechanical movement mechanism, magnetic rods, color touch screen, UV sterilizer, heating and temperature control modules, and control system. ① USB port ② Glass panel ③ 10-inch touchscreen ④...
- Page 10 3.2 Device Installation and Setting Up 3.2.1 Operating conditions MultiEX 096P must be installed and used indoors and under the following conditions: • Ambient temperature: 10°C ~ 40°C • Relative humidity: 30% ~ 80% • Power supply: 200-240VAC, 100-120VAC; 50/60Hz •...
- Page 11 3.2.3. System Specifications Model MultiEX 096P Throughput 1-96 samples Processing volume 50-1000ul Processing time 20-40min/run (depending on reagents and volumes) Plate capacity 6 plates Plate type 96-well deep-well plate Other consumables Magnetic rod sleeves Reagent type Magnetic bead-based reagent kits (open system) Heating Temperature Range 37°C- 125°C...
-
Page 12: Operating Instructions
4. Operating Instructions 4.1 Power connection Connect one end of the power cord to the power port on the back of the instrument and the other end to the power socket, then turn on power. 4.2. Installation and Removal of Magnetic Rod Sleeves Install the magnetic rod sleeves: Insert the magnetic rod sleeves to the fixing grooves of the magnetic rod sleeve rack. - Page 13 4.3 Installing the deep-well plates Place the deep well plate on to the well slots provided on the platform or on the heating pads. Press down the deep-well plate until it’s placed correctly with a “click” sound. The same installation way goes for the other deep-well plates.
-
Page 14: User Interface
5. User Interface 5.1 Start up Close the door, and turn on the power switch on the back of the instrument and wait for the start-up display. The Home Screen has Five Main Menus which can be accessed from the side bar: 1. - Page 15 5.2 Create & Edit Programs To create or edit program, press the ‘Edit Prog.’ Icon on the Home screen side bar menu. ‘Edit Prog.’ Menu Options The following options can be accessed from the bottom menu bar • Create: To create new programs •...
- Page 16 5.2.1‘Edit Prog.’ Instructions Creating New Programs: Programs can be created in two ways. • Option 1 -‘Create’ option: Use this option when creating an entirely new program, and while operating the instrument for the first time. Once the program is created all program parameters needs to be entered for each step.
- Page 17 Edit Parameter: After creating the new program, you need to set corresponding para -meters for each step by clicking “Edit” button. Scroll down to the bottom of the Program List to see the newly created program and click to select the program. Then click the “Edit” button on the bottom menu to edit program parameters.
- Page 18 After copying the program, click the “Paste” button in the bottom menu to create a new program by replicating the program parameters of the old program. You will be prompted to rename the program on clicking the “Paste” button. Enter new name and click ‘Confirm‘.
- Page 19 The newly renamed program will appear just below the copied program. Click on the program to select. Then click the “Edit” button on the bottom menu to edit program parameters. This will take you to the ‘Edit Parameters’ page. For detailed instructions on how to add steps and edit program parameters, please see section 5.2.1.3 Editing Program Parameters.
- Page 20 • Add step: Create a new step • Delete step: Delete existing step • Copy Step: Copy an existing step to replicate • Paste Step: Paste a copied step • Auto check: Set Auto-Check Note: Long press any step to edit parameters Adding a Step Click “Add Step”...
- Page 21 Copy step & Paste step (Copying and replicating an existing step) Useful if you want to copy an existing step and then edit step parameters. Choose a step, click “Copy step” and then “Paste step” to replicate the step. Once the new step is created edit step parameters by long pressing, to enter ‘Edit Step’.
- Page 22 • Mix Time: The time for mixing during this step • Mix Speed: Higher the speed level, the faster the stirring. Generally, high-viscosity liquids require high speed while low-viscosity liquids require low speed, otherwise the liquid may splash. • Magnet Lowering (Time): It is the time set for the magnetic rod head to move from the liquid level towards the bottom of the well at a constant speed.
- Page 23 • Lysis: Sets the temperature in heating Plate 1 for lysis • Elution: Sets the temperature in heating plate 6 for elution • Auto check: Click “Auto check” to enter the setting page. As shown below, you can choose to check different items automatically before running the program. 5.3 Run Program All saved programs can be found under the 'Run Prog.' Menu on the Home Page.
- Page 24 On choosing any saved programs, you can see the full ‘Program Parameters', and then the user can start the program by clicking the ‘Run' Icon. Run Status: The extraction progress can be monitored from the ‘Run Status’ page. The corresponding well plate icon will be high lighted when the program is running on those wells.
- Page 25 Nucleic acid extraction progress bar. 5.2.2.2 Functions on the ‘'Run Status'Page :Starts the program. :Pauses the program at the current running position. Click again to resume. :Ends the program and all moving components go back to initial position. :All modules are reset but the program will not end. :Turns On/Off the light to illuminate the extraction area :Turns On/off UV sterilization :Click ‘Parameters’...
- Page 26 5.4.1 Log Click the date on to view the corresponding working record. The detailed steps, running times and errors are recorded. Export: Click , and select initial date and end date and click “Confirm” to download the data to USB. (Export format is TXT)
- Page 27 5.4.2 Auto Check Choose the auto checks you want to perform by selecting the corresponding options. Unselect the options you don’t want to check. 5.4.3 Manual mode The manual mode is intended for use by trained service professionals and is not recommended for use by the customer.
- Page 28 5.4.4 Light The light in the extraction chamber can be turned on or off with this setting 5.4.5 Upgrade (Software Upgrade): “Interface Software Upgrade” and “Control Software Upgrade” are available. User needs to put the updated installation package in the root directory of USB. (Name of Interface Software Upgrade: update.apk;...
- Page 29 5.4.6 Settings (Ventilation & Pre-Heat Settings) “Air Drying Fan Control” and “Auto-heat Setting for Blocks” Air Drying Fan Control: Turn on/off the fan near the heating platform. Auto-Heat Settings for Blocks: Control the block temperature after the system starts or after the extraction completes. 5.4.7 Device Information Check Device Serial Number, Interface Software version and Control Software version.
- Page 30 5.4.8 Time & Lang (Time/Language settings) Set the time. Choose the language between Chinese and English 5.4.9 Calibration Mode The calibration is rarely required and is done only when there is some change in sensor position. Entering the calibration mode requires a password. There are 4 calibrations: “Gap calibration between magnetic rods and magnetic rod sleeves”, “Well plate calibration”, “Calibration of the magnetic rod sleeves and the deep well plate bottoms”and "Temperature calibration"...
-
Page 31: Consumable List
If ‘Auto-Off on Completion’ is selected, the device will turn off automatically after the UV sterilization is completed. -
Page 32: Troubleshooting
6. Trouble shooting Troubleshooting and solutions Causes Solution Issue Power cord isn’t plugged in correctly Plug in the power cord correctly No display on Power isn’t connected Check and connect power screen after Blown Fuse powered on Contact supplier Power indication light is off ‘System Hang’... -
Page 33: Warranty
by UV light for more than 30 minutes. Avoid contact with strong corrosive liquids and mechanical impact. • When the device isn't in regular use, it is recommended to do a trial run every 30 days. • Ensure that the instrument is placed on a firm and flat surface, the input voltage is stable, and the operating environment, meets the temperature and humidity requirements. - Page 34 Date:2024.09.06 Version:V1.0...
Need help?
Do you have a question about the MultiEX 096P and is the answer not in the manual?
Questions and answers