Table of Contents
Advertisement
Quick Links
Advertisement
Table of Contents

Related Manuals for Four E's Scientific MultiEX 032


Summary of Contents for Four E's Scientific MultiEX 032
- Page 1 Operating Instructions Nucleic Acid Extraction System MultiEX 032...
-
Page 2: Table Of Contents
Contents 1. Introduction - Intended Use - Working Principles & Steps 2. Safety Instructions 3. Unpacking & Installation 4. Operating Instructions 5. User Interface 6. Trouble shooting 7. Error Codes 8. Maintenance & Care 9. Warranty... -
Page 3: Introduction
Fields of Application: It is widely used in routine scientific research, genomics, food safety, disease diagnosis, forensic identification, and other fields. - Working Principle and Steps The MultiEX series extractors works on the principle of magnetic bead adsorption. MultiEX 032 Automated nucleic acid extraction system can process up to... - Page 4 32 samples per run. The automated system integrates lysis, binding, mixing, washing, and elution steps to extract nucleic acid of high purity. Magnetic beads, with strong affinity and adsorption force for nucleic acids, binds to the nucleic acid released on lysis. The nucleic acids bound to the magnetic beads can be transferred to different wells using the magnetic rods.
- Page 5 Washing: Alcoholic wash buffers in the wash wells facilitate the removal of contaminants. Since the magnetic sleeves were soaked in alcohol during the wash stage, they need to “air dry” above the wells so that the alcohol can volatilize before starting the elution stage. Stir up Stir up and down...
-
Page 6: Safety Instructions
2. Safety Instructions Standards & Regulations The product is manufactured in accordance with the following standards: Safety Standards: EN 61010-1 : 2020 / A1 : 2019, EN 61010-2-010 : 2020, EN 61010-2-101 : 2017, UL 6101-1 EMC Standards: EN 61326-1 : 2013, EN 61326-2-6 : 2013 Associated EU guidelines:EMC-guideline 89/336/EWG We declare under our sole responsibility that this product corresponds to the directives... - Page 7 For your safety and that of others, follow the guidelines provided in the following pages concerning the use of the MultiEx 032 system. WARNING: Ignoring the following may lead to fire or electric shock.
- Page 8 • In case there is any liquid residue inside the device, wipe it up a soft paper tissue, etc. • Repairs to the MultiEx 032 system should only be performed by personnel specifically authorized by Manufacturer. • Only original replacement parts should be used.
- Page 9 extend hands into the working area while the sample run or calibration is in progress. HOT SURFACE • Touching the heating pads while in operation may cause burn injury. User shouldn’t touch the heating blocks during or immediately after operation. Regarding Reagent Kit:...
-
Page 10: Unpacking & Installation
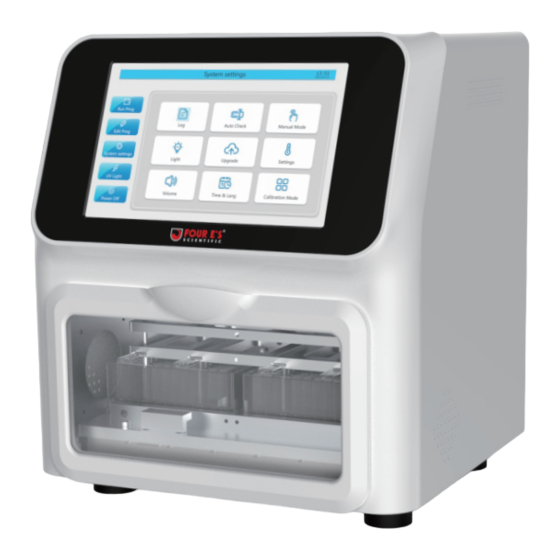
3. Unpacking & Installation 3.1 Unpacking Unpack the device carefully and check for any damages which may have arisen during transit. Please contact the manufacturer/supplier for technical support. Note: If there is any apparent damage to the device, please do not connect the power line 3.1.1 Contents of the Package Item Main Unit... - Page 11 3.1.2 System Structure This automatic nucleic acid extraction system consists of main housing, mechanical movement mechanism, magnetic rods, color touch screen, UV sterilizer, heating and temperature control modules, and control system. ① ② ⑦ ⑧ ③ ⑨ ④ ⑤ ⑥ ①...
- Page 12 • Environment temperature: 10℃~40℃ • Relative humidity: 30%~80% • Power supply: 200-240VAC, 100-120VAC; 50/60Hz • Good ventilation and no direct sunlight • The installation requires a flat and stable space of no less than 65cm× 50cm (length × width), and capable of bearing a load of more than 70KG.
- Page 13 3.2.3. System Specifications Sample Quantity 1-32 Plate Quantity Plate Type 96-well deep-well plate Reagent Type Magnetic bead-based open-source reagents Volume Capacity 50-1000μL Heating Temp. Room temp.~140℃ Dimension 349mm*325mm*390mm Mixing Intensities Adjustable: 8 Levels Max. Mixing Speed 10Hz (10 times up and down in 1 second) Display 10-inch color touch screen Magnetic Bead Recovery Rate...
-
Page 14: Operating Instructions
4. Operating Instructions 4.1 Power connection Connect one end of the power cord to the power port on the back of the instrument and the other end to the power socket, then turn on power. 4.2. Installation and Removal of Magnetic Rod Sleeves Installing the sleeves: Insert the magnetic rod sleeves fully into the grooves. -
Page 15: User Interface
① ① 5. User Interface 5.1 Start up Close the door, and turn on the power switch on the back of the instrument and wait for the start-up display. The Home Screen has Five Main Menus which can be accessed from the side bar: 1. - Page 16 5.2 Create & Edit Programs To create or edit program, press the ‘Edit Prog. ’ Icon on the Home screen side bar menu. ‘Edit Prog.’ Menu Options The following options can be accessed from the bottom menu bar • Create: To create new programs •...
- Page 17 • Copy: Copy a Selected Program • Paste: Paste a copied program (need to rename while pasting) • Delete: Delete a selected program Note: In the ‘Edit Program’ Menu a list of existing programs will be shown in chronological order. Long press any program to edit ‘Program Name’...
- Page 18 Edit Parameter: After creating the new program, you need to set corresp -onding parameters for each step by clicking “Edit” button. Scroll down to the bottom of the Program List to see the newly created program and click to select the program. Then click the “Edit” button on the bottom menu to edit program parameters.
- Page 19 Option 2: ‘Copy’ + ‘Paste’ Copy program & Paste Program: From the program list in the ‘Edit Prog.’ Menu, select the program you want to copy by clicking on the program. Then click “Copy” button in the bottom menu to copy the program. After copying the program, click the “Paste”...
- Page 20 The newly renamed program will appear just below the copied program. Click on the program to select. Then click the “Edit” button on the bottom menu to edit program parameters. This will take you to the ‘Edit Parameters’ page. For detailed instructions on how to add steps and edit program parameters, please see section 5.2.1.3 Editing Program Parameters.
- Page 21 • Add step: Create a new step • Delete step: Delete existing step • Copy Step: Copy an existing step to replicate • Paste Step: Paste a copied step • Auto check: Set Auto-Check Note: Long press any step to edit parameters Adding a Step Click “Add Step”...
- Page 22 Copy step & Paste step (Copying and replicating an existing step) Useful if you want to copy an existing step and then edit step parameters. Choose a step, click “Copy step” and then “Paste step” to replicate the step. Once the new step is created edit step parameters by long pressing, to enter ‘Edit Step’.
- Page 23 deep well plate (and 7-12 refers to wells on the other half of the well plate) • Vol. (Volume): The total volume after filling samples and reagents in the corresponding wells. The volume should be less than 1000μL to avoid spilling. •...
- Page 24 • Wait (Wait Time): If the value is set greater than 0, the magnetic rod sleeves will stay above the deep-well plates for that much time. If the corresponding step collects the magnetic beads and moves up, then the wait time can facilitate air drying of the bead. Air drying is usually required before elution.
- Page 25 5.3 Run Program All saved programs can be found under the ‘Run Prog.’ Menu on the Home Page. Programs chosen as frequently-used programs will be shown on as icons on the ‘Run Prog.’ menu and all programs can be accessed by clicking the ‘Prog.
- Page 26 Run Status: The extraction progress can be monitored from the ‘Run Status’ page. The corresponding well(s) icon will be highlighted when the program is running on those wells. Extraction in Progress Nucleic acid extraction progress bar. 5.2.2.2 Functions on the ‘Run Status’ Page :Starts the program.
- Page 27 5.4. Device Settings Settings Icon in the Main Menu help configure and manage the different device settings: 5.4.1 Log (Extraction Logs): Click the date on to view the corresponding working record. The detailed steps, running times and errors are recorded.
- Page 28 Export: Click , and select initial date and end date and click “Confirm” to download the data to USB. (Export format is TXT) 5.4.2 Auto Check Choose the auto checks you want to perform by selecting the corresponding options. Unselect the options you don’t want to check.
- Page 29 5.4.3 Manual mode The manual mode is intended for use by trained service professionals and is not recommended for use by the customer 5.4.4 Light The light in the extraction chamber can be turned on or off with this setting...
- Page 30 5.4.5 Upgrade (Software Upgrade): “Interface Software Upgrade” and “Control Software Upgrade” are available. User needs to put the updated installation package in the root directory of USB. (Name of Interface Software Upgrade: update.apk; Name of control software upgrade:update.hex). After the program upgrade is completed, it the device needs to be restarted.
- Page 31 5.4.7 Sound Alert (Mute/Unmute) The user can mute or unmute the sound alerts (error alert & beep alert when extraction is finished)
- Page 32 5.4.8 Time & Lang (Time/Language settings) Set the time. Choose the language between Chinese and English 5.4.9 Calibration Mode The calibration is rarely required and is done only when there is some change in sensor position. Entering the calibration mode requires a password.
-
Page 33: Trouble Shooting
after the UV sterilization is completed. 6. Trouble shooting Trouble shooting and solutions Issue Causes Solution Power cord isn’t plugged in Plug in the power correctly cord correctly No display on screen after Power isn’t connected Check and connect power powered on Blown Fuse Contact supplier... - Page 34 Issue Causes Solution ‘System Hang’ Restart the device Operation can’t stop automatically after Sensor is damaged/ Contact supplier opening the door open circuit fault Remove obstacle, and Obstacle stops robot contact supplier if the arm movement obstacle can’t be removed Cannot complete Remove obstacle, and Obstacle on the magnetic...
-
Page 35: Error Codes
7. Error Codes Error Types Error Description Error Codes Remark Short circuit of heating module1-12 Error 301~ Temperature Error 324 Open circuit of heating module 1-12 The main control system communication is Error 101 Communica abnormal. -tion The heating control system communication Error 102 is abnormal. -
Page 36: Maintenance & Care
8. Maintenance and Care • The instrument should be cleaned regularly with 75% ethanol and be disinfected by UV light for more than 30 minutes. Avoid contact with strong corrosive liquids and mechanical impact. • When the device is not in regular use, it is recommended to do a trial run every 30 days. - Page 37 Scope The following conditions are not covered under the warranty. • Faults resulting from improper use and maintenance which are not in accordance with operating instructions. • deep well plates and magnetic rod sleeves or due to incorrect installation. • Issues caused by unauthorized disassembly or modification.
Need help?
Do you have a question about the MultiEX 032 and is the answer not in the manual?
Questions and answers