Table of Contents
Advertisement
Quick Links
FPI M
AG
TM
FPI Mag 3000
Electromagnetic Flow Meter
Installation, Operation and
Maintenance Manual
Standard Model
For use in non-hazardous locations
HL Model
For use in hazardous locations:
• Class I, Division 2, Groups A B C D, T5
30127-05 Rev. 1.0
• Class I, Zone 2 IIC T5
26AUG2024
Hach's Flow Solutions by
Advertisement
Table of Contents

Related Manuals for McCrometer HACH FPI Mag 3000


Summary of Contents for McCrometer HACH FPI Mag 3000
- Page 1 FPI M FPI Mag 3000 Electromagnetic Flow Meter Installation, Operation and Maintenance Manual Standard Model For use in non-hazardous locations HL Model For use in hazardous locations: • Class I, Division 2, Groups A B C D, T5 30127-05 Rev. 1.0 •...
-
Page 2: Table Of Contents
LTRA Contents SAFETY SYMBOLS AND WARNINGS . . . . . . . . . . . . . . . . . . . . . . . . . . . . . . . . . . . . . . . . . . . . . . . . . . . . . . . . . . 1 1 .0 DESCRIPTION OF FLOW METER . -
Page 3: Safety Symbols And Warnings
When installing, operating, and maintaining McCrometer equipment where hazards may be present, you must protect yourself by wearing Personal Protective Equipment (PPE) and be trained to enter confined spaces. Examples of confined spaces are manholes, pumping stations, pipelines, pits, septic tanks, sewage digesters, vaults, degreasers, storage tanks, boilers, and furnaces. -
Page 4: Description Of Flow Meter
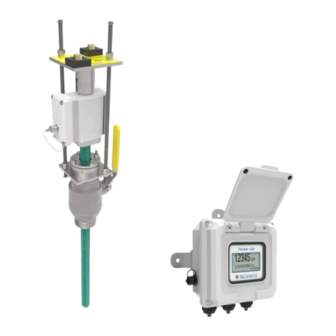
LTRA DESCRIPTION OF FLOW METER 1 .0 DESCRIPTION OF FLOW METER Hach’s FPI Mag (Full Profile Insertion) flow meter provides accurate flow measurement for full-pipe clean water applications. The electromagnetic sensor automatically senses and corrects for shifting velocity in the pipe by constantly obtaining an area weighted mean velocity. -
Page 5: Verify Information On Cable Tags
LTRA UNPACKING AND VERIFYING COMPONENTS The transmitter and sensor are supplied as a custom calibrated matched system. Verify the system serial numbers on both the transmitter and sensor match. This will ensure a properly calibrated system. The meter serial number is located on the The tag on the side of the transmitter has the transmitter side of the sensor body on a silver label. -
Page 6: Tools Required For Installation
LTRA SENSOR PROBE INSTALLATION 2 .3 Tools Required for Installation Tools provided: Tools recommended for installation: 2 - 9/16” or 3/4” reversible ratchet wrenches. (Size is dependent on the 1 - 7/16” wrench or 1 - pipe wrench size of the retaining rods supplied crescent wrench capable of a 4”... -
Page 7: Step 1: Review Names Of Sensor Components
LTRA SENSOR PROBE INSTALLATION STEP 1: Review names of sensor components This manual refers to the part names of the sensor. It is important to be familiar with the parts and their names as shown below in Figure 5 when following the installation instructions. For a full list of replaceable parts with part numbers, see Section 13.0. -
Page 8: Step 2: Detach The Cable Quick Connects
The upstream and downstream straight-pipe recommendations are conservative, based on research completed in the McCrometer NIST traceable calibration facility. In many cases, the installation distances suggested below can be shortened depending on flow conditions and piping layout. - Page 9 Note: The table above is not inclusive of each possible installation scenario for Hach’s FPI Mag. For installations not included in the table, the McCrometer Applications Team is available to review cases and make a determination as to the viability of the installation.
-
Page 10: Step 4: Verify Sufficient Installation Clearance From Obstructions
LTRA SENSOR PROBE INSTALLATION VALVE VALVE VALVE VALVE 1D DOWN- 1D DOWN- 20D UPSTREAM 20D UPSTREAM STREAM STREAM FLOW FLOW FLOW FLOW Figure 7 . FPI Mag Installation Orientation With A Gate Valve Or Elbow Rotational axis of a butterfly valve Butterfly Valve Install the FPI Mag perpendicular to the... -
Page 11: Step 5: Installing The Ball Valve
LTRA SENSOR PROBE INSTALLATION STEP 5: Installing the ball valve WARNING! Pressurized pipes should only be hot tapped, cut, or drilled by qualified personnel. If possible, depressurize and drain the pipe before attempting any installation. The sensor comes standard with a 2” stainless steel ball valve and a 2” x close stainless steel nipple. The 2” x close stainless steel nipple is to be used if the installation site has a female fitting, i.e., a welded coupling. -
Page 12: Step 6: Ensure Sensor Will Be Installed Perpendicular To The Pipe
LTRA SENSOR PROBE INSTALLATION STEP 6: Ensure sensor will be installed perpendicular to the pipe The probe should be installed perpendicular to the pipe as shown in Figure 12 for a vertical installation. The allowable tolerance for installation is ± 0.5°. A perpendicular installation is determined by the coupling that is mounted on the pipe. Prior to installing the sensor, a level ruler should be used to check the coupling and ensure that it sits level. -
Page 13: Step 8: Connect The Sensor Onto Ball Valve
LTRA SENSOR PROBE INSTALLATION STEP 8: Connect the sensor onto ball valve The sensor assembly uses a compression seal, which keeps the sensor watertight when the pipe is under pressure. Care must be taken when installing the sensor to avoid leaks. Follow the steps below to install the sensor onto the pipe valve: Put a generous amount of the pipe sealant or Teflon tape on the compression seal threads. -
Page 14: Step 10: Insert The Sensor Probe Through The Ball Valve Into The Pipe
(Figure 18) NOTE 3: Using the sensor insertion tool McCrometer recommends using a sensor insertion tool (see Figure 19) to rotate the captive nuts. This will ensure the top plate compresses evenly and will help avoid any damage to the sensor. - Page 15 LTRA SENSOR PROBE INSTALLATION Follow the steps below to insert the sensor probe into the pipe . If you disassembled and reassembled the compression seal, hand tighten the compression seal bolts and nuts. DO NOT FULLY TIGHTEN THE COMPRESSION SEAL BOLTS AND NUTS. If you did not disassemble the compression seal, proceed to step 2.
-
Page 16: Step 11: Apply Appropriate Compression Load To The Sensor
LTRA SENSOR PROBE INSTALLATION STEP 11: Apply appropriate compression load to the sensor A compression load is required to be applied at the top of the sensor forcing the bottom of the sensor to seat firmly against the far wall of the pipe. The amount of load is indicated by the three lines etched into the top plate and the location of the set screw relative to the lines. -
Page 17: Step 12: Install The Retaining Rods
LTRA SENSOR PROBE INSTALLATION STEP 12: Install the retaining rods After the sensor has been inserted and the load adjusted, remove the insertion rods and install the shorter retaining rods. This will make the sensor assembly more compact. (Figure 25) If the short retaining rods are not used, run a 3/8"... -
Page 18: Step 13: Attach The Ground Wire
LTRA INSTALLING THE Transmitter AND CABLES STEP 13: Attach the ground wire The FPI Mag meter is electrically continuous to a conductive (non PVC) pipe through the retaining rods. Additional grounding may be required to a dedicated earth ground via ring terminal and 10 AWG wire (not provided). -
Page 19: Mounting The Transmitter
IMPORTANT: Do not cut or alter the cable length on power or signal cables! Connections to the sensor must be made with cable supplied by McCrometer specifically for that purpose. Do not substitute the supplied cable with other types of cable, even for short runs. For repairs or added lengths of cable, the entire cable between the sensor and the transmitter must be replaced. -
Page 20: Pulling Sensor Cable Through Electrical Conduit
LTRA INSTALLING THE Transmitter AND CABLES INSTALLING THE TRANSMITTER AND CA INSTALLING THE TRANSMITTER AND CABLES ProComm 3000 ProComm 3000 4 .4 Pulling Sensor Cable Through Electrical Conduit It is very important to protect the end of the sensor cable when pulling it through a conduit. Pulling Sensor Cable Through Electrical Conduit Pulling Sensor Cable Through Electrical Conduit Cable cover is... -
Page 21: Internal Wire Connection
LTRA INTERNAL WIRE CONNECTION 5 .0 INTERNAL WIRE CONNECTION This section describes cable and wire harness connection inside the transmitter. Section 6.0 describes wire connection for all peripherals outside of the transmitter, including pulse output and external power options. 5 .1 Terminal Block Diagram and Grounding Lug Coils and electrodes Power... -
Page 22: Wiring Diagrams
LTRA INTERNAL WIRE CONNECTION 5 .2 Wiring Diagrams TERMINAL BLOCK ASSIGNMENTS Coils Harness Terminal Port Wire Color YELLOW Black BLACK Electrodes Harness Terminal Port Wire Color GREEN BARE WIRE Green WHITE Bare wire White Pulse Output Harness Terminal Port Wire Color PINK Pink BROWN... -
Page 23: Optional Smart Output Hook Up
(Figure 36) • Signals and associated wire colors in the McCrometer SmartOutput™ interface cable are identified together in the top row of the table at right. • Corresponding wire colors for transceivers from each compatible AMI vendor are identified in the columns under the top row. -
Page 24: Pin-Out Of Male And Female Connectors
LTRA INTERNAL WIRE CONNECTION INSTALLING THE SMARTTRAX 5 .5 Pin-out of Male and Female Connectors Pin-out of Male and Female Connectors Black FEMALE CABLE Brown Gray Pulse / AMI / 5V Analog White Connector Blue Figure 38 . Pin-out of Female Connector Figure 12. -
Page 25: External Wire Connection
IMPORTANT Connections to the sensor must be made with cable supplied by McCrometer specifically for that purpose. Do not substitute the supplied cable with other types of cable, even for short runs. For repairs or added lengths of cable, the entire cable between the sensor and the transmitter must be replaced. -
Page 26: Power Options
IMPORTANT To connect sensor and transmitter via quick connect plugs and sockets, only use the supplied cable assemblies from McCrometer. IMPORTANT When not in use, always keep the attached cap firmly screwed into the connector to insure a water-tight seal. -
Page 27: Dc Power Cable (Optional)
LTRA EXTERNAL WIRE CONNECTION 6 .3 DC Power Cable (Optional) The cable contains wiring for both the optional 10-32VDC power to the meter, and the 4-20mA output from the meter. (Figure 44) Note: Input power is for the transmitter only if that option was selected at time of purchase. The 4-20mA loop requires its own power supplied to the loop, not be used with red/black wires. -
Page 28: Solar Panel Option
IMPORTANT Connections to the sensor must be made with cable supplied by McCrometer speci cally for that purpose. Do not substitute the supplied cable with other types of cable, even for short runs. For repairs or added lengths of cable, the entire cable between the sensor and the transmitter must be replaced. -
Page 29: Battery Installation And Replacement
LTRA BATTERY INSTALLATION AND REPLACEMENT ProComm GO Battery Installation and Replacement 7 .0 BATTERY INSTALLATION AND REPLACEMENT Battery Installation and Replacement Procedure for the ProComm GO Converter This procedure applies to all ow meters with the ProComm WARNING GO converter. It describes how to install batteries in a new EXPLOSION HAZARD. -
Page 30: Removing The Batteries
LTRA ProComm GO Battery Installation and Replacement BATTERY INSTALLATION AND REPLACEMENT II. Removing the batteries Unplug tall connectors to sensor, outputs, and Loosen the captive screws opposite of the hinge and power. lift the battery cover. Hinge Hinge screws Connectors Unplug the batteries. - Page 31 LTRA ProComm GO Battery Installation and Replacement BATTERY INSTALLATION AND REPLACEMENT III. Installing the batteries and restoring the power Cut the zip tie holding the 10. Pass the new zip tie through the 11. Wrap the new zip tie around the dry pack to the hinge on the slots in the internal hinge.
-
Page 32: Replacing The Gasket
Copyright © 2022 McCrometer, Inc. All printed material should not be changed or altered without permission of McCrometer. Any published pricing, technical data, and instructions are subject to change without notice. Contact your McCrometer representative for current pricing, technical data, and instructions. -
Page 33: Operation
General The flow meter comes pre-configured from the factory based on the installation parameters provided to McCrometer at the time of order. Other than activating the display, there is nothing required of the user for the basic operation of the flow meter. -
Page 34: Transmitter Configuration
This is only a summary of the configuration tool’s functionality. The software has complete set-up and operation instructions included. The software can be downloaded from the McCrometer Web site. You must have your flow meter’s serial number before you begin. There are no installation files. -
Page 35: Error Messages For Troubleshooting
LTRA ERROR MESSAGES FOR TROUBLESHOOTING 10 .0 ERROR MESSAGES FOR TROUBLESHOOTING Display Message Troubleshooting BAT LOW Battery replacement Kit is needed to replace batteries. The batteries Should last approximately 6-9 months from the time the warning is shown. 420 ERR The 4-20 circuit is not wired correctly. -
Page 36: Sensor Removal
LTRA SENSOR REMOVAL 11 .0 SENSOR REMOVAL WARNING! The pipe may be under pressure. Serious injury or death may result if proper procedures are not followed. Do not attempt to remove the short retaining rods without the long retaining rods properly installed. Do not attempt to remove the sensor with only the short retaining rods. -
Page 37: Specifications
• FPI Mag 5000: ProComm Max transmitter Electronics Mount Remote mount only • Standard: 25’/7.6 m McCrometer supplied submersible cable with each remote mount unit. • Optional: Up to 500’/152.4 m, or 25’/7.6 m max for battery powered. Sensor Cable Lengths •... -
Page 38: Speci Cation Sheet
Warranty 2 years Note regarding cable length: McCrometer recommends minimizing cable length. Electromagnetic ow meters may have unfavorable signal strength to noise ratio in electrically noisy environments. Longer lengths of cable increase the likelihood of interference. In those cases where the meter’s signal must be transmitted a long distance, or where the environment may be particularly noisy, we suggest using the converter’s analog output(s) that allows locating the transmitter as close... -
Page 39: Imperial Units
Speci cation Sheet FPI M LTRA SPECIFICATIONS FPI Mag Flow Meter Flow Meter Pipe Sizes and Flow Ranges with ProComm Go Electronics Imperial Units Standard Flow Ranges Minimum Velocity Pipe ID Range Program Pipe Size Clearance (GPM Standard) Range Defaults (Nominal) Required During Min Pipe... - Page 40 LTRA SPECIFICATIONS SPECIFICATIONS ProComm 3000 PROCOMM GO TRANSMITTER SPECIFICATIONS 10.0 SPECIFICATIONS Physical Speci cations Electronic Housing Diecast aluminum, powder coated enclosure w/ tamper resistant seal, 6½” x 6½” x 43/8” tall Transmitter See "Dimensions" section for meter mount and remote mount transmitter dimensions. Dimensions Battery: Standard: three 3.6V lithium-thionyl chloride (Li-SOCI2) D size...
-
Page 41: Certi Cations
LTRA SPECIFICATIONS SPECIFICATIONS ProComm 3000 Display and Measurement (cont.) Gallons Barrel (42G) Miners Inch Hour (11.22G) Cubic Feet Barrel (46G) Miners Inch Day (11.22G) Acre Feet Barrel (55G) Miners Inch Hour (9G) CUM Cubic Meters Imperial Gallon Miners Inch Day (9G) Totalizer Units Liters Acre Inch... -
Page 42: Replacement Parts
LTRA REPLACEMENT PARTS 13 .0 REPLACEMENT PARTS Diagram Part Description Number Number Protective Cap FPI-002RP Captive Nut 42226 Captive Nut Bearing Retainer 42225 Captive Nut Bearing 92121 Top Plate for use with 3/8" retaining rods MIM043 Top Plate for use with 1/2" retaining rods MIM053 Set screw (2 ea.) 920001001... -
Page 43: Maintenance
Prior to calling for a return authorization number, determine the model number, serial number (located inside the front panel of the transmitter), and reason for return. • Contact McCrometer Customer Service Department and ask for a Return Authorization (RA) number. • Telephone: 1-800-220-2279 •... -
Page 44: Warranty
Current as of: 1/29/2021 WARRANTY FPI Mag warranty - EN McCrometer warrants that this product will be free from Purchaser’s sole remedy and manufacturer’s sole obligation defects in material and workmanship for a period 24 for alleged product failure, whether under warranty... - Page 45 Copyright © 2024 McCrometer, Inc. All printed material should not be changed or altered without permission of McCrometer. Any published pricing, technical data, and instructions are subject to change without notice. Contact your McCrometer representative for current pricing, technical data, and instructions.
Need help?
Do you have a question about the HACH FPI Mag 3000 and is the answer not in the manual?
Questions and answers