
Related Manuals for WamBam WESTPORT BL19106


Summary of Contents for WamBam WESTPORT BL19106
- Page 1 BL19106 ASSEMBLY INSTRUCTIONS ASSEMBLY WESTPORT 4 FT VINYL INSTRUCTIONS GATE BL19106 (48”H X 48”W) 60 MIN Approximate assembly time Want to see a video on how to assemble this product? Scan the QR code WWW.WAMBAMFENCE.COM WWW.WAMBAMFENCE.COM VER. 043021...
- Page 2 BL19106 ASSEMBLY INSTRUCTIONS GENERAL INFORMATION MISSING DAMAGED PARTS? Visit Our Website so we can help you right away! parts.nychbrands.com You can also reach us via phone or email. Hours of Operation Weekdays 9am-5pm EST To better help you, Your product number (BL19106) please have the following Your original product box...
- Page 3 BL19106 ASSEMBLY INSTRUCTIONS GENERAL 1. Read over fence instructions first. Your gate and fence will work better together if you first take the time to read and understand your fence. 2. Pre-assemble the gate frame. Please do not screw the gate frame together until you have temporarily assembled the gate frame.
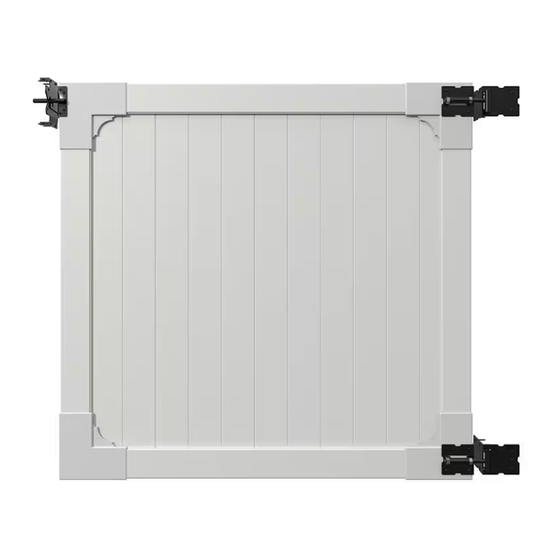
- Page 4 BL19106 ASSEMBLY INSTRUCTIONS DETAILED PRODUCT DIMENSIONS AND SPECIFICATIONS 48 1/4 in. 46 3/8 in. 2 in. ro nd 54 in. WWW.WAMBAMFENCE.COM...
- Page 5 BL19106 ASSEMBLY INSTRUCTIONS LAY OUT MATERIALS STEP 1: Tools required for a smoother installation experience. Drill Wood Blocks Hinge with Fasteners (2) 11/4” Self-Drilling with 11/4” Black Stainless Gate Bracket (4) Stainless Steel Steel Screws (26) Screw (16) Latch Catch (1) with 11/4” Black Stainless Steel Rail (2) Screws (6)
- Page 6 BL19106 ASSEMBLY INSTRUCTIONS ASSEMBLE GATE FRAME STEP 1: STEP 2.1 Insert the Rail all the way into the Gate Brackets until it hits the corner of the gate bot- tom bracket as illustrated. Ensure the bottom rail hits the back of the bottom brackets as illus- trated.
- Page 7 BL19106 ASSEMBLY INSTRUCTIONS STEP 2.2 Insert (2) Vertical Stiles into the gate bottom brackets until they hit the bottom rail. WWW.WAMBAMFENCE.COM...
- Page 8 BL19106 ASSEMBLY INSTRUCTIONS STEP 2.3 Insert (1) Trimmed Board and (1) Board into the side vertical stiles followed by (2) middle Boards for simplest install. WWW.WAMBAMFENCE.COM...
- Page 9 BL19106 ASSEMBLY INSTRUCTIONS STEP 2.4 Insert the Top Rail all the way into the Gate Brackets until it hits the corner of the gate bottom bracket as illustrated. Ensure the top rail hits the back of the brackets just as you did in step 2.1.
- Page 10 BL19106 ASSEMBLY INSTRUCTIONS FASTEN GATE HINGES AND LATCH FINGER STEP 3: STEP 3.1 Secure each gate bracket with 11/4” Self-Drilling Stainless Steel Screws to hold your frame together. WWW.WAMBAMFENCE.COM...
- Page 11 BL19106 ASSEMBLY INSTRUCTIONS STEP 3.2 Fasten the Latch Finger to the top bracket with (6) 11/4” black self-drilling stainless steel screws. Fasten the Hinge to the front of the gate brack- ets with (8) total 1 1/4” black self-drilling screws. WWW.WAMBAMFENCE.COM...
- Page 12 BL19106 ASSEMBLY INSTRUCTIONS ALIGN AND SECURE GATE HINGES TO POST STEP 4: STEP 4.1 Use temporary spacers or wooden blocks to rest the gate on during alignment and installa- tion. Fasten the gate hinges to the post using (6) 11/4” black stainless steel screws. WWW.WAMBAMFENCE.COM...
- Page 13 BL19106 ASSEMBLY INSTRUCTIONS STEP 4.2 Fasten the gate hinges to the inside of the fence post with (8) total 11/4” black self-drilling stainless steel screws by swinging the gate out as illustrated. Fasten the hinges to the inside of the gate brackets with (4) total screws.
- Page 14 BL19106 ASSEMBLY INSTRUCTIONS LEVEL GATE AND ADJUST HINGES STEP 5: STEP 5.1 Level the gate to the fence post. Check the gate to make Note: The hinges sure it functions correctly. can be adjusted moderately to level gate. Note: To adjust the spring tension in Level the hinges, use the...
- Page 15 BL19106 ASSEMBLY INSTRUCTIONS 6935 Reames Rd. Ste. hmmm@wambamfence.com 704-892-5222 877-778-5733 WWW.WAMBAMFENCE.COM WWW.WAMBAMFENCE.COM...
Need help?
Do you have a question about the WESTPORT BL19106 and is the answer not in the manual?
Questions and answers