
Subscribe to Our Youtube Channel
Related Manuals for Stryker S3 MedSurg 3005


Summary of Contents for Stryker S3 MedSurg 3005
- Page 1 MedSurg Bed ® with StayPut ® Frame 3005 Operations Manual 2016/06 G.0 3005-009-001 REV G www.stryker.com...
-
Page 3: Symbols
This icon means the iBed Locator is connected. This icon means the iBed Locator is not connected. This icon means the Network is connected. This icon means the Network is not connected. Return To Table of Contents www.stryker.com 3005-009-001 REV G... -
Page 5: Table Of Contents
Introduction ................Intended Use – Stryker S3 ®... - Page 6 International Warranty Clause............. 3005-009-001 REV G www.stryker.com...
-
Page 7: Warning/Caution/Note Definition
NOTE This provides special information to make maintenance easier or important instructions clearer. Return To Table of Contents www.stryker.com 3005-009-001 REV G... -
Page 8: Introduction
Stryker beds. The desired bed parameters will be set by clinicians at the bedside. The iBed ® Wireless software is intended to be used only with specifically enabled Stryker beds that have been verified and validated with the iBed Wireless software, and is not intended to provide bed status information for non-Stryker beds. The iBed ®... -
Page 9: Expected Service Life
This helps reduce the need for patient repositioning once the bed StayPut Bed Frame Technology ® adjustment is made. Patients also remain in close proximity to bedside belongings as the bed is articulated. Return To Table of Contents www.stryker.com 3005-009-001 REV G... -
Page 10: Mattress Specifications
Atmospheric Pressure 700 hPa 500 hPa Stryker reserves the right to change specifications without notice. Specifications listed are approximate and may vary slightly from unit to unit or by power supply fluctuations. Return To Table of Contents 3005-009-001 REV G... -
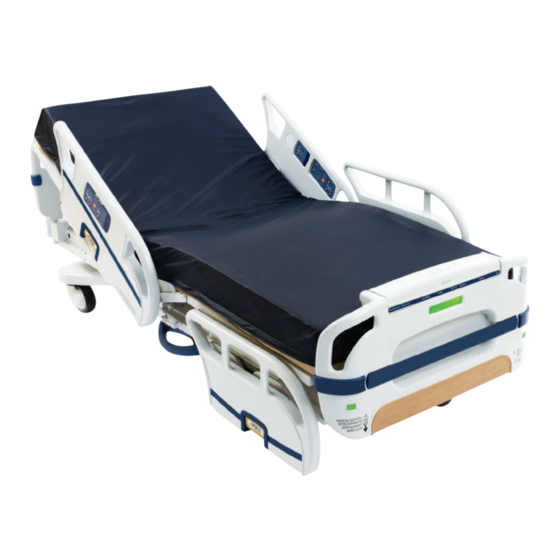
Page 11: Product Illustration
Introduction PRODUCT ILLUSTRATION Patient Headboard Control Panel Siderail Nurse Footboard Control Panel Control Panel Steer Pedal (not shown) Ground Chain Siderail Release Handle Brake Pedal Ground Chain Footboard Caster Return To Table of Contents www.stryker.com 3005-009-001 REV G... -
Page 12: Contact Information
Stryker Medical 3800 E. Centre Avenue Portage, Michigan 49002 Please have the serial number (A) of your Stryker product available when calling Stryker Customer Service or Technical Support. Include the serial number in all written communication. SERIAL NUMBER LOCATION The serial number is located at the head end of the bed just below the headboard and above the power cord where it comes out from the frame. -
Page 13: Summary Of Safety Precautions
• Do not use the intermediate position in place of the highest position. • Always use a Stryker supplied interface cable. Use of any other cable may cause the bed to function improperly, which may result in patient or user injury. - Page 14 • Always determine the proper use of the restraint straps and restraint strap locations. Improperly adjusted restraint straps can cause serious injury to a patient. Stryker is not responsible for the type or use of restraint straps on any of Stryker’s products.
- Page 15 • The weight of pumps placed on footboard pump holder should not exceed 45 pounds. • The safe working load of the defibrillator tray is 40 lb. • The safe working load of the oxygen holder is 45 lb. Return To Table of Contents www.stryker.com 3005-009-001 REV G...
-
Page 16: Ibed ® Wireless Option
Locator, thus providing incorrect bed location information. CAUTION Wireless bed only transmits bed information and not nurse call information. The wireless bed is not intended to replace the existing nurse call system. Return To Table of Contents 3005-009-001 REV G www.stryker.com... -
Page 17: Setup
This product is equipped with a hospital-grade plug for protection against electric shock hazard. • Always use a Stryker supplied interface cable. Use of any other cable may cause the bed to function improperly, which may result in patient or user injury. - Page 18 5212 iBed Locator refer to the instruction sheet (part number 5212-009-101) packaged with your optional 5212 iBed Locator Installation kit. If any problems are found during the iBed Locator Installation, contact Stryker Technical Support at (800) 327−0770. WARNING The iBed Locator must be correctly associated or mapped to the room / location in order to provide accurate location information.
-
Page 19: Operation
When quick access to the patient is needed, and the Fowler (head of bed) is raised, squeeze one of the two release handles (marked by the red CPR label) and the fowler can quickly be guided down to a flat position. Return To Table of Contents www.stryker.com 3005-009-001 REV G... -
Page 20: Foot Prop Usage
Always determine the proper use of the restraint straps and restraint strap locations. Improperly adjusted restraint straps can cause serious injury to a patient. Stryker is not responsible for the type or use of restraint straps on any of Stryker’s products. -
Page 21: Positioning Siderails
To change the control panel light settings, press the “Menu” button on the footboard. Scroll down through the menu items and select “Backlight” then press “Enter”. Select the desired setting by highlighting it and then pressing “Enter”. Return To Table of Contents www.stryker.com 3005-009-001 REV G... -
Page 22: Operating Iv Poles
Rotate the IV hangers (B) to desired position and hang IV bags. To lower the IV pole turn the latch (C) clockwise until section (A) lowers. CAUTION The maximum safe working load for each IV pole is 40 pounds. Return To Table of Contents 3005-009-001 REV G www.stryker.com... -
Page 23: Night Light Usage
• Do not attach power cords to any moving part of the product. • Always unplug all power cords before opening the service compartment, junction box, or receptacle to avoid the risk of electrical shock. Return To Table of Contents www.stryker.com 3005-009-001 REV G... -
Page 24: Nurse Control Functions (Outside Siderail)
NOTE: The intent of the nurse call light on the siderails is to ensure the patient immediately knows which button to push to contact the nurse station. Turning the light off may compromise this ability, especially in a darkened room. Return To Table of Contents 3005-009-001 REV G www.stryker.com... -
Page 25: Patient Control Functions Without Optional Smart Tv (Inside Siderail)
Fowler Up Press to raise the Fowler. Fowler Down Press to lower the Fowler. Knee Gatch Down Press to lower the Knee Gatch. Knee Gatch Up Press to raise the Knee Gatch. Return To Table of Contents www.stryker.com 3005-009-001 REV G... -
Page 26: Patient Control Functions With Optional Smart Tv (Inside Siderail)
Fowler Up Press to raise the Fowler. Fowler Down Press to lower the Fowler. Knee Gatch Down Press to lower the Knee Gatch. Knee Gatch Up Press to raise the Knee Gatch. Return To Table of Contents 3005-009-001 REV G www.stryker.com... -
Page 27: Patient Tv Channel Control Functions With Optional Smart Tv (Inside Siderail)
Press to mute TV volume. Mute TV Press again to turn the sound back on. Press to display the closed captioning. Closed Caption Press again to turn off the closed captioning. Return To Table of Contents www.stryker.com 3005-009-001 REV G... -
Page 28: Footboard Control Panel
Menu Patient Bed Up/ Knee Gatch Down Menu Up Down Lock Trend Cardiac Chair Menu Down Reverse Trend CPR Drop Exit Bed/Litter Up Bed Exit Arm/Disarm Enter Bed Exit Zone Control Return To Table of Contents 3005-009-001 REV G www.stryker.com... -
Page 29: Button Name
Cardiac Chair approximately 60 degrees and the bed will tilt to approximately -10 Reverse Trendelenburg (foot end down). Activates electronic CPR function; flattens litter and puts bed in low CPR Drop height. Return To Table of Contents www.stryker.com 3005-009-001 REV G... - Page 30 Scroll Up through menu. Menu Down Scroll Down through menu. Exits or Escapes from menu selection; also used to Cancel Exit operations. Enter Selects menu item; also used to Save operations. Return To Table of Contents 3005-009-001 REV G www.stryker.com...
-
Page 31: Footboard Led Indicators
AMBER flashes if a Bed Exit event occurs. Zone 3 LED: LED is illuminated when Bed Exit is “On” and Zone 3 activated; AMBER flashes if a Bed Exit event occurs. Return To Table of Contents www.stryker.com 3005-009-001 REV G... - Page 32 Awareness): LED is illuminated if iBed ® Awareness AMBER system is “On”. The LED will blink when siderail state has changed. Power LED: LED is illuminated when bed has power. GREEN Return To Table of Contents 3005-009-001 REV G www.stryker.com...
-
Page 33: Display Screens
• As required message screens are provided during alarm conditions and user interaction with the bed. E. Main Menu • The Menu screen provides of list of available features accessible to the operator. Return To Table of Contents www.stryker.com 3005-009-001 REV G... -
Page 34: Chaperone ® Bed Exit (Optional)
XPRT, do not initialize (“Arm”) bed exit with Percussion, Vibration, Rotation or Turn Assist active. The patient motion and position resulting from a dynamic therapy mattress may adversely affect bed exit system performance. Return To Table of Contents 3005-009-001 REV G www.stryker.com... -
Page 35: Chaperone ® Bed Exit With Zone Control (Optional)
If the patient’s center of gravity moves from the original location more than 1 inch to either side or 1 inch toward the head or foot, an alarm will sound. NOTE All zone dimensions are ± .5 inches. Return To Table of Contents www.stryker.com 3005-009-001 REV G... -
Page 36: Scale System (Optional)
• Do not zero bed scales or weigh patient with Percussion, Vibration, Rotation or Turn Assist active. Patient motion and position resulting from the dynamic therapy mattress may adversely affect scale system performance. Return To Table of Contents 3005-009-001 REV G www.stryker.com... - Page 37 “Unable to Zero - Try Again” if unsuccessful. If the problem continues after three attempts, the scale system will lock and the scale monitor will read: “Unable to Zero”. Return To Table of Contents www.stryker.com 3005-009-001 REV G...
- Page 38 NOTE: Refer to Figure 6 • If the Gain or the Loss exceeds 99.9 lb, then the system will display ‘---’ instead of a value. Figure 6 Return To Table of Contents 3005-009-001 REV G www.stryker.com...
- Page 39 - Press “Exit” to cancel operation. • If “Enter” is pressed, the message “Do Not Touch Bed” will flash on the display. • If “Exit” is pressed, “Patient Weight Changed” message will display. Return To Table of Contents www.stryker.com 3005-009-001 REV G...
- Page 40 • Scroll through the 10 Tone Patterns listed in the menu. A sample alarm will sound for each Tone Pattern highlighted. • Select desired Tone Pattern and Press “Enter” • “Save Successful” message will be displayed. Return To Table of Contents 3005-009-001 REV G www.stryker.com...
- Page 41 • Select “On” to Enable or “Off” to disable and then press “Enter” • “Save Successful” message will be displayed. 8. Exit Menu Exits Main Menu screen and returns display to the default Status Screen. Return To Table of Contents www.stryker.com 3005-009-001 REV G...
-
Page 42: Ibed ® Awareness Intended Use
The following message will be displayed on the screen: “Awareness On”. Turning off the iBed Awareness system ® Press and hold the iBed On/Off button. The following message will be displayed on the screen: “Awareness Off”. Return To Table of Contents 3005-009-001 REV G www.stryker.com... -
Page 43: Ibed ® Awareness Monitoring And Alarms
The siderail LED blinks and the display screen flashes between the message in Figure 17 and the mes- sage in Figure 18. Figure 18 Figure 17 NOTE The arrow pointing to the siderail in Figure 17 and 18 will change depending on the siderail position in alarm. Return To Table of Contents www.stryker.com 3005-009-001 REV G... -
Page 44: Bed Exit
• If the caregiver would like to set the Awareness alarm to the Nurse Call Station, the “Status To N/C” must be turned “On” through the Advanced Options Menu in the Main Menu. NOTE • By default these two advanced options are turned “Off”. Return To Table of Contents 3005-009-001 REV G www.stryker.com... -
Page 45: Ibed ® Awareness Locks
• If any of the Patient Control lock buttons are pressed, Figure 29 as shown above will be displayed. • If any of the Patient Control lock buttons are pressed when already “on” then Figure 30 as shown above will be displayed. Return To Table of Contents www.stryker.com 3005-009-001 REV G... -
Page 46: Pendant - Motion/Nurse Call (3006-315-011)
Press to raise head section. Press to raise knee section. Press to lower knee section. Press to lower head section. Press to turn on/off room lights Press to turn on/off reading lights Return To Table of Contents 3005-009-001 REV G www.stryker.com... -
Page 47: Optional Infrared (Ir) Module
Wireless (WiFi) Connection LED Slow Flash - WiFi attempting to connect. Solid LED = WiFi connected. Rapid Flash - WiFi was not connected after 6 minutes and timed out. Return To Table of Contents www.stryker.com 3005-009-001 REV G... -
Page 48: Optional Ibed Locator
Installation and operational procedures for the Optional iBed Locator are located in the iBed Locator Instructions For Use manual (5212-009-101). Item Name Function Provides Infrared communications with the iBed IR Module. IR (Infrared) Lens Return To Table of Contents 3005-009-001 REV G www.stryker.com... -
Page 49: Preventive Maintenance
Preventive Maintenance At a minimum, check all items listed during annual preventive maintenance for all Stryker products. You may need to perform preventive maintenance checks more frequently based on your level of product usage. CHECKLIST _____ All fasteners secure (reference all assembly drawings). -
Page 50: Cleaning
• Some cleaning products are corrosive in nature and may cause damage to the product if used improperly. If the products described above are used to clean Stryker patient care equipment, measures must be taken to insure the beds are wiped with a damp cloth soaked in clean water and thoroughly dried following cleaning. -
Page 51: Emc Information
IEC 61000-4-8 characteristic typical location in a typical commercial and/or hospital environment. Note: U is the a.c. mains voltage prior to applications of the test level. Return To Table of Contents www.stryker.com 3005-009-001 REV G... - Page 52 At 80 MHz and 800 MHz, the separation distance for the higher frequency range applies. Note 2 These guidelines may not apply in all situations. Electromagnetic propagation is affected by absorption and reflection from structures, objects and people. Return To Table of Contents 3005-009-001 REV G www.stryker.com...
- Page 53 If abnormal performance is observed, additional measures may be necessary, such as reorienting or relocating the S3 ® MedSurg Bed, Model 3005. Over the frequency range 150 kHz to 80 MHz, field strengths are less than 3 V/m. Return To Table of Contents www.stryker.com 3005-009-001 REV G...
-
Page 54: Guidance And Manufacturer's Declaration - Electromagnetic Emissions
CISPR 11 connected to the public low voltage power supply network that supplies buildings used for domestic purposes. Harmonic Emissions Class A IEC 61000-3-2 Voltage Fluctuations Flicker Emissions Complies IEC 6100-3-3 Return To Table of Contents 3005-009-001 REV G www.stryker.com... -
Page 55: Warranty
Stryker’s obligation under this warranty is expressly limited to supplying replacement parts and labor for, or replacing, at its option, any product which is, in the sole discretion of Stryker, found to be defective. If requested by Stryker, products or parts for which a warranty claim is made shall be returned prepaid to the factory. Any improper use or any alteration or repair by others in such manner as in Stryker’s judgment affects the product materially and adversely... - Page 57 Stryker Medical 3800 E. Centre Avenue Portage, MI 49002 2016/06 3005-009-001 REV G www.stryker.com...
Need help?
Do you have a question about the S3 MedSurg 3005 and is the answer not in the manual?
Questions and answers