
Related Manuals for Stryker LUCAS 3 v3.1


Summary of Contents for Stryker LUCAS 3 v3.1
- Page 1 LUCAS 3, v3.1 ® chest compression system Orientation guide LUCAS 3 orientation guide 1...
- Page 2 All operators must read the complete Instructions for Use before operating the LUCAS chest compression system. This PowerPoint does not replace the Instructions for Use document. LUCAS 3 orientation guide 2...
- Page 3 LUCAS chest compression system • Effective, consistent, and continuous chest compressions as recommended in the American Heart Association guidelines and the European Resuscitation Council guidelines • LUCAS can be used in a wide variety of situations and settings: on the scene, during patient movement, during transportation in road and air ambulances, hospitals, and catheterization laboratories...
- Page 4 AHA/ERC Guidelines 2015 • Minimize pauses in chest compressions • Depth 2.0-2.4 inches • Rate 100-120 per min • Full chest recoil • Avoid excessive ventilation (30:2 or 10 per min) LUCAS 3 orientation guide 4...
-
Page 5: Important User Information
Important user information Setup options LUCAS 3, v3.1 • The setup options are optional • If NOT applied, the device will operate according to its factory default settings, which are identical to LUCAS 3, v3.0 and LUCAS 2, v2.2 • The training, application steps, and user interface remains the same as LUCAS 3 and LUCAS 2 devices LUCAS 3 orientation guide 5... -
Page 6: Intended Use
Intended use Adult patients with acute circulatory arrest: • Absence of spontaneous breathing • Absence of pulse • Loss of consciousness LUCAS must only be used in cases where chest compressions are likely to help the patient. The LUCAS device is intended for use as an adjunct to manual CPR when effective manual CPR is not possible (e.g., during patient transport, extended CPR, fatigue,... - Page 7 Contraindications Do not use the LUCAS chest compression system in these cases: • If it is not possible to position the LUCAS device safely or correctly on the patient’s chest • Too small patient - If LUCAS alerts with 3 fast signals when lowering the suction cup and you cannot enter the PAUSE mode or ACTIVE mode •...
-
Page 8: Side Effects
Side effects The International Liaison Committee on Resuscitation (ILCOR) states these side effects of CPR “Rib fractures and other injuries are common but acceptable consequences of CPR given the alternative of death from cardiac arrest. After resuscitation, all patients should be reassessed and reevaluated for resuscitation-related injuries.”... -
Page 9: Patient Parameters
Patient parameters • Sternum height of 6.7 to 11.9 inches - Too small patient - If LUCAS alerts with 3 fast signals when lowering the suction cup and you cannot enter the PAUSE mode or ACTIVE mode • A maximum chest width of 17.7 inches - Too large patient - If you cannot lock the LUCAS upper part to back plate without compressing the patient’s chest The use of the LUCAS device is not restricted by patient weight. - Page 10 LUCAS fits large patients Weight: 180 lbs Height: 6 ft Weight: 330 lbs Height: 6 ft, 5 in Weight: 320 lbs Height: 5 ft, 10 in LUCAS 3 orientation guide 10...
- Page 11 LUCAS chest compression system • 98% of patients fit in the LUCAS device in North American study • 95% of patients fit in the LUCAS device in large RCT LINC trial (Europe) Using the LUCAS device is not restricted by patient weight. Weight: 1.
-
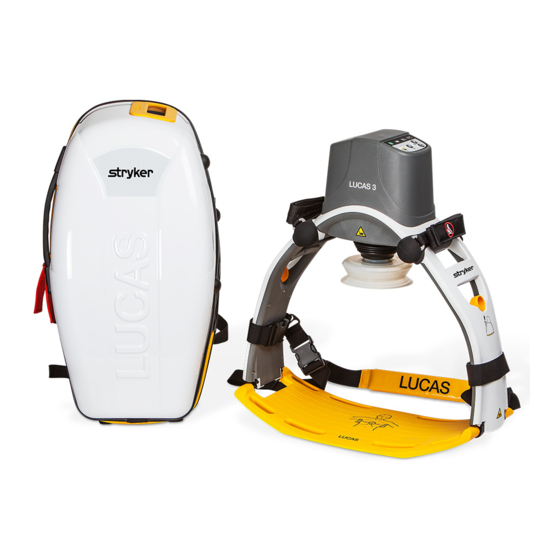
Page 12: Main Components
Main components The main parts of the LUCAS chest compression system include: • An upper part which contains the proprietary and rechargeable LUCAS battery and the compression mechanism with the disposable suction cup • A stabilization strap which helps secure the position of the device in relation to the patient •... -
Page 13: Device Components
Device components 1. Hood 12. Back plate* 2. User control panel 13. Claw locks 3. Battery 14. Car Power cable 4. DC input 15. Power supply cord 5. Bellows 16. Power supply 6. Suction cup* 17. External battery charger 7. Patient wrist strap* 18. -
Page 14: User Interface
User interface MUTE alarm when device operates Alarm Indicator Check battery charge when OFF Fully charged Battery indicator TRANSMIT data 2/3 charged 1/3 charged ON/OFF Low battery: approx. 10 minutes of operating capacity remain ACTIVE Battery charge too low/ (continuous) Battery overheat End of battery ACTIVE (30:2) - Page 15 Power Lithium-ion polymer battery (rechargeable) Capacity: 3300mAh (typical), 86 Wh Battery runtime: 45 minutes (typical) Charge: • External power supply - Input; 100-240VAC - Charge time in LUCAS device > 2 hrs • External battery chager - Charge time > 4 hrs •...
- Page 16 Charge device in carrying case Convenient battery charge access port ✓ Open up flap on back ✓ Connect LUCAS device to external power through case Note: Pack LUCAS device with the DC input facing the case charge port LUCAS 3 orientation guide 16...
- Page 17 Power at a glance Quickly check your battery charge status Top window Press MUTE to see charge level • LUCAS device in OFF mode Note: Position the LUCAS device in the right direction inside the bag (LUCAS DC input facing the case charge port) LUCAS 3 orientation guide 17...
- Page 18 Hard carrying case • Light and compact • Easy to clean • Reflective sticker • Big handholds • Easy-to-open zipper • Adjustable shoulder straps LUCAS 3 orientation guide 18...
- Page 19 Inside the hard carrying case In the carrying case compartment between the LUCAS support legs, you may put optional accessories such as the external power supply, a charged spare LUCAS battery and extra suction cups. LUCAS 3 orientation guide 19...
- Page 20 LUCAS in the cath lab • LUCAS is mostly radiotransluscent, with the exception of the hood and piston, allowing for projections at multiple angles Simulated drawing depicting radiotranslucency of LUCAS LUCAS 3 orientation guide 20...
- Page 21 Multiple back plate options Allows for angiography during CPR LUCAS 3 back plate AP view LUCAS 3 back plate oblique view LUCAS 3 orientation guide 21...
- Page 22 Optional: setup options Configure LUCAS 3, v3.1 device behavior via your LUCAS account on LIFENET System Compressions Ventilation Timer Transmit data Suction cup (continuous or (send and revice data (rate/depth) (number of prompts, (AutoFit, CPR timer) after the event) pause duration, QuickFit, chest rise) manual)
- Page 23 Compressions rate and depth Setup option LUCAS 3, v3.1 Preset a fixed rate Demo – 111 – 120/min Changing rate from 102 to 120 Preset various rates – 111 – 120/min (toggle ACTIVE key/s to change rate on the fly) Preset fixed depth 1.8 –...
- Page 24 Suction cup start position Setup option LUCAS 3, v3.1 QuickFit Demo (small adjustment of 1.2 inch span, AutoFit factory default setting) AutoFit (full automatic adjustment to the chest) Manually (no automatic adjustment at all) Note: Training instructions remain the same; lower suction cup manually and look for correct position on chest Note: bold brown...
- Page 25 Ventilation during CPR Setup option LUCAS 3, v3.1 Ventilation in 30:2 mode Demo Ventilation pause from up to 5 sec Audible ventilation alert in ACTIVE continuous mode Ratios: 30:2 or 50:2 Ventilation in continuous mode Ventilation LED alerts from 6 to 10/min Audible alerts ON/OFF Ventilation pause...
- Page 26 Timers Setup option LUCAS 3, v3.1 Timers (ON/OFF) Demo Audible alert e.g. every 2 minutes Audible timer alert in ACTIVE continuous mode Set up 1-15 min in 1 min increments • CPR timer (measures time only in ACTIVE modes) • Continuous timer (measures time independent of operation mode) Note:...
-
Page 27: Transmit Data
Transmit data Send and receive data after the event LUCAS captures data of the device status and use, and can be configured to meet local protocols. The data can be transmitted using Bluetooth ® or Wi-Fi ®. Push the TRANSMIT data key to send device data and receive new configurations. - Page 28 Post-event reporting Send and receive data after the event A post-event report (PDF) can be emailed to any predetermined email address(es). The post-event report will be emailed if: • LUCAS device is in range of a known Wi-Fi network • The TRANSMIT key is pressed (LUCAS must be in power OFF mode) - Can be set up to occur automatically when device is idle and charging (optional opt-in)
-
Page 29: Defining Setup Options
Defining setup options Marketing material – GDR 3336793 • Marketing piece to support how to define setup on LUCAS device LUCAS 3 orientation guide 29... - Page 30 Basic orientation, use and handling of LUCAS LUCAS 3 orientation guide 30...
-
Page 31: Arrival At The Patient
Arrival at the patient ✓ Immediately start manual CPR Uninterrupted high-quality CPR is related to good patient outcomes. Work in teams to minimize interruptions to manual CPR before and during LUCAS application. LUCAS 3 orientation guide 31... - Page 32 1. Power On LUCAS Rescuer 1 (LUCAS operator) ✓ Open the carrying case ✓ Push ON/OFF to start self-test and power up the LUCAS device ✓ The device will be ready and in ADJUST mode Rescuer ✓ Provide manual CPR Note: If you let the LUCAS device stay in ADJUST mode, it will power off automatically after 5 minutes.
-
Page 33: Place The Back Plate
2. Place the back plate Rescuer 1 (LUCAS operator) ✓ Pause manual CPR briefly ✓ Put the back plate under the patient, immediately below the armpits Rescuer 2 ✓ Assist back plate placement ✓ Resume manual CPR LUCAS 3 orientation guide 33... - Page 34 Position the back plate Position the back plate correctly from the start. This helps facilitate a correct position of the suction cup. ✓ Place patient’s arms straight out (i.e. crucifix position) ✓ In large patients, move the patient’s arms up towards the head to get adipose tissue out of the way ✓...
- Page 35 Position the back plate LUCAS 3 orientation guide 35...
-
Page 36: Attach The Upper Part
3. Attach the upper part Rescuer 1 (LUCAS operator) ✓ Pull the release rings once to open claw locks, then let go of the rings ✓ Stop manual CPR briefly while attaching the upper part to the back plate. Listen for “click”... - Page 37 4. Push the suction cup down and adjust the position if needed Rescuer 1 (LUCAS operator) ✓ Push down the suction cup ✓ The lower edge of suction cup should be immediately above the end of the sternum ✓ Adjust if necessary (stay in ADJUST mode) Rescuer 2 ✓...
- Page 38 5. Lock position and start compressions Rescuer 1 (LUCAS operator) ✓ Push PAUSE to lock start position ✓ Push ACTIVE (continuous) ACTIVE (30:2) to start compressions Rescuer 2 ✓ Assist LUCAS 3 orientation guide 38...
- Page 39 6. Apply stabilization strap ✓ Apply the stabilization strap ✓ Follow CPR protocols LUCAS stabilization strap helps secure the correct position. Make sure that LUCAS is positioned correctly on the patient's chest during the whole resuscitation effort. Note: Delay the application of the LUCAS stabilization strap if this prevents or delays any medical treatment of the patient.
- Page 40 Move the patient: Secure the patient’s arms ✓ Use the patient straps to facilitate patient transportation ✓ Make sure that IV access is not obstructed when using patient straps Do not lift LUCAS by the patient straps. LUCAS 3 orientation guide 40...
- Page 41 Defibrillation • PAUSE compressions for ECG analysis ✓ If shock is indicated, defibrillate during LUCAS compressions or during pause, according to your local protocols • Defibrillation can be performed while the LUCAS device operates ✓ You can apply the defibrillation electrodes before or after the LUCAS device has been put in position ✓...
- Page 42 CPR during transport Lift the patient 2. Those at the patient’s side will lift with one hand 1. One person on each side and one person beneath the claw locks of the back plate, keeping supporting the patient’s head, even with fingers clear of the claw locks, while the other hand stabilization strap in place.
- Page 43 CPR during transport LUCAS can be active while you lift and move the patient if: • LUCAS and the patient are safely positioned on the transportation device • LUCAS stays in the correct position and angle on the patient's chest If necessary, adjust the position of the suction cup.
- Page 44 Exchange battery during operation “Smart Restart” When the battery charge is low, the LUCAS alarms with an intermittent yellow LED and an alarm signal. Keep interruptions to a minimum while changing the battery. ✓Push PAUSE to temporarily stop the compressions ✓Remove battery ✓Insert fully-charged battery ✓Push ACTIVE (continuous)
- Page 45 Connect to external power supply You can connect the LUCAS power supply or car power cable in all operation modes of the LUCAS device. ✓ Connect the power adapter to the DC input on the side of the LUCAS device ✓...
- Page 46 Remove LUCAS from the patient If there are interruptions, or the compressions are not sufficient, or something unusual occurs during operation: ✓ Push ON/OFF for 1 second to stop mechanical chest compressions • Immediately start manual compressions! After use remove the LUCAS device ✓...
-
Page 47: High-Priority Alarm
High-priority alarm ✓ Battery charge is too low and compressions will stop If you do not have a charged battery at hand, remove the stabilization strap and the LUCAS device, and resume manual chest compressions immediately. Examples of other reasons for the high-priority alarm: ✓... -
Page 48: Troubleshooting
Troubleshooting For troubleshooting, indications, and alerts during normal operation, refer to Chapter 8 of the LUCAS 3 Instructions for Use. LUCAS 3 orientation guide 48... - Page 49 Maintenance, care after use preparations for next use LUCAS 3 orientation guide 49...
- Page 50 Optional: send and receive data after the event LUCAS captures data of the device status and use, which can be configured to meet local protocols. The data can be transmitted using Bluetooth or Wi-Fi. Push the TRANSMIT data key to send device data and receive new configurations.
- Page 51 After use of the LUCAS device ✓ Remove and discard the suction cup ✓ Mount new suction cup ✓ Remove patient and stabilization straps and clean separately ✓ Clean device ✓ Remove and recharge battery Refer to Chapter 6 of the LUCAS 3 Instructions for Use.
-
Page 52: Cleaning Routines
Cleaning routines Clean all surfaces and straps with a soft cloth and warm water with a mild cleaning agent or disinfectant agent: • 70% isopropyl alcohol solution • 45% isopropyl alcohol with added detergent • Quaternary ammonium compound • 10% bleach •... -
Page 53: Maintenance - Routine Checks
Maintenance – routine checks Weekly, or after each use of the LUCAS device, do the following: ✓ Check device for cleanliness and completeness e.g. new suction cup, patient straps and stabilization strap attached ✓ Check battery level (press when device is in OFF mode) ✓... - Page 54 For more theoretical and practical training on LUCAS… …please visit lucas-cpr.com/web_training/lucas3 ✓ Basic orientation, use and handling onthe LUCAS device with a theoretical test ✓ Train to apply the LUCAS device hands-on and do a performance evaluation ✓ Platform available in multiple languages LUCAS 3 orientation guide 54...
- Page 55 Thank you for your attention! LUCAS 3 orientation guide 55...
- Page 56 LUCAS 3 orientation guide 56...
Need help?
Do you have a question about the LUCAS 3 v3.1 and is the answer not in the manual?
Questions and answers