
Related Manuals for Fametech TYSSO KS-1 27 Series


Summary of Contents for Fametech TYSSO KS-1 27 Series
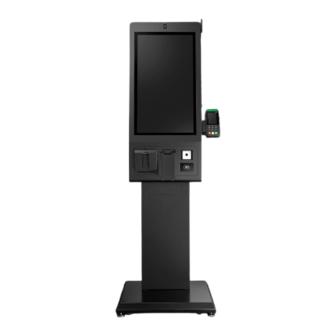
- Page 1 KS-1X27 Multi-Function, Digital Self-Order Kiosk User Manual Installation Guide Ver. 1.1...
-
Page 2: Table Of Contents
Contents General Information Revision History ....................1 About this Manual ....................2 Disclaimer ......................2 Warning ....................... 2 Caution ........................ 2 Warranty Limits ....................3 Trade Marks and Service Marks ................3 Important Safety Information ................4 Product Overview 1.1. Packing ..................... -
Page 3: General Information
V1.0 Initial Release Ariel Chiu Modify Drawing Hong 2024/04/22 V1.1 Copyright © 2024 Fametech Inc. All Rights Reserved. All other brands, product names, company names, trade names, trademarks and service marks used herein are the property of their respective owners. -
Page 4: About This Manual
Consult a dealer or an experienced radio/TV technician for assistance. Caution Copyright © 2024 Fametech Inc. All Rights Reserved. All other brands, product names, company names, trade names, trademarks and service marks used herein are the property of their respective owners. -
Page 5: Warranty Limits
Warranty does not cover any damage caused by improper use. Trade Marks and Service Marks TYSSO is a registered trademark of FAMETECH INC. Other brand and product names are trademarks and registered trademarks and service marks of their respective owners. -
Page 6: Important Safety Information
When the system is not in use, cover the system and store it with care. Copyright © 2024 Fametech Inc. All Rights Reserved. All other brands, product names, company names, trade names, trademarks and service marks used herein are the property of their respective owners. -
Page 7: Product Overview
Cover Partition Thumb Screws RS232 Cables x3 AC Power Cord Copyright © 2024 Fametech Inc. All Rights Reserved. All other brands, product names, company names, trade names, trademarks and service marks used herein are the property of their respective owners. - Page 8 AC Power Cord Note: Optional accessories can be adjusted as customers required. Copyright © 2024 Fametech Inc. All Rights Reserved. All other brands, product names, company names, trade names, trademarks and service marks used herein are the property of their respective owners.
-
Page 9: Specification
Audio : 1 x Line-out & 1 x MIC-in 1 x Line-out / MIC-in Copyright © 2024 Fametech Inc. All Rights Reserved. All other brands, product names, company names, trade names, trademarks and service marks used herein are the property of their respective owners. - Page 10 Wall Mount Bracket Kit Multiple Holder (Supermarket Version) Ticketing Printer Copyright © 2024 Fametech Inc. All Rights Reserved. All other brands, product names, company names, trade names, trademarks and service marks used herein are the property of their respective owners.
-
Page 11: Dimension
198 mm 168 mm 272 mm 300 mm 516 mm Copyright © 2024 Fametech Inc. All Rights Reserved. All other brands, product names, company names, trade names, trademarks and service marks used herein are the property of their respective owners. -
Page 12: Part Description
Printer EMV bracket (optional/payment not included.) Printer power adaptor System power adaptor Copyright © 2024 Fametech Inc. All Rights Reserved. All other brands, product names, company names, trade names, trademarks and service marks used herein are the property of their respective owners. -
Page 13: I/O Ports
CR LAN USB USB COM2 HDMI Mic-in 12V-in COM3 COM1 Line-out Copyright © 2024 Fametech Inc. All Rights Reserved. All other brands, product names, company names, trade names, trademarks and service marks used herein are the property of their respective owners. -
Page 14: Kiosk Installation
③ Turn on the power switch (blue mark). Copyright © 2024 Fametech Inc. All Rights Reserved. All other brands, product names, company names, trade names, trademarks and service marks used herein are the property of their respective owners. -
Page 15: Unlock The Door
Turn counterclockwise (the key cannot be removed) Groove opening can reach 180 degrees Copyright © 2024 Fametech Inc. All Rights Reserved. All other brands, product names, company names, trade names, trademarks and service marks used herein are the property of their respective owners. -
Page 16: Install The Floor Stand
*Ensure proper cable passage through the decorative panel during installation. Copyright © 2024 Fametech Inc. All Rights Reserved. All other brands, product names, company names, trade names, trademarks and service marks used herein are the property of their respective owners. - Page 17 *Ensure proper cable passage through the decorative panel during installation. Copyright © 2024 Fametech Inc. All Rights Reserved. All other brands, product names, company names, trade names, trademarks and service marks used herein are the property of their respective owners.
- Page 18 *Mounting hole *Thumb screw Copyright © 2024 Fametech Inc. All Rights Reserved. All other brands, product names, company names, trade names, trademarks and service marks used herein are the property of their respective owners.
- Page 19 5. Remove the back cover of the floor stand, route the internal wiring to the chassis outlet and pull it outside. Copyright © 2024 Fametech Inc. All Rights Reserved. All other brands, product names, company names, trade names, trademarks and service marks used herein...
-
Page 20: Stabilize The Floor Stand
Copyright © 2024 Fametech Inc. All Rights Reserved. All other brands, product names, company names, trade names, trademarks and service marks used herein are the property of their respective owners. -
Page 21: Install The Wall Mount
2.6. Install the Wall Mount Wall Copyright © 2024 Fametech Inc. All Rights Reserved. All other brands, product names, company names, trade names, trademarks and service marks used herein are the property of their respective owners. - Page 22 *Mounting hole *Thumb screw Copyright © 2024 Fametech Inc. All Rights Reserved. All other brands, product names, company names, trade names, trademarks and service marks used herein are the property of their respective owners.
-
Page 23: Cable Routing
①Two types of covers can be disassembled according to usage habits. ②The routing of the power cord and other cables (USB/LAN/etc.) Copyright © 2024 Fametech Inc. All Rights Reserved. All other brands, product names, company names, trade names, trademarks and service marks used herein... -
Page 24: Replace The Ssd/Ram
①Loosen the Box PC’s screws x6 ② Remove the top cover of the Box PC to replace RAM/SSD/PCIe card, etc. Copyright © 2024 Fametech Inc. All Rights Reserved. All other brands, product names, company names, trade names, trademarks and service marks used herein... -
Page 25: Replace The Extended Ac Socket
② Unlock cable connect, and remove the AC extension socket module. Copyright © 2024 Fametech Inc. All Rights Reserved. All other brands, product names, company names, trade names, trademarks and service marks used herein are the property of their respective owners. -
Page 26: Replace The Paper Roll
③ Insert the paper roll with the thermal side facing up. Pull out a length of paper and close the printer paper tray cover. Copyright © 2024 Fametech Inc. All Rights Reserved. All other brands, product names, company names, trade names, trademarks and service marks used herein... -
Page 27: Replace The Front Device Panel
① Remove the screws x6. ② Remove the front panel bracket. Copyright © 2024 Fametech Inc. All Rights Reserved. All other brands, product names, company names, trade names, trademarks and service marks used herein are the property of their respective owners. -
Page 28: Install The Wireless Module(Optional)
Cable RP→SMA male→ SMA bracket(Box and antenna side)→washer →hexagon nut Copyright © 2024 Fametech Inc. All Rights Reserved. All other brands, product names, company names, trade names, trademarks and service marks used herein are the property of their respective owners. - Page 29 ⑥ Push the antenna bracket inward and tighten the screws (x2). from being dismantled from the outside. Copyright © 2024 Fametech Inc. All Rights Reserved. All other brands, product names, company names, trade names, trademarks and service marks used herein...
-
Page 30: Install The Payment (Optional)
② Install EMV front bracket. ③ Install the payment and pass through the cable. Copyright © 2024 Fametech Inc. All Rights Reserved. All other brands, product names, company names, trade names, trademarks and service marks used herein are the property of their respective owners. - Page 31 Adaptor (Use straps to secure it to the backboard support.) Copyright © 2024 Fametech Inc. All Rights Reserved. All other brands, product names, company names, trade names, trademarks and service marks used herein are the property of their respective owners.
- Page 32 ① Install EMV side bracket. ② Install the payment and pass through the cable. Copyright © 2024 Fametech Inc. All Rights Reserved. All other brands, product names, company names, trade names, trademarks and service marks used herein are the property of their respective owners.
- Page 33 Cable tie the backboard support.) Payment AC plug Cable tie Copyright © 2024 Fametech Inc. All Rights Reserved. All other brands, product names, company names, trade names, trademarks and service marks used herein are the property of their respective owners.
- Page 34 *The backboard holes can accommodate optional brackets for installation. Copyright © 2024 Fametech Inc. All Rights Reserved. All other brands, product names, company names, trade names, trademarks and service marks used herein are the property of their respective owners.
Need help?
Do you have a question about the TYSSO KS-1 27 Series and is the answer not in the manual?
Questions and answers