Ultimaker Factor 4 Repair Manual
Recirculation module
Hide thumbs
Also See for Factor 4:
- Quick start manual (44 pages) ,
- Installation and user manual (28 pages) ,
- Repair manual (6 pages)
Advertisement
Quick Links
Repair manual
Recirculation
module
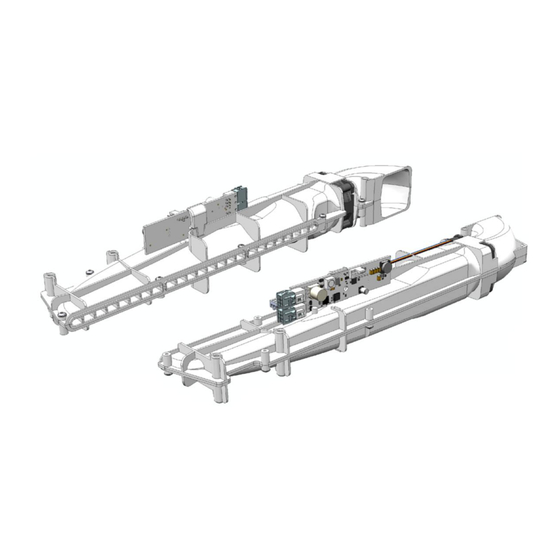
The recirculation modules are part of the air management system in the UltiMaker Factor 4. These ducts are
placed at either side of the gantry. They take in air from the back and use a fan to blow this air over the nozzle
plane. This helps ensure an accurate and consistent build volume temperature.
If both of the recirculation modules have problems, the build volume temperature cannot be accurately
monitored or controlled. The current print job will be aborted and the printer cannot accept new print jobs. If
there is a problem with one of the recirculation modules, the UltiMaker Factor 4 can continue printing and can
also start new print jobs. However, the temperature will only be controlled on one side which may not be as
accurate.
When a problem is detected with a recirculation module, it can be replaced as a complete assembly. First, the
gantry must be removed so you can access the recirculation module.
Requirements
Level
•
Operator level:
instructed, or skilled
•
Service level: 2
Notes
•
This repair process requires disconnecting components. Turn off the printer and disconnect the power cable
before starting.
•
This repair requires removing the gantry module; follow the instructions in the gantry manual. You need at
least 700 mm of clearance in front of the printer. Prepare a flat and stable surface (at least 600 x 500 mm) to
place the gantry module on.
•
During this process, sensitive electronic components will be exposed. Make sure not to touch the PCBA at
the top of the module, or take ESD measures just in case to prevent damaging the PCBA.
•
The left and right recirculation modules are identical, except for the PCBA and its orientation. Do not attempt
to install the left recirculation module on the right side of the printer or vice versa.
•
This manual shows visuals for replacing the left recirculation module. The steps for the right recirculation
module are the same, but mirrored.
UltiMaker Factor 4
Tools
•
Torx 20 screwdriver
•
Hex 2.5 mm screwdriver
•
Container for small parts
•
ESD prevention supplies
Repair manual – Recirculation module
Parts
•
70-232567
Recirculation module right
and / or
•
70-232573
Recirculation module left
EN-V1.1-240524
Advertisement

Related Manuals for Ultimaker Factor 4


Summary of Contents for Ultimaker Factor 4
- Page 1 The current print job will be aborted and the printer cannot accept new print jobs. If there is a problem with one of the recirculation modules, the UltiMaker Factor 4 can continue printing and can also start new print jobs. However, the temperature will only be controlled on one side which may not be as accurate.
- Page 2 Tip: You don’t need to remember the orientation. These cables are daisy-chained so the orientation does not matter. UltiMaker Factor 4 Repair manual – Recirculation module EN-V1.1-240524...
- Page 3 X beam carrier, and use the Hex 2.5 screwdriver to gantry module. tighten the screw at the left side of the print head. Tip: For detailed instructions on reinstalling the gantry Finished! module, please refer to the gantry manual. UltiMaker Factor 4 Repair manual – Recirculation module EN-V1.1-240524...
- Page 4 (depending on which module was replaced)] Test print Finally, run a short test print to check the entire system. Observe the behavior of the Factor 4 during the print preparation, printing, and post-printing stages to ensure everything works as expected. During the print, ensure that the recirculation modules are functioning correctly.
Need help?
Do you have a question about the Factor 4 and is the answer not in the manual?
Questions and answers