Ultimaker Factor 4 Installation And User Manual
Hide thumbs
Also See for Factor 4:
- Quick start manual (44 pages) ,
- Repair manual (5 pages) ,
- Repair manual (2 pages)
Table of Contents
Advertisement
Quick Links
Advertisement
Table of Contents

Related Manuals for Ultimaker Factor 4


Summary of Contents for Ultimaker Factor 4
- Page 1 Installation and user manual...
-
Page 2: Table Of Contents
5.5 Print core maintenance 6. Troubleshooting 6.1 UltiMaker support 6.2 Error messages 6.3 General recommendations 7. Limited Warranty 7.1 General 7.2 Conditions 7.3 Claim handling 7.4 Exclusions 7.5 Limitations and disclaimers 7.6 Applicable law and competent court UltiMaker Factor 4 Installation and user manual... - Page 3 Original instructions Disclaimer This manual sets out the instructions on how to install and operate the UltiMaker Factor 4. Please read and understand the contents of this installation and user manual carefully. Failure to read the manual may lead to personal injury, inferior print results, or damage to the UltiMaker printer or its accessories.
-
Page 4: Safety And Compliance
UltiMaker Factor 4 and its operators. Additionally, this chapter contains compliance and regulatory information. 1.1 Safety messages The information provided below applies to the UltiMaker Factor 4 when used with its original and optional additional compatible UltiMaker accessories (“UltiMaker products”). This guide contains tips and notes: Tip: Additional information that is helpful to do a task or learn more. -
Page 5: General Safety Information
Do not store items inside UltiMaker products, except compatible material spools in the Material Station. • Do not store items on top of the UltiMaker Factor 4 and never cover the exhaust vent in the top panel. • When performing maintenance procedures, follow the guided procedures in the printer’s firmware where possible. -
Page 6: Hazards
Risk of burns Hot surface hazard. There is a potential risk of burns: the print heads of the UltiMaker 3D printers can reach temperatures above 200 °C, while the heated bed can reach temperatures above 100 °C. Do not touch either of these parts with your bare hands. -
Page 7: Regulatory Information
(minimum refresh rate or AER of 1.8 for a room size of 30.6 m3). When multiple UltiMaker 3D printers are operated in a contained environment, concentrations of UFPs and/or VOCs will increase. Depending on the specific situation, please consider other safety measures, such as a dedicated ventilation system. -
Page 8: Introduction
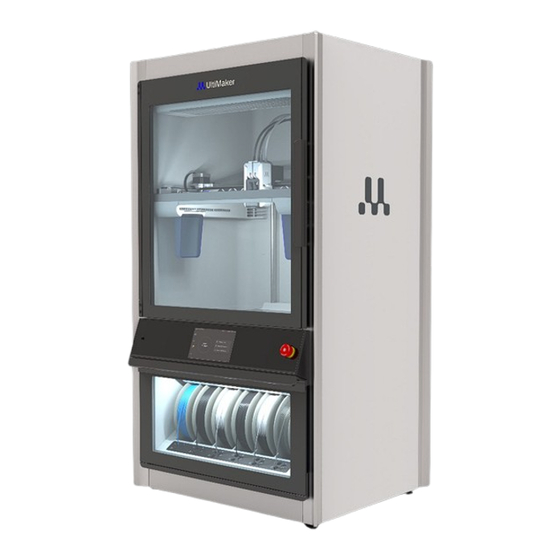
Monitor your print jobs and manage your digital library using the UltiMaker Digital Factory for a streamlined, cloud-based workflow. The UltiMaker Factor 4 features a direct drive print head with easily swappable print cores, an enclosed build chamber for enhanced part stability, an air filtration system with HEPA filter, and an integrated Material Station for automated material switching. -
Page 9: Specifications
Safety features Red Stop Button for motion & heat sources immediate stop Open Door Sensor for motion and extrusion pausing Tip: Download the full specifications in the UltiMaker Factor 4 product data sheet from website. UltiMaker Factor 4 Installation and user manual... -
Page 10: Software And Accounts
2.4 Software and accounts Use UltiMaker’s software and cloud solutions in combination with your UltiMaker Factor 4 for an integrated digital workflow. Tip: You can already download the software and set up your account before unboxing the printer for a more efficient gettingIt is recommended to set up your account and download the software before unboxing the printer. -
Page 11: Set Up For First Use
Note: Only skilled persons are allowed to install or move the machine. Warning: Due to the size and weight of the printer, the UltiMaker Factor 4 is considered non-portable. Do not attempt to carry the printer, but use proper means to move and install this product, such as a forklift or similar device. -
Page 12: Unboxing
3.4 Installation Warning: Due to the size and weight of the printer, the UltiMaker Factor 4 is considered non-portable. Do not attempt to carry the printer, but use proper means to install this product, such as a forklift, pallet lift, or similar device. -
Page 13: Accessories
3.5 Welcome setup Turn on the printer using the power switch at the back. When you power on the UltiMaker Factor 4 for the first time, you will first be asked to select your preferred language. After this, the welcome setup will appear on the display. -
Page 14: Operation
All UltiMaker materials have been extensively tested and have optimized profiles in UltiMaker Cura to ensure the best print results. Therefore, it is advised to use one of the default profiles in UltiMaker Cura for the highest reliability. Using UltiMaker materials will also allow you to benefit from the NFC detection system. UltiMaker spools will be automatically recognized by the material bays. -
Page 15: Preparing A Print
4.3 Preparing a print Use UltiMaker Cura to prepare your prints. If you have not already done so, add your UltiMaker Factor 4 to Cura via Digital Factory for an optimal workflow. Alternatively, select the UltiMaker Factor 4 manually from the list of non-networked printers. -
Page 16: Printing Process
When a print job is sent via cloud, monitor the status and progress via Digital Factory. You can easily navigate to Digital Factory via the monitor tab, or via the quick links menu. If your UltiMaker Factor 4 is not connected to the Digital Factory, but via local network, the monitor tab shows the printer’s camera view. -
Page 17: Remove The Print
4.5 Remove the print Once your 3D print is finished, it must be removed from the build plate. The UltiMaker Factor 4 has a convenient flexible build plate, which makes removing prints quick and simple. -
Page 18: Remove Support Material
PVA. For the quickest result, fresh water is recommended. Breakaway support UltiMaker Breakaway support material is optimized to snap off easily from the object. Follow the steps below: Warning: The support structures can be sharp. Wear protective gloves to prevent injury, especially when working with larger models. -
Page 19: Change Configuration
Tip: Learn more about print cores and their compatibility on support.ultimaker.com. Print cores can be easily changed on the UltiMaker Factor 4 by using the procedure from the menu. You can also choose to only load or unload a print core. The printer will guide you through the steps. -
Page 20: Calibrations
A correct XY calibration will ensure that the two colors or materials align well. The print cores that are supplied with the UltiMaker Factor 4 are already calibrated. For any new combination of print cores, an XY offset calibration must be performed. The printer will then store this calibration value internally. - Page 21 Gantry calibration The movements of the print head in the X and Y directions are controlled by the gantry. The UltiMaker Factor 4 can run a gantry calibration procedure to achieve optimal dimensional accuracy. In the Settings...
-
Page 22: Maintenance
Maintenance Update firmware → Wait for the UltiMaker Factor 4 to finish updating the firmware. The printer will restart. Do not power off the printer during the firmware installation. Update using a USB stick If your UltiMaker Factor 4 is not connected to a network, you can update to the latest firmware via USB. -
Page 23: Preventive Maintenance Schedule
(resealable) bag. Install the new filter and close the filter box. Tip: For detailed instructions on how to perform each maintenance action, visit ultimaker.com/Factor4-maintenance or go to the UltiMaker Digital Factory. UltiMaker Factor 4 Installation and user manual... -
Page 24: Flexible Build Plate Maintenance
5.5 Print core maintenance UltiMaker print cores should be cleaned periodically for optimal print results. Material can sometimes get stuck inside the nozzle and degrade. This can cause extrusion problems, or even completely block the print core. Some materials are more prone to degradation and blocking the nozzle, such as PVA and composite materials. -
Page 25: Troubleshooting
6.2 Error messages When the UltiMaker Factor 4 detects that something is wrong, or when it reads values outside of the allowed range, an error will occur. The display will give a short description of the detected issue along with its unique error code. -
Page 26: Limited Warranty
UltiMaker or its authorized reseller will assess warranty claims to determine their validity. If the claim is justified, UltiMaker or the reseller shall rectify the defects by repairing or replacing the non-conforming or damaged part(s) of the Product in a commercially reasonable time. -
Page 27: Exclusions
FOR ANY INDIRECT, INCIDENTAL, COLLATERAL, EXEMPLARY, PUNITIVE, SPECIAL, OR CONSEQUENTIAL DAMAGES, INCLUDING LOSS OF USE OR LOSS OF PROFITS, EVEN IF ULTIMAKER HAS BEEN ADVISED OF THE POSSIBILITY OF SUCH CLAIMS OR DAMAGES. ULTIMAKER’S LIABILITY IS LIMITED TO THE PURCHASE VALUE OF THE PRODUCT. - Page 28 You can also contact our support team by submitting a case. Resellers ultimaker.com/resellers Find a reseller near you to buy an UltiMaker product or receive support in your language. Compliance and regulatory information ultimaker.com/compliance Find important compliance and regulatory information about UltiMaker hardware, software, and materials, or download certifications.
Need help?
Do you have a question about the Factor 4 and is the answer not in the manual?
Questions and answers