Table of Contents
Advertisement
Quick Links
Advertisement
Table of Contents

Related Manuals for Charge Amps Luna


Summary of Contents for Charge Amps Luna
- Page 1 Charge Amps Luna Installation English Manual www.chargeamps.com...
-
Page 2: Table Of Contents
4.4.2 Residual current safety Internet access 4.5.1 Wi-Fi 2,4 GHz connection 4.5.2 LTE Cat 1bis connection Installation Mounting Connection 5.2.1 Cable connection Reassemble Configuration Create a Charge Amps Partner Account Configure via Charge Amps Installer App Configure via Installation Wizard... - Page 3 Cloud connectivity Dismounting Maintenance Product support and service Warranty...
- Page 4 Neglecting to follow and carry out the directions, instructions and safety precautions in this Installation Manual implies that any warranty provisions will be cancelled and that Charge Amps AB can reject any and all claims for compensation in connection with any injuries/damage or incidents – direct or indirect –...
-
Page 5: Safety
Safety WARNING: Read all instructions before installation! • The product must only be installed by a qualified electrician in accordance with the Installation Manual. • Make sure to switch the power off at the main switch before installation or service. •... -
Page 6: Technical Data
2 Technical data Charging mode Mode 3 EV power supply identifier Metering 1 to 3 phase voltage, current and power Socket Type 2, 22 kW Rated voltage (U 230/400 V Rated insulation voltage (U 250/400 V Rated impulse withstand voltage 4 kV Rated frequency (f 50 Hz... - Page 7 Enclosed wall-mounted surface type: mounting - Surface mounted on walls - Stationary ground and floor mounted installation with accessory Next Green Poleplate for Charge Amps Luna. Type of construction Fixed parts Intended use and location type By ordinary persons, indoor and...
- Page 8 Bluetooth Version: Bluetooth 5.0 (LE) and Bluetooth LE 5.3 certified Range: 2400 – 2480 MHz Max output: 19 dBm Wi-Fi Type: 802.11 b/g/n/ax Range: 2412 – 2484 MHz Max output: 20.5/20.0/19.0/19.0 dBm@802.11b/g/n/ax Cellular networks communication Type: LTE-FDD and GSM Supported bands: B3/B7/B8/B20/B28 Range: 703–915/1710–1785/2500–...
-
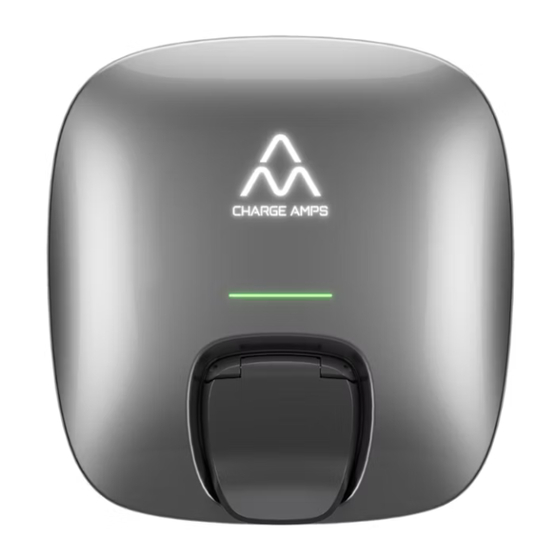
Page 9: Product Overview
3 Product overview Front cover EV socket-outlet Illuminated Charging unit logotype RFID reader Status LED... -
Page 10: Package Contents
3.1 Package Contents 2x long screw 2x short screw RFID tag Strain relief... - Page 11 Front cover Installation lid Charging unit Drill template Accessories bag: • 1x RFID tag • 1x Strain relief • 2x long screw (PT40x30) • 2x short screw (PT40x14) Additional contents: • Quick Guide • Welcome letter...
-
Page 12: Before Installation
4.2 Materials provided by installer • 3x Mounting screws (5x40mm or longer, non-countersunk screws) for fastening Charge Amps Luna to the wall. Long bit is required. • Installation cable, according to the charging capability of the... -
Page 13: Mounting Requirements
4.3 Mounting requirements • If possible, do not mount the Charge Amps Luna in direct sunlight. Overheating may impact the charging power. • Make sure the wall can support a weight of 1,4 kg and the tractive force from the inserted cabling. -
Page 14: Electrical Requirements
If an upstream RCD is required, it is recommended to be selected as follows: • If selectivity in relation to the built-in RCD in Charge Amps Luna is required: RCD Type A Type S, 100mA or 300mA. • If selectivity in relation to the built-in RCD in Charge Amps Luna... -
Page 15: Internet Access
4.5 Internet access N.B: Wi-Fi is recommended for optimal performance. Both Wi-Fi and LTE connection is available for Charge Amps Luna. If a Wi-Fi connection is configured, it will be prioritized over LTE. 4.5.1 Wi-Fi 2,4 GHz connection Wi-Fi connection is recommended, and the placement of Charge Amps Luna is key to solid Wi-Fi connectivity. -
Page 16: Lte Cat 1Bis Connection
N.B: Note that the LTE connection is a paid service. For more information see www.chargeamps.com/product/4g- connectivity/ The first time the Charge Amps Luna attach to the network it will require some additional time (up to ten minutes). Please be aware that mobile operator networks may change and interferance and noise disturbance might be added over time. -
Page 17: Installation
5 Installation 5.1 Mounting 1. Unpack Charge Amps Luna and make sure it is in good condition. 2. Make sure the mounting surface is flat, and use the drill template to mark the mounting holes on the wall. 3. Mount the Charging unit to the wall. -
Page 18: Connection
There are two options for cable entry: via the back or bottom of Charge Amps Luna. 1. For back side cable entry, make a hole in the rubber grommet and pull the cable through the back of Charge Amps Luna. Back side cable entry... - Page 19 2. For bottom side cable entry, make a hole in the rubber grommet, pull the cable through the cable entry and screw the strain relief in place (Max. 1 Nm). Bottom side cable entry PT40x30...
- Page 20 N.B: Compared other Charge Amps chargers, Charge Amps Luna can not internally rotate the connected phases after the physical installation is completed. Hence, take additional care when selecting which phase to install on the L1 connector on Charge Amps Luna.
- Page 21 TN/TT 1 phase connection 3 phase connection 1 phase connection...
- Page 22 5. Connect the cables. 6. Mount the installation lid and screw it in place (Max. 2 Nm). PT40x14...
- Page 23 8. Make sure the Status LED and Illumination logo are on. 9. Test the internal RCD according to the instructions in Charge Amps Luna User Manual. 10. Once the test of the RCD is completed, continue chapter 5.3 to reassemble Charge Amps Luna.
-
Page 24: Reassemble
5.3 Reassemble 1. Carefully press the Front cover in place. -
Page 25: Configuration
N.B: Always register in Charge Amps Partner Portal to configure Charge Amps Luna. There’s two ways to configure Charge Amps Luna, via the Charge Amps Installer App or via the Installation Wizard in Charge Amps Cloud. Before starting the configuration, make sure to create a Partner Account in Charge Amps Partner Portal. -
Page 26: Configure Via Charge Amps Installer App
1. Open the app and press the button for configuration on the front page 2. Select the Charge Amps Luna you wish to configure and enter the PIN code. (The PIN code can be found in the Welcome letter included in the box of Charge Amps Luna). -
Page 27: Cloud Connectivity
7 Cloud connectivity Charge Amps Installer App and Charge Amps Cloud are available for Charge Amps Luna connected to Charge Amps as the cloud provider. Charge Amps Installer App Please download Charge Amps Installer App, available in App store and Google Play. - Page 28 2. Using a flat screwdriver, carefully bend the front cover open. 3. Use this Installation manual and follow the steps in reverse order to dismount Charge Amps Luna in the correct order. N.B: Dismounting shall only be performed by a qualified...
-
Page 29: Maintenance
9 Maintenance WARNING: Never spray water or any other liquid directly on the product. • Visually check that the EV socket-outlet is free from damage. • The outside of the product must be regularly wiped with a clean, dry cloth to remove dirt and dust. •... -
Page 30: Warranty
11 Warranty Warranty terms may differ from market to market. Contact your supplier regarding the warranty terms. - Page 31 Charge Amps AB (publ) Frösundaleden 2B, 8th floor SE–169 75 Solna, Sweden Doc. Nr: 131590 © Copyright Charge Amps AB. Rev: 01 All rights reserved...
Need help?
Do you have a question about the Luna and is the answer not in the manual?
Questions and answers