Table of Contents
Advertisement
Quick Links
Advertisement
Table of Contents

Related Manuals for Extech Instruments VPC260


Summary of Contents for Extech Instruments VPC260
- Page 1 User Manual Particle Counter Model VPC260...
-
Page 2: Table Of Contents
Table of contents Introduction................1 Product Feature Overview ..........1 Additional Features ............. 1 Product Description ............2 Meter Parts ............... 2 Control and Function Buttons ........3 Display Icon Descriptions ..........3 Rechargeable Battery ............5 Battery Type .............. 5 Charging the Battery ........... 5 3.2.1 Charging with a USB Connection...... - Page 3 Table of contents 6.2.2 Font Colour........... 16 6.2.3 Language............. 16 6.2.4 Brightness ............ 17 6.2.5 Auto Power OFF (APO) ........17 6.2.6 Display Timeout..........18 6.2.7 Alarm ............18 6.2.8 Memory Status ..........19 6.2.9 Factory Setting Reset........19 6.2.10 Units ............19 Record Browser ..............
-
Page 5: Introduction
Introduction 1.1 Product Feature Overview Thank you for selecting the Extech VPC260 six (6) channel Particle Counter. This meter provides quick and accurate particle count, air temperature, and relative humidity readings. Measurements are made with the built-in particle counting probe and temperature/relative humidity sensor. A zero count filter is supplied for purging particles from the meter before and after each use to en- sure accuracy. -
Page 6: Product Description
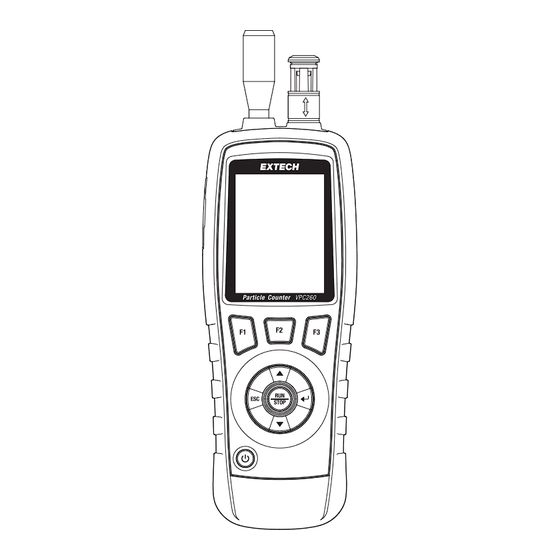
Product Description 2.1 Meter Parts 1. Particle count probe 2. Temperature and RH sensor 3. Protective sliding sensor sleeve 4. Compartment for USB port and AC adaptor jack 5. Colour TFT LCD 6. Function buttons 7. Control buttons 8. ON/OFF button (long press) 9. -
Page 7: Control And Function Buttons
Product Description 2.2 Control and Function Buttons Function button F1. Opens the test record browser. While in the brows- er, press to delete the selected test record. Function button F2. Opens the System settings menu (from the opening screen) or the Test settings menu (from the measurement screen). Function button F3. - Page 8 Product Description Press F3 under this icon to open the general information page. Press F2 under this icon to open the Test settings menu. Test is running. Test is stopped/paused. #NAS100084; r. AA/93064/93076; en-GB...
-
Page 9: Rechargeable Battery
Rechargeable Battery 3.1 Battery Type The meter is equipped with an internal rechargeable 3.7 V lithium-ion battery. The battery is not user-serviceable, please contact Extech service to coordi- nate a battery replacement. 3.2 Charging the Battery This meter can be charged using the supplied 9 V adaptor or a USB connec- tion to PC or 5 V charger. -
Page 10: Operation
Operation CAUTION Keep the meter away from sources of electrical and magnetic energy as these can affect reading accuracy. Do not operate this meter in areas of extremely high temperature (> 50℃ [122℉]) or hu- midity (> 90% RH). 4.1 Opening Screen Long press the power button to switch the meter on. -
Page 11: Measurement Screen
Operation 4.2 Measurement Screen Long press the power button to switch the meter on. At the opening screen, press ENTER to access the measurement screen, shown below. 1. Current Date and time. 2. Sample mode icons Cumulative (∑), Differential (Δ), Concentration (CON) and Run (>|), Pause (||) icons. -
Page 12: Measurement Preparation
Operation 4.3 Measurement Preparation 4.3.1 Indoor Air Quality (IAQ) Considerations Particle pollution is a mixture of various components including smoke, dust, chemicals, mold, and gases. Evaluating IAQ by determining the concentration and size of these particles can help to determine if a problem exists. Locating the source of these par- ticles can help to determine effective methods of reducing these and improv- ing IAQ. -
Page 13: Running A Test
Operation Finally, switch the meter off, remove the zero count filter, and reattach the par- ticle count probe to begin testing. 4.4 Running a Test 1. Slide the protective temperature/RH sensor sleeve down to expose the sensor to the ambient air. 2. -
Page 14: Test Settings Menu
Test Settings Menu 5.1 Accessing the Test Settings Menu 1. Long press the power button to switch the meter ON. 2. From the opening screen, press ENTER to access the measurement screen. 3. Press F2 under the Test settings icon to open the Test settings menu (shown below). -
Page 15: Start Delay
Test Settings Menu 5.2.2 Start Delay Add a delay (from 3 to 100 seconds) to the start of the tests. 1. Scroll to the Start Delay selection in the menu. 2. Press ENTER to open the selection. 3. Press ENTER again to prepare the setting for editing. 4. -
Page 16: Sample Cycle
Test Settings Menu 1. Scroll to the Ambient Temperature / RH% selection in the menu. 2. Press ENTER to open the selection. 3. Use the arrow buttons to select Enable or Disable. 4. When enabled, ambient measurements will appear on the measurement screen. -
Page 17: Interval
Test Settings Menu Differential Mode (represented by the delta symbol Δ): Includes all particles that are ≥ the selected particle size (2.5μm, 10μm, etc.) but < the next largest particle size. Concentration Mode (represented by the abbreviation ‘CON’): This mode is used to take a quick sample of airborne particulates of all sizes, especially in areas where the particulate levels are unknown. - Page 18 Test Settings Menu 3. Use the arrows to designate the channel that will control the alarm and the colour bar graph. 4. Press ESC to save the setting. #NAS100084; r. AA/93064/93076; en-GB...
-
Page 19: System Settings Menu
System Settings Menu 6.1 Accessing the System Settings Menu 1. Long press the power button to switch the meter ON. 2. Press F2 under the System settings icon to open the menu (shown below). 6.2 System Setting Descriptions 6.2.1 Date and Time 1. -
Page 20: Font Colour
System Settings Menu 6.2.2 Font Colour Select the colour for displayed text. 1. Scroll to the Font Colour selection in the menu. 2. Press ENTER to open the selection for editing. 3. Use the arrows to highlight the desired colour. 4. -
Page 21: Brightness
System Settings Menu 6.2.4 Brightness Adjust the LCD brightness. 1. Scroll to the Brightness selection in the menu. 2. Press ENTER to open the selection for editing. 3. Use the arrows to highlight the desired brightness level. 4. Press ESC to save the setting. 6.2.5 Auto Power OFF (APO) Set or disable the APO timer. -
Page 22: Display Timeout
System Settings Menu 6.2.6 Display Timeout To conserve battery energy, the meter can switch off the display after a pro- grammed time. This will not affect meter operation. Press any key to wake the display. 1. Scroll to the Display Timeout selection in the menu. 2. -
Page 23: Memory Status
System Settings Menu 6.2.8 Memory Status Check the number of records stored in memory. 1. Scroll to the Memory Status selection in the menu. 2. Press ENTER to open the status page. 3. The status page shows the number of records stored. Up to 1,000 records can be stored. -
Page 24: Record Browser
Record Browser 7.1 Browser Overview The meter can store up to 1,000 records, each test is automatically saved as a record. Records include particle count, ambient measurements, and time/ date. You can export records to a spreadsheet using the PC interface, see Section 9. - Page 25 Record Browser 7. Air volume. 8. Recording sample rate (60 seconds, in this example). 9. Date and time of test. Open the Memory Status menu item in the System settings menu to check the number of records stored (maximum 1,000 records). #NAS100084;...
-
Page 26: Particle Count Alarm
Particle Count Alarm The meter alerts you (visually and audibly) when the particle count limit, for the designated channel, is exceeded. Designate the channel that will control the alarm using the Level Indication menu item, explained in step 2, below. The animated colour bar graph shows the particle count status for the desig- nated channel. -
Page 27: Pc Interface
USB-A port on your PC. The meter has a built-in USB driver that connects the meter to the PC. Refer to the Software Help information contained in the VPC260 software for com- plete instructions. -
Page 28: Maintenance
Maintenance 10.1 Cleaning and Storage Wipe the meter housing with a damp cloth as necessary, do not use abrasives or solvents. Slide the temperature/RH sensor’s protective sleeve to the ‘up’ position to protect the sensor when cleaning or when storing. Do not allow moisture to enter the particle counter probe. -
Page 29: Specifications
Specifications 11.1 General Specifications Display 5.6 x 7.1 cm (2.2 x 2.8 in.) TFT colour LCD Battery status indication Animated battery charge symbol on top right of LCD Internal memory Up to 1,000 test records Power supply Rechargeable 3.7 V lithium-ion battery 9 V AC adaptor;... -
Page 30: Ambient Measurement Specifications
Specifications 11.3 Ambient Measurement Specifications Air Temperature Range 0 to 50℃ (32 to 122℉) Air Temperature Resolution 0.1℃/℉ Air Temperature Accuracy ±0.5℃ (0.9℉) from 10 to 40℃ (50 to 104℉) ±1.0℃ (1.8℉) all other ranges Relative Humidity Range 0 to 100% RH Relative Humidity Resolution 0.1% Relative Humidity Accuracy... -
Page 31: Limited Two-Year Warranty
Limited Two-Year Warranty FLIR Systems, Inc. warrants this Extech brand instrument to be free of defects in parts and workmanship for two years from date of shipment. To view the full warranty text please visit: https://www.extech.com/support/warranties #NAS100084; r. AA/93064/93076; en-GB... -
Page 32: Customer Support
Customer Support Customer Support Telephone List: https://support.flir.com/contact Main Support Site: https://support.flir.com User Manual and PC Software Downloads: www.extech.com #NAS100084; r. AA/93064/93076; en-GB... - Page 34 User Manual last page Website http://www.flir.com Customer support http://support.flir.com Copyright © 2023, FLIR Systems, Inc. All rights reserved worldwide. Disclaimer Specifications subject to change without further notice. Models and accessories subject to regional market considerations. License procedures may apply. Products described herein may be subject to US Export Regulations.
Need help?
Do you have a question about the VPC260 and is the answer not in the manual?
Questions and answers