D-Link MediaLounge DSM-520 User Manual
Wireless hd media player
Hide thumbs
Also See for MediaLounge DSM-520:
- Features and benefits (2 pages) ,
- Install manual (28 pages) ,
- Install manual (420 pages)
Table of Contents
Advertisement
Quick Links
Download this manual
See also:
Installation Manual
Advertisement
Table of Contents

Related Manuals for D-Link MediaLounge DSM-520


Summary of Contents for D-Link MediaLounge DSM-520
-
Page 2: Table Of Contents
Accessing the Media on your PCs ................24 Sharing Media Content in Folders ................25 Refreshing Folder Contents .................. 25 Naming the Media Server ..................26 Stopping the D-Link Media Server ................27 Using Windows Media Connect Software ............28 ®... - Page 3 My Kid’s Tunes™....................77 Napster™ ....................... 78 Rhapsody™ ..................... 81 Current Rhapsody™ Subscribers ..............81 For Users New to Rhapsody™ ................ 82 Configuring Rhapsody™ for use with the DSM-520 ..........88 TotalVid™ ....................... 90 Setup ......................91 Network ......................91 Wireless......................92 System ......................
-
Page 4: Safety Information
DSM-520 User’s Manual Safety Information Safety Information For optimum performance, please read the following information carefully. Safety Precautions The lightning flash with arrowhead symbol, within an equilateral triangle, is intended to alert users to the presence of uninsulated “dangerous voltage” within the product’s enclosure that may be of sufficient magnitude to constitute a risk of electric shock to persons. -
Page 5: Safety Information
DSM-520 User’s Manual Safety Information CAUTION! • DO NOT INSTALL OR PLACE THIS UNIT IN A BOOKCASE, BUILT-IN CABINET OR IN ANOTHER CONFINED SPACE. ENSURE THE UNIT IS WELL VENTILATED. TO PREVENT RISK OF ELECTRIC SHOCK OR FIRE HAZARD DUE TO OVERHEATING, ENSURE THAT CURTAINS AND ANY OTHER MATERIALS DO NOT OBSTRUCT THE VENTILATION VENTS. - Page 6 DSM-520 User’s Manual Safety Information Radio and TV Interference: This equipment has been tested and found to comply with the limits for a Class B digital device, pursuant to Part 15 of the FCC Rules.These limits are designed to provide reasonable protection against harmful interference in a residential installation.This equipment generates,...
- Page 7 Certain features of this device may be unavailable when accessing stored media content on UPnP AV network attached storage devices. USB flash drive and USB hard drive sold separately. D-Link is not responsible for damage to USB drives, or loss and/or damage to files on the USB drives, due to improper installation or usage.
-
Page 8: Introduction
Simple to setup with a sleek design that makes it a natural addition to any home entertainment center. The AV jacks on the back panel of the DSM-520 allow for direct connection to your television. Use the included remote control to access media content stored on your PC. -
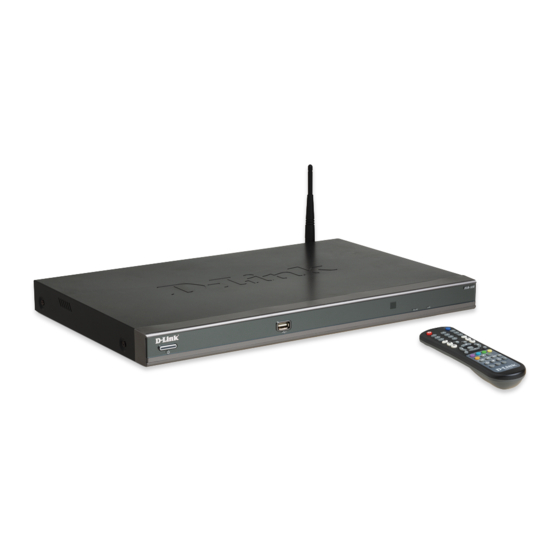
Page 9: Package Contents
Package Contents Package Contents D-Link DSM-520 Wireless HD Media Player Printed Install Guide CD-ROM with Manual (Contains D-Link Media Server Software, Install Guide, and Manual) 2dBi Wireless Antenna Ethernet (CAT5-UTP/Straight-Through) Cable Standard Composite RCA Audio/Video Cable ... -
Page 10: Features & Benefits
DSM-520 User’s Manual Features and Benefits Features and Benefits Stream media content from a PC or D-Link Network Attached Storage to your entertainment center. Supports WMV9 video files, as well as MPEG 1/2/4, XVID, and AVI. High-Definition (HD) video files with support for resolution up to 1080i. -
Page 11: Hardware Overview
Use this port to directly playback content stored in USB storage devices. Power Button Remote Sensor To manually start the DSM-520 without To operate the DSM-520, point the remote control, simply press this the supplied remote control at power button. -
Page 12: Getting Started
Ethernet port). The DSM-520 Media Server software installed on the PC you will be sharing files from. This computer will collect music, photo and video content from local sources (a digital camera for example) and from the Internet (downloaded MP3 music, digital photos, or video files). -
Page 13: Using The Remote Control
DSM-520 User’s Manual Using the Remote Control Using the Remote Control 1. Power 2. Alphanumeric Keys 3. HOME 4. “.” (period or dot) 5. DELETE 6. MUTE 7. PAGE UP & DOWN 8. VOLUME + & - 9. BACK 10. ENTER 11. - Page 14 DSM-520 User’s Manual Using the Remote Control Power Turn the DSM-520 ON or OFF. Alphanumeric Keys Enter numbers where needed, or use the onscreen keyboard to input text. Number keys 1-9 can be defined as Music presets. To define a...
-
Page 15: Installing The D-Link ® Media Server Software
DSM-520 via your wired/wireless network connection. Currently the DSM-520 only connects to one Media Server at a time. If more than one PC contains files you want to share, you can select one of the following options: 1. - Page 16 DSM-520 User’s Manual Installing the D-Link Media Server Software ® Insert the DSM-520 CD-ROM into the CD-ROM drive and the following screen will appear. Click on Install D-Link ® Media Server If the screen on the right does not appear, go to My Computer and double-click on the CD-ROM drive.
- Page 17 The D-Link license agreement screen appears. Click Next Choose a Destination location or accept the default location. This is where the D-Link Media Server software will be copied to on your system. Click Next Choose a Start Menu folder or accept the default location.
- Page 18 DSM-520 User’s Manual Installing the D-Link Media Server Software ® Select the icons you want created. Select Create a desktop icon to access the program from your desktop. Select Create a Quick Launch icon to access the program from your taskbar.
- Page 19 DSM-520 User’s Manual Installing the D-Link Media Server Software ® The Windows Security Alert screen may open when the D-Link Media Server is started. ® Click Unblock when this message appears. Click Unblock If your computer is using firewalls set by security software, etc., you may need to reset the firewalls before you can use the D-Link...
-
Page 20: Choosing Music, Photo, And Video Files To Share
Media Server software enables you to share the files from your computer with ® the DSM-520. By sharing the files, there is no need to copy the files from your computer to the unit before they can play. The data is streamed directly from the files on your computer over the network to your DSM-520. - Page 21 DSM-520 User’s Manual Choosing Music Files to Share The FileTypes tab is where you select the types of audio, video, and photo files that you want to share. The Shared Folder tab is where you select the folders that contain your audio, video, and photo files.
- Page 22 DSM-520 User’s Manual Choosing Music Files to Share Select the folder containing the files you wish to share. Click OK Repeat the steps until all of the folders containing audio, video, and photos you want to share have been added.
- Page 23 DSM-520 User’s Manual Choosing Music Files to Share The Media Files tab will show all your audio, video, and photo files as well as display important file information. The D-Link Media Server software configuration is complete! ® D-Link Systems, Inc.
-
Page 24: Using The D-Link ® Media Server Software
Media Server Software ® Accessing the Media on your PCs Before you can access the media from a PC, you must install the D-Link Media Server ® software (See Page 15). Simply install the included software on each PC where music, video, or digital photos are stored. -
Page 25: Sharing Media Content In Folders
Add a folder. If you copy additional files into these folders, they will be seen by the DSM-520 when you refresh the folder contents. Refresh a folder: To refresh a folder’s contents, select a folder and then click the Refresh a folder button. -
Page 26: Naming The Media Server
The Media Server name is entered here. This is the server name that is displayed when searching for available media servers on your DSM-520. See page 41 “Select a Media Server” and page 94 “Default Server”, for an example of the DSM-520 searching for a media server. -
Page 27: Stopping The D-Link Media Server
DSM-520 only if the D-Link Media Server is running. Online ® Zone content that does not require PC-based software (such as Radio@AOL and Live365) can still be accessed from the DSM-520 without r unning the D-Link Media Server software. ®... -
Page 28: Using Windows ® Media Connect Software
XP users with Service Pack 2 can utilize the Windows Media Connect ® ® software in addition to or instead of using the D-Link Media Server software. The Windows Media Connect software allows the DSM-520 to playback DRM (Digital ®... - Page 29 DSM-520 User’s Manual Using Windows Media Connect Software ® The Sharing tab is where you configure the folders that you want to share with your DSM-520. Click Add Click Browse Select the folder that you want to share Click OK...
- Page 30 Windows starts. You can also Stop/Start sharing. Click Close The DSM-520 supports additional file types that are not supported by the Windows Media ® Connect software. The file types shown on page 31 are supported by both Windows Media ®...
- Page 31 .srt Be sure to select the Windows Media Connect server as the default ® server in the DSM-520 System Setup if you want to access content by Media Connect server. To do so, press the SETUP using the Windows ®...
-
Page 32: Connecting The Dsm-520
DSM-520 User’s Manual Connecting the DSM-520 Connecting the DSM-520 All audio, video, and networking connections are located on the rear panel of the DSM-520. Video Connections Select one of four ways to connect video to your DSM-520: Composite Video Connector •... - Page 33 DSM-520 User’s Manual Connecting the DSM-520 HDMI • Plug the HDMI cable into the HDMI connector on the back panel of the DSM-520. Plug the opposite end to the matching HDMI connector on your television or audio/video system. Note: This cable is not supplied.
-
Page 34: Audio Connections
DSM-520 User’s Manual Connecting the DSM-520 Audio Connections Select one of three ways to connect audio to your DSM-520: The AUDIO OUT button on the remote control toggles between the composite audio output and the digital audio output (optical/coaxial). Composite Audio •... -
Page 35: Network Connections
Setup Menu. To access the Setup Menu, press the SETUP button on the remote control. Note: If you place the DSM-520 in an enclosed area (e.g. an entertainment center) you may need to obtain an extension antenna to provide an optimal wireless signal. -
Page 36: Using The On-Screen Keyboard
Whenever the cursor is in a text field and you need to enter text, press ENTER on the remote control and the on-screen keyboard will appear. The keyboard is used for a variety of functions such as naming your DSM-520 and performing searches for music, photos or video.To use the keyboard, highlight a character with the arrow buttons on the remote control and press the ENTER button.Text can also be entered by using... -
Page 37: The Dsm-520 Setup Wizard
The DSM-520 Setup Wizard The DSM-520 Setup Wizard The DSM-520 Setup Wizard is navigated using the directional arrows and the ENTER button on the remote control. To toggle between the configuration options, use the up and down arrows on the remote control. To toggle between the Back, Next, and Rescan buttons, use the left and right arrows on the remote control. - Page 38 DSM-520 User’s Manual The DSM-520 Setup Wizard Select Your Network Connection The connection type defaults to Wireless. Wireless If using a wireless network, press the down arrow on the remote control to navigate to the Next button. Once the Next button is highlighted, press ENTER on the remote control to proceed to the next screen.
- Page 39 DSM-520 User’s Manual The DSM-520 Setup Wizard Current Wireless Settings Your current wireless settings are displayed To use Windows Connect Now, please ® based on the SSID you selected in the skip to page 42. previous step. If you chose the enter the SSID manually, then the default settings are entered.
- Page 40 DSM-520 User’s Manual The DSM-520 Setup Wizard Key (continued) Press the ENTER button on the remote control with this field highlighted to enter a key. The on-screen keyboard will be displayed and you can enter the key. Keys are defined by entering in a string in HEX (hexadecimal - using characters 0-9, A-F) or ASCII (American Standard Code for Information Interchange –...
- Page 41 Servers. Use the left and right arrows to navigate between the Next and Rescan button. A Media Server is any PC running the D-Link Media Server software or UPnP AV compliant device on the network that can communicate with the DSM-520. Setup is Complete Press ENTER on the remote control with Done highlighted to complete the setup.
-
Page 42: Windows Connect Now Configuration
If you already have wireless settings configured on your PC, instead of using the setup wizard, you can use Windows ® Connect Now to configure the wireless settings on your DSM-520. Note: Windows Connect Now is only available on PCs running Windows XP with Service ®... - Page 43 DSM-520 User’s Manual Windows Connect Now Configuration ® The wizard provides two methods for setting up a wireless network. Using a USB flash drive is recommended. Select to use a USB flash drive to save your wireless network settings and click Next to continue.
- Page 44 ® Next, remove the USB Flash Drive from your PC and insert it into the USB port on the DSM-520, which is located on the front panel. The following screen will appear, prompting you to apply your wireless settings. Click OK to continue.
- Page 45 Windows Connect Now Configuration ® Next, remove the USB Flash Drive from the DSM-520 and insert it back into the USB port on your PC. Click Next to continue. Wireless configuration using Windows ® Connect Now is now complete.The setup wizard will display the devices that have been setup with your wireless network.
-
Page 46: Menu
DSM-520 Menu Menu Basics The DSM-520 uses an on-screen menu interface. As you move through the menus, you will use the selection arrows on the remote control to move up, down, right and left.The highlight bar moves from item to item as you press the selection arrows. In some instances you will need to press ENTER on the remote control to access the pulldown menu within an item. -
Page 47: Music
DSM-520 User’s Manual Music Music Music Quality Your music listening experience on the media player depends upon the quality of your digital music files on your PC. Avoid quality settings below 48kbps as they are unsupported. For CD quality music, rip your MP3s at 128kbps or higher, with a sample rate of 44.1kHz. -
Page 48: Organizing Music Files
Music files are located on your PC and can be contained in one directory folder, or organized in several subfolders. The DSM-520 automatically organizes your music files by genres, artists, albums, and tracks. This information is obtained from the ID3 tags in each of your music files. The ID3 tag is created for you when you rip (copy) your music from your CD. -
Page 49: Playing A Track
DSM-520 User’s Manual Music Playing a Track Once you enter the music menu, there are several ways that you can view tracks. You can view all tracks, playlists, tracks by genre, artist, album, or folder name. Use the selection arrows to navigate to the track you wish to play. Once you have located the appropriate track, highlight it and press ENTER or PLAY on the remote control. -
Page 50: Creating A Preset
Note: Presets cannot be erased but can be replaced by another selection. After creating a preset, you can play the preset any time the DSM-520 and the PC containing the tracks are powered on by pressing the preset number on your remote control. The song files on your PC must remain in the same folder location that they were in when the preset... -
Page 51: Browsing For Music
DSM-520 User’s Manual Music Browsing for Music There are many ways to browse for a music track. For example, let’s use the following music file located in the following shared location: c:\Documents and Settings\Administrator\My Documents\My Music\Beethoven\Ode to joy.mp3 Ode to joy.mp3... -
Page 52: Creating Music Playlists
Controlling Music Playback Your DSM-520 works just like a stereo or CD player. Controlling your music playback will be an easy and natural experience. Use the remote to PLAY, PAUSE, or STOP music. -
Page 53: Creating An Editable Playlist
DSM-520 User’s Manual Music Creating an Editable Playlist An Editable Playlist is a file that only works with MediaLounge ™ products. It is stored in your PC media server. 1. Select the MUSIC category from the Home page or click on the MUSIC button on the remote control. - Page 54 DSM-520 User’s Manual Music Creating an Editable Playlist (continued) 5. When the keyboard appears, type in the title for your new playlist. After you have typed in the title, click ENTER to select. 6. When the Add Songs to the playlist screen...
-
Page 55: Now Playing
DSM-520 User’s Manual Music Creating an Editable Playlist (continued) 9.You have completed the creation of an Editable Playlist! You can now enjoy your selections. “Now Playing” The “Now Playing” feature allows you to display information about which song file is currently playing in the background. -
Page 56: Viewing Photos While Music Is Playing
DSM-520 User’s Manual Music Viewing Photos while Music is Playing Your DSM-520 is capable of displaying photos and playing background or preset music simultaneously. Background Music: You can start background music by playing a song in MUSIC mode. Go to PHOTO mode and start your photo slideshow. -
Page 57: Photo
DSM-520 User’s Manual Photo Photo Supported Photo Formats The following photo file formats are supported: BMP (non-compressed) Windows bitmap file. Widely used in Microsoft Windows for pictures and backgrounds. JPEG (grayscale, RGB, YCbCy) (Does not support CMYK, YCCK.) The JPEG format is the Internet and digital photo format standard used by most digital cameras. -
Page 58: Organizing Photo Albums
My Pictures directory called Vacation and copy all of your vacation photos into it. Your DSM-520 will show the Vacation folder. To play a slideshow of the folder, highlight it and press the PLAY button. To view a list of photos in the folder, highlight it and press the right arrow button. -
Page 59: Playing A Photo Slideshow
DSM-520 User’s Manual Photo Playing a Photo Slideshow To start playing a photo slideshow, highlight a folder and press the PLAY button. The first photo will be displayed and then followed by the next photo in the folder. All photos in the folder will be displayed. -
Page 60: Viewing Photo Information
DSM-520 User’s Manual Photo Viewing Photo Information To view information about a photo, highlight the photo and press the INFO button. D-Link Systems, Inc. -
Page 61: Photo Viewing Effects
DSM-520 User’s Manual Photo Photo Viewing Effects When viewing a photo you can change the on-screen appearance by applying rotate, pan, and zoom effects.These on-screen effects are only for enhancing the on-screen view and are not saved to the actual file. To access the photo viewing effects, press the MENU button on the remote control while viewing the photo that you want to manipulate. -
Page 62: Video
DSM-520 User’s Manual Video Video Supported Video Formats The following video file formats are supported: MPEG-1 (up to 8Mbps, Resolution up to 480p) MPEG-2 (up to 8Mbps, Resolution up to 1080i) MPEG-4 (ASP - Advanced Simple Profile) ... -
Page 63: Search By Time
DSM-520 User’s Manual Video How to use the ‘Search Video by Time’ feature Besides the FF/Rev option, your media player also supports searching a video by time. This option is called Jump in the Setup menu. Before watching a video, you must make a selection between these two options. - Page 64 DSM-520 User’s Manual Video Search Video by Time (continued) 1. To select Jump in Video Seek Mode, click OK. The pop-up screen shown here will display. Click OK. 2. To use the new Jump setting with your video viewing, select VIDEO on your remote. Make your selection in the Video category by scrolling and pressing ENTER.
- Page 65 DSM-520 User’s Manual Video Search Video by Time (continued) 1. Press SEARCH while the video is playing and you will see this pop-up window. Enter the hour, minute, and second that you want the video to “jump” to. If you choose not to use this feature, press SEARCH or BACK.
-
Page 66: Pip - Picture-In-Picture
DSM-520 User’s Manual Video PIP - Picture-in-Picture The DSM-520 features Picture-in-Picture mode. 1. Select a video file and play it. After it begins to play, hit the BACK, left arrow, or PIP button on your remote control.You should notice that the video file still plays, but is now located in... -
Page 67: Subtitles
DSM-520 User’s Manual Video Subtitles Your media player supports the display of the SRT subtitle file format. To use it, make sure that it is in the same folder as your movie file and that they are both named exactly the same. -
Page 68: Using The Remote Control With Videos
DSM-520 User’s Manual Video Using the Remote Control with Videos ENTER - Click ENTER to play your highlighted video. PLAY/PAUSE - To pause the video and to resume playing the video. + (VOLUME) - To increase the volume. - (VOLUME) - To decrease the volume. -
Page 69: Search
DSM-520 User’s Manual Search Search Click the SEARCH button on the remote control and the screen below will appear.This screen allows you to search for music tracks, videos, or photos. Use the up and down arrows on the remote control to navigate through the options. Press ENTER on the remote control to make a selection. -
Page 70: Online Zone
New services will be added in the future and made available via firmware upgrades. If your DSM-520 is configured to perform firmware upgrades automatically (see Version on page 98 for details), then you will see new options as soon as they become available. -
Page 71: For Aol ® Members
DSM-520 User’s Manual Online Zone After selecting AOL Services (as shown on the previous page), you will be given the ® option to sign in as an AOL Member, or, if you are not a member, you can enjoy a Free ®... -
Page 72: Radio@Aol
DSM-520 User’s Manual Online Zone For AOL Members (continued) ® Radio@AOL Information about the current selection will be displayed here. Use the up and down arrow buttons on your remote to scroll up and down through the genre list. If a station is highlighted, you will need to press the left arrow on your remote control to navigate to the genre list. -
Page 73: Radio@Aol Presets
DSM-520 User’s Manual Online Zone For AOL Members (continued) ® Radio@AOL Presets Click Radio@AOL Presets Preset Radio stations are available here. Use the arrow buttons on your remote control to highlight the station of your choice and press ENTER to select it. AOL Presets can only be ®... -
Page 74: Aol ® Services For Non-Members
DSM-520 User’s Manual Online Zone Services for Non-members ® Click Setup to begin your free trial of Radio@AOL using your DSM-520. Click Free Trial Click OK You are now ready to begin your free trial. Please see the previous pages for an explanation of your listening options. -
Page 75: Live365
DSM-520 User’s Manual Online Zone Live365 ™ Live365 is an Internet radio service that provides unlimited on-demand access to thousands ™ of radio stations. The audio is streamed directly over the Internet. Live365 ™ allows you to select your own preset stations and provides custom station recommendations. - Page 76 DSM-520 User’s Manual Online Zone Live365 (continued) ™ Editor’s Station Picks: Lists recommended stations based on your preset stations. Press the MENU button to add a station to your preset list. Genres: Lists stations according to genre. Press the MENU button to add a station to your preset list.
-
Page 77: My Kid's Tunes
To collect music, stories and audio files from My Kid’s Tunes™, you must order though their online service. Once you’ve ordered from My Kid’s Tunes™ you may begin to listen to the downloaded content through your DSM-520. Browse My Kid’s Tunes™ and place an order through their website. -
Page 78: Napster
Files downloaded with Napster are in the Windows Media DRM format. This is a type of ™ copy protection. These files can be played on the DSM-520 if you use the Windows Media ® Connect software. This software can only be run on Windows XP with Service Pack 2 or ®... - Page 79 DSM-520 User’s Manual Online Zone Napster (continued) ™ You can search by artist, track names, album names, and even search other member’s collections. Select a track that you want to download. Click the download button to download the file to your computer.
- Page 80 Be sure to select the Windows Media ® Connect server as the default server in the DSM-520 System Setup if you want to access content downloaded from Napster ™ To do so, press the SETUP button on the remote control. Navigate to System by using the down arrow and then press ENTER.
-
Page 81: Rhapsody
Current Rhapsody Subscribers ™ If you already have an account with Rhapsody and have the Rhapsody software installed on ™ ™ your computer, please skip to page 88 - Configuring Rhapsody for use with the DSM-520. ™ D-Link Systems, Inc. -
Page 82: For Users New To Rhapsody
DSM-520 User’s Manual Online Zone For New Rhapsody Users ™ The D-Link DSM-520 CD-ROM contains a link to the latest version of the Rhapsody software. ™ Click Online Media Services Note: You can also get to the link by visiting our website at http://support.dlink.com. - Page 83 DSM-520 User’s Manual Online Zone For New Rhapsody Users (continued) ™ The installation software will begin downloading to your computer. Click Next Please read the Terms of Use. If you do not agree to these terms, the installation process can not occur.
- Page 84 DSM-520 User’s Manual Online Zone For New Rhapsody Users (continued) ™ Select a destination folder for the software installation or use the default location. Click Next If you are connecting through a proxy server you can enter the settings here.
- Page 85 DSM-520 User’s Manual Online Zone For New Rhapsody Users (continued) ™ By default the options are configured to create shortcuts on your Desktop and on the Quick Launch toolbar. Click Finish Click Register Now! Fill in the blank fields to begin the registration process.
- Page 86 DSM-520 User’s Manual Online Zone For New Rhapsody Users (continued) ™ Complete the registration information on this page. Click Next Click Finish D-Link Systems, Inc.
- Page 87 Now that you’ve installed the Rhapsody software and created an account, you need to ™ configure the software for use with the DSM-520. Please follow the steps on the following page to configure the software. D-Link Systems, Inc.
-
Page 88: Configuring Rhapsody™ For Use With The Dsm-520
Online Zone Configuring Rhapsody for use with the DSM-520 ™ To use Rhapsody with your DSM-520 you need to enable the UPnP Server within the User ™ Settings. To do this, launch the Rhapsody application and follow the steps below. ™... - Page 89 DSM-520 (continued) ™ Only songs (albums or individual tracks) and radio stations that have been added to your library are available for streaming to your DSM-520. The library displays music and radio stations that have been added to your library.
-
Page 90: Totalvid
DSM-520 User’s Manual Online Zone TotalVid ™ TotalVid is a video service that provides hundreds of high quality, digital downloads available ™ without a subscription. With TotalVid downloads, you are always just minutes away from watching top videos. No need to wait for shipping. With downloads starting at just $1.99, TotalVid offers you a great way to check out titles before you buy the DVD.When you download... -
Page 91: Setup
DSM-520 User’s Manual Setup Setup If you want to change the configuration of your setup you can press the SETUP button on the remote control. For an explanation of the terminology used in the Setup functions, please see the Glossary. -
Page 92: Wireless
If you do not have a DHCP-enabled router, you will select Static and provide the following information: IP: Enter the IP address of the DSM-520. Netmask: Enter the subnet mask of the DSM-520. Gateway: Enter the IP address of the router on your network. - Page 93 The ASCII string is converted to HEX for use over the network. Four keys can be defined, so that you can change keys easily. WPA-PSK-TKIP requires your router and the DSM-520 to have the same pre-shared key to establish a wireless connection.
-
Page 94: System
System Restart: Navigate to this button by using the down arrow on your remote control. Press ENTER on the remote control to restart the DSM-520. System Reset: You will lose all current settings when selecting this option. The factory defaults will be restored and any settings you have entered will be erased. -
Page 95: General
DSM-520 User’s Manual Setup General The General option contains a submenu of four options: Audio/Video Aspect ratio: The aspect ratio can be adjusted to match the capture settings of your video clips. Video Output: You can select the video output... -
Page 96: Additional Settings
DSM-520 User’s Manual Setup Additional Settings Screen Saver Delay: Select the amount of idle time before the screen saver appears. Choose a time between 1-30 minutes. Use the up and down arrows on your remote control to navigate through the list. Press the ENTER button on your remote control to make a selection. - Page 97 DSM-520 User’s Manual Setup Check Internet Connection Check Internet Connection: Select this option to check the validity of your Internet connection. Press OK to proceed with the test. The phrase “Connection test succeeded!” will appear at the bottom of the window when your Internet connection is valid.
-
Page 98: Version
Please visit http://support.dlink.com for the latest version of the Media Server software. Note: If you have a version of the D-Link Media Server already installed on your system, please uninstall the software and restart your system before installing a newer version of the D-Link Media Server software. -
Page 99: Frequently Asked Questions
What operating system do I need to run the server software? Windows XP/2000 How does the D-Link DSM-520 get its files from my computer? As soon as you have installed the D-Link Media Server software on your PC, the ®... - Page 100 Can I use my Universal remote control? No, the DSM-520 is not compatible with a universal remote but you can use a remote with learning ability. Can I connect the DSM-520 directly to a PC without using a router or a hub? ...
-
Page 101: Troubleshooting
DSM-520 User’s Manual Troubleshooting Troubleshooting I cannot see the Setup Wizard when I turn on my DSM-520 player for the first time. Make sure your TV is displaying the appropriate video source.You may need to use the AV Input, Source, Select, or TV/Video button on your TV or TV remote to change video sources. - Page 102 Click on the Media Server icon and select Show Media Server to verify you are sharing the correct directories. If using a wired network, verify the Ethernet cable is properly attached to your DSM-520 and to a network switch, hub or router. Verify that the switch, hub or router is powered ...
- Page 103 Some of my MP3 and WMA files don’t appear. The DSM-520 supports the most common music file formats. However, there are almost an infinite variety of bit rates and sample rates. If a file does not appear on the receiver, it most likely uses an unsupported rate.
- Page 104 Media Server icon to add or change your folder options. How do I reset my DSM-520? Under normal circumstances, you should not need to reset your media player. However, to fully reset the media player, lightly insert a paper clip into the reset opening on the unit’s rear panel for ten seconds.
- Page 105 This is a limitation set in the AVI standard. The DSM-520 will not play my WMA Pro files. WMA Pro files are currently not supported. The DSM-520 will play WMA files, but not WMA Pro files. The DSM-520 will not play my WMV files.
-
Page 106: Technical Specifications
DSM-520 User’s Manual Technical Specifications Technical Specifications Network* • TCP/IP (DHCP or Static IP Address) • 802.11g Wireless (Supports up to 54Mbps transfer rate) • 802.11b Wireless (Supports up to 11Mbps transfer rate) • Wired LAN: 10/100Mbps Media Streaming Protocol •... - Page 107 DSM-520 User’s Manual Technical Specifications Antenna: • Type: 2.4GHz swivel-type monopole antenna • Frequency: 2.4GHz to 2.5GHz • Impedance: 50 ohms • Gain: 2dBi Dimensions • H x W x L: 1.5” x 11.25” x 16.75” • Weight: 5.5 pounds Security: •...
-
Page 108: Appendix
Do not allow your computer to enter a standby power state, or you will have to “wake up” your PC to view music or photos on your DSM-520. However, your monitor can be in a low power state or turned off. -
Page 109: Wireless Installation Considerations
The key to maximizing wireless range is to follow these basic guidelines: Keep the number of walls and ceilings between the DSM-520 and other network devices to a minimum. Each wall or ceiling can reduce your DSM-520’s range from 3-90 feet (1-30 meters). ... -
Page 110: File Information And Codec Of Your Media File
DSM-520 User’s Manual Appendix How to Check your Media For WMA/WMV/MP3, you may use “Windows Media ASF Viewer 9 Series” to examine your media files. This tool can be downloaded from: http://www.microsoft.com/windows/ windowsmedia/format/ASFViewer.aspx Here is a sample screenshot of the Windows Media ASF Viewer examining a WMV file. -
Page 111: Convert A Wmv File Into Wmv9
There are many variations of video files (including WMV files) which may affect playback on the DSM-520. To alleviate this issue, there are software tools available on the web to check the properties of a video file and to convert an earlier WMV file into WMV9. If you have Windows ®... - Page 112 DSM-520 User’s Manual Appendix Convert a WMV File into WMV9 (continued) Step 3: Select the video file. Step 4: Movie Maker will start importing the file. D-Link Systems, Inc.
- Page 113 DSM-520 User’s Manual Appendix Convert a WMV File into WMV9 (continued) Step 5: The video file you selected will show up in display. Step 6: Drag and drop the video into the bottom panel for editing. D-Link Systems, Inc.
- Page 114 DSM-520 User’s Manual Appendix Convert a WMV File into WMV9 (continued) Step 7: Select “Save to my computer” on the left panel. Step 8: Give the new file a name and select the desired location to save it. D-Link Systems, Inc.
- Page 115 DSM-520 User’s Manual Appendix Convert a WMV File into WMV9 (continued) Step 9: Select the quality of your new video file. Step 10: Once selected, Movie Maker will start creating your new video file. D-Link Systems, Inc.
- Page 116 DSM-520 User’s Manual Appendix Convert a WMV File into WMV9 (continued) Step 11: Once completed, this screen will show up. You can verify the new video file is created in WMV9 format. (This screenshot shows you both the old file (WMV8) and the new file (WMV9))
-
Page 117: Audio And Video Cables Guide
DSM-520 User’s Manual Appendix Audio and Video Cables Guide D-Link Systems, Inc. -
Page 118: Television Aspect Ratio Chart
Video files will be in one of the three aspect ratios: 4:3 Pan/Scan, 4:3 Letter Box, or 16:9 Widescreen. The aspect ratio setting of the DSM-520 must match the file that is to be played for the type of TV you have. -
Page 119: Glossary
DHCP-capable device in your network, you will not need to assign a static IP address to your DSM-520. However, if you do not have a DHCP-capable device in your network, you will need to assign a static IP address to your DSM-520. -
Page 120: Music
Wireless: Devices networked using radio frequencies instead of physical cabling. WPA-PSK (Wi-Fi Protected Access with Pre-Shared Key): A security protocol for wireless local area networks that requires that the router and DSM-520 have the same pre-shared key in order to establish a wireless connection. -
Page 121: Photo
DSM-520 User’s Manual Glossary Photo BMP: The standard bit-mapped graphics format used in the Windows environment. By convention, graphics files in the BMP format end with a .BMP extension. GIF: Pronounced jiff or giff and stands for graphics interchange format, it is a bit-mapped graphics file... - Page 122 Macintosh and Windows PC computers. The latest QuickTime implementation is MPEG-4 compliant. Resolution: The DSM-520 can allow resolution up to 480 Interlaced, 480 Progressive, 720 Progressive, or 1080 Interlaced. XviD: XviD is an ISO MPEG-4 compliant video codec. It’s an open source project which is developed and maintained by many people from all over the world.
-
Page 123: Contacting Technical Support
Technical Support Technical Support You can find software updates and user documentation on the D-Link website. D-Link provides free technical support for customers within the United States and within Canada for the duration of the warranty period on this product. -
Page 124: Warranty
Warranty Period or ninety (90) days, whichever is longer, and is subject to the same limitations and exclusions. If a material defect is incapable of correction, or if D-Link determines that it is not practical to repair or replace the defective Hardware, the actual price paid by the original purchaser for the defective Hardware will be refunded by D-Link upon return to D-Link of the defective Hardware. - Page 125 · The customer is responsible for all in-bound shipping charges to D-Link. No Cash on Delivery (“COD”) is allowed. Products sent COD will either be rejected by D-Link or become the property of D-Link. Products shall be fully insured by the customer and shipped to D-Link Systems, Inc., 17595 Mt.
- Page 126 FOR WARRANTY SERVICE) RESULTING FROM THE USE OF THE PRODUCT, RELATING TO WARRANTY SERVICE, OR ARISING OUT OF ANY BREACH OF THIS LIMITED WARRANTY, EVEN IF D-LINK HAS BEEN ADVISED OF THE POSSIBILITY OF SUCH DAMAGES. THE SOLE REMEDY FOR A BREACH OF THE FOREGOING LIMITED WARRANTY IS REPAIR, REPLACEMENT OR REFUND OF THE DEFECTIVE OR NON-CONFORMING PRODUCT.
-
Page 127: Registration
DSM-520 User’s Manual Registration Registration Product registration is entirely voluntary and failure to complete or return this form will not diminish your warranty rights. 09/28/05 D-Link Systems, Inc.
Need help?
Do you have a question about the MediaLounge DSM-520 and is the answer not in the manual?
Questions and answers