D-Link DSM-520 Install Manual
Wireless hd media player
Hide thumbs
Also See for DSM-520:
- Features and benefits (2 pages) ,
- User manual (127 pages) ,
- Install manual (420 pages)
Advertisement
Quick Links
Advertisement

Related Manuals for D-Link DSM-520


Summary of Contents for D-Link DSM-520
- Page 2 System Requirements DSM-520 Install Guide D-Link Systems, Inc.
-
Page 3: Usb Port
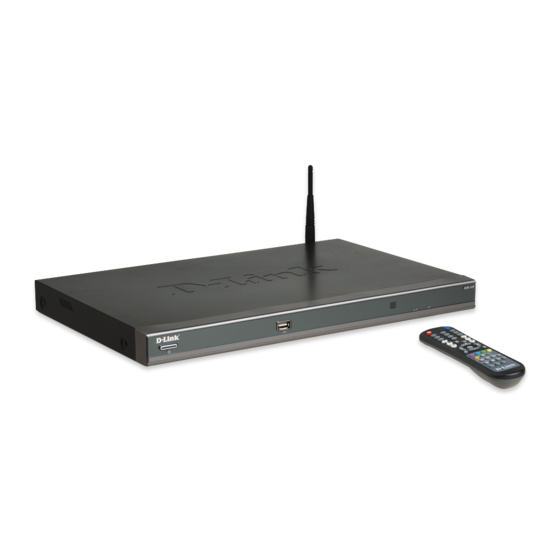
DSM-520 Install Guide Power Button To manually start the DSM-520 without the remote control, simply press this power button. D-Link Systems, Inc. USB Port Use this port to directly playback content stored in USB storage devices. Remote Sensor To operate the DSM-520,... - Page 4 Hardware Overview Antenna Coaxial Digital Audio Optical Digital Audio Composite Audio S-Video Composite Video Component Video DSM-520 Install Guide Ethernet HDMI Reset This button will restore the DSM-520 to factory default settings. D-Link Systems, Inc.
- Page 5 Install the D-Link Media Server Software on each PC that contains ® music, video, or photo files you wish to use with the DSM-520. Follow the steps in this section to install the software. Insert the DSM-520 CD-ROM into the CD-ROM drive and the following screen will appear.
- Page 6 The D-Link license agreement screen appears. Click Next Choose a destination location or accept the default location. This is where the D-Link Media Server software will be copied to on your system. Click Next Choose a start menu folder or accept the default location.
- Page 7 DSM-520 Install Guide Select the icons you want created. Select Create a desktop icon to access the program from your desktop. Select Create a Quick Launch icon to access the program from your taskbar. Select Create a startup icon so the program launches on startup.
- Page 8 Configuring the D-Link If you checked the Launch D-Link following screens will be displayed. The FileTypes tab is where you select the types of audio, video, and photo files that you want to share. The Shared Folders tab is where you select the folders that contain your audio, video, and photo files.
- Page 9 DSM-520 Install Guide Configuring the D-Link Select the folder containing the files you wish to share. Click OK Repeat the steps until all of the folders containing audio, video, and photos you want to share have been added. D-Link Systems, Inc.
- Page 10 Configuring the D-Link The Media Files tab will show all your audio, video, and photo files as well. Click Close Media Server DSM-520 Install Guide ® D-Link Systems, Inc.
-
Page 11: Video Connections
All audio, video, and networking connections are located on the rear panel of the DSM-520. Video Connections Select one of four ways to connect video to your DSM-520: • Composite Video Connector Plug the supplied yellow video cable into the VIDEO... - Page 12 Connecting the DSM-520 • HDMI Plug the HDMI cable into the HDMI connector on the back panel of the DSM-520. Plug the opposite end to the matching HDMI connector on your television or audio/ video system. Note: This cable is not supplied.
-
Page 13: Audio Connections
The AUDIO OUT button on the remote control toggles between the composite audio output and the digital audio output (optical/coaxial). Select one of three ways to connect audio to your DSM-520: • Composite Audio Plug the supplied red and white... -
Page 14: Network Connections
Connecting the DSM-520 Network Connections Select one of two ways to connect your DSM-520 to your network: • RJ-45 Ethernet Connector C o n n e c t t h e s u p p l i e d Ethernet cable to the network... - Page 15 DSM-520 Install Guide Connecting the DSM-520 Below is a diagram displaying what your network might look like once all of the connections have been made to the MediaLounge™ DSM-520 Wireless HD Media Player. D-Link Systems, Inc.
- Page 16 12. SETUP 13. MENU 14. Color-Coded Shortcut Keys 15. Stop, Play/Pause, REV, FF, PREV, and NEXT 16. INFO 17. REPEAT 18. SEARCH 19. SHUFFLE 20. PIP (Picture In Picture) 21. AUDIO OUT 22. VIDEO OUT DSM-520 Install Guide D-Link Systems, Inc.
- Page 17 The keyboard is used for a variety of functions such as naming your DSM-520 and performing searches for music, photos or video. To use the keyboard, highlight a character with the arrow buttons on the remote control and press the ENTER button. Text can also be entered by using numbers 2-9 on the remote, just as you would on a cell phone.
- Page 18 DSM-520 Setup Wizard Upon initial startup, the DSM-520 displays the Setup Wizard. The Setup Wizard will guide you through the necessary steps for configuring the DSM-520.You can also use Windows (WCN) to simplify the wireless setup, skip to page 22.
- Page 19 DSM-520 Install Guide Type in a name of your choice or select the default setting. Click Next to continue Select your network connection type. If selecting Wired, skip to Your Current Network Settings on page 20 Click Next to continue...
- Page 20 DSM-520 Setup Wizard Your current network settings are displayed and can be changed at this point. Keys can be entered in hex or ASCII format. See the User Manual located on the CD-ROM for details. Click Next to continue Your current network settings are displayed and can be changed at this point.
- Page 21 For detailed usage instructions and information on supported file types, please refer to the User Manual that is located on the MediaLounge™ CD-ROM. Your MediaLounge™ DSM-520 is now ready to stream music, photo, and video content for enjoyment on your home entertainment center.
- Page 22 If you already have wireless settings configured on your PC, instead of using the setup wizard, you can use Windows to configure the wireless settings on your DSM-520. Note: WCN is only available on PCs running Windows Service Pack 2 installed.
- Page 23 DSM-520 Install Guide Select the option to add new computers or devices to your existing wireless network. Click Next to continue Select the option Use a USB flash drive, to save your wireless network settings. Click Next to continue D-Link Systems, Inc.
- Page 24 Configure Wireless Settings with WCN Plug your flash drive into a USB port on this computer. Click Next to continue This screen will appear when the wireless settings have been saved to the USB flash drive. DSM-520 Install Guide D-Link Systems, Inc.
- Page 25 DSM-520 Install Guide Next, remove the USB Flash Drive from your PC and insert it into the USB port on the DSM-520, which is located on the front panel. The following screens will appear on the DSM-520. Click Next to continue The following screen confirms...
- Page 26 Configure Wireless Settings with WCN Next, remove the USB Flash Drive from the DSM-520 and insert it back into the USB port on your PC. Click Next to continue Click Finish You have Completed Configuring your Wireless Settings using WCN! DSM-520 Install Guide D-Link Systems, Inc.
- Page 27 DSM-520 Install Guide Notes D-Link Systems, Inc.
Need help?
Do you have a question about the DSM-520 and is the answer not in the manual?
Questions and answers