
Related Manuals for Knoll k. bench


Summary of Contents for Knoll k. bench
- Page 1 Knoll Office bench ™ Installation Instructions Notes: · See k. bench Replacement Parts on knoll.com+ for orderable service part numbers. Some components are available as replacement kits only.
-
Page 2: Table Of Contents
CONTENTS Contents Dual Benches Desk Screens Center Screens Hinged Cover Power Strip Felt Cable Sleeve Vertical Wire and Infeed Manager Data Faceplate Bracket ©2019 Knoll Inc. k.bench Installation Instructions... - Page 3 Rubber Bumper (O) Isolation Bushing (P) (M) 3AH5009 (N) 3AH4041 (O) 3AH4042 k. bench hardware kit, consisting of: M6-1x10mm Set Screw (Q) M6-1x10mm Flat Head Socket Screw (R) M10-1.5x25mm Socket Cap Screw (S) 10.5/20mm x 2mm Washer (T) (P) 4A22297...
- Page 4 (4) Rubber Bumpers rail assembly. (O) on top of the Inner Tubes (G). Ensure each column is plumb, then secure the rails from below by tightening the (16) previously installed set screws (Q). ©2019 Knoll Inc. k.bench Installation Instructions...
- Page 5 Position the top on the base so that to level the complete installation. the back edge of the top is 2" forward from the centerline of the base (back- to-back tops will be 4" apart). The side ©2019 Knoll Inc. k.bench Installation Instructions...
-
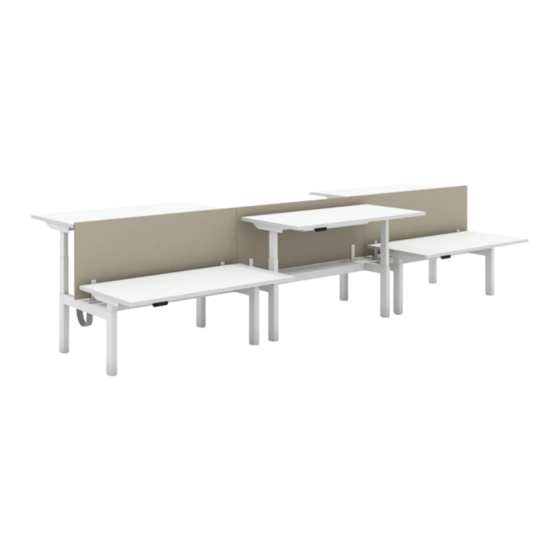
Page 6: Dual Benches
DUAL BENCH Dual Bench, Plan View Dual Bench, Plan View (2) Dual Benches Connected ©2019 Knoll Inc. k.bench Installation Instructions... - Page 7 Rail Set (E) Inner Tube Access Holes Rail Access Holes for 48" and for 48"w Top Application 54"w Top Applications (Align with Inner Tube Access Holes) Inner Tube Access Holes for 54"w Top Application ©2019 Knoll Inc. k.bench Installation Instructions...
- Page 8 10.5/20mm x 2mm Washer (T) Crossbar (B) Column/Crossbar Brackets Step 3 Column, Left Hand, 2 or 3 Segment (C) M6-1 x 10mm Flat Head Socket Screw (R) Column, Right Hand, 2 or 3 Segment (D) ©2019 Knoll Inc. k.bench Installation Instructions...
- Page 9 Crossbar (8) M6-1 x 14mm Button Head Socket Screws (U) Step 12 Rubber Bumpers (O) Inner Tubes (G) Step 11 Leveling Glides Step 7 Cantilever (H) M6-1 x 14mm Button Head Socket Screw (U) ©2019 Knoll Inc. k.bench Installation Instructions...
- Page 10 M2" ports Steps 15 & 22 Handset, Toggle Style Shown (X), Connect to Motor Control Box (I), Step 13 "HS" port Motor Control Box (I) #6 x ⁄ " Pan Head Zinc Wood Screw (W) ©2019 Knoll Inc. k.bench Installation Instructions...
- Page 11 DUAL BENCH Dual Bench, Partially Exploded View, Steps 19-20 Linking Bridge Installation Linking Bridge Crossbar (B) M6-1 x 14mm Button Head Socket Screws (U) ©2019 Knoll Inc. k.bench Installation Instructions...
- Page 12 DUAL BENCH Dual Bench, Step 25 Crossbar Shroud Intallation Crossbar Shroud Crossbar (B) Crossbar Shroud, Shown Installed ©2019 Knoll Inc. k.bench Installation Instructions...
-
Page 13: Desk Screens
Mounting Bracket (A) ¼-20 x 5/8" Machine Screw (B) #14 x 1" Flat Head Wood Screw (C) Desk Screen Panel (Hard Surface) Fabric Board for Desk Screen (optional) Tools Needed: Power Driver with #2 Phillips Bit ©2019 Knoll Inc. k.bench Installation Instructions... - Page 14 Desk Screen Panel. The top edge the top of the board. of the Fabric Board should be able to slide on the Desk Screen Panel, while the bottom edge is held, slightly tipped up. ©2019 Knoll Inc. k.bench Installation Instructions...
- Page 15 DESK SCREEN k. bench Desk Screens Installed, Axonometric View, Two Screens with Optional Fabric Boards Shown k. bench Desk Screens Fabric Board Installation, Steps 1-3 Fabric Board Tape Liner Paper Step 3 Desk Screen Panel ©2019 Knoll Inc. k.bench Installation Instructions...
- Page 16 DESK SCREEN k. bench Desk Screen Fabric Board Installation, Steps 4-8 Fabric Board Desk Screen Panel Step 5 Step 7 Position: Tape Liner Paper ⁄ " from edge Position: ⁄ " from top k. bench Desk Screens Partially Exploded View Shown with Optional...
-
Page 17: Center Screens
(H) 4A22309 Screw (H) Center Screen Panel (Upholstered or Hard Surface) Tools Needed: Power Driver with #2 Phillips Bit Rubber Mallet Soldering Iron (for fabric covered screens) Protective Pad (e.g., a folded microfiber towel) ©2019 Knoll Inc. k.bench Installation Instructions... - Page 18 2. For a fabric covered Center Screen Weldment (C) and a RH Mast Bottom Panel, pierce both sides of the fabric Bracket (D) to both k. bench crossbars by first engaging the top tab of each at each hole location. A soldering iron...
- Page 19 Center Screen Installed Axonometric View Center Screen Installation Steps 1-3, Partially Exploded View Center Screen Panel Front Upper Mast, Countersunk (A) Back Upper Mast, Flat (B) ⁄ " M6-1 x 29mm Flat Head Machine Screw (F) ©2019 Knoll Inc. k.bench Installation Instructions...
- Page 20 CENTER SCREEN Center Screen Installed View From Below Center Screen Installation Step 4, Exploded View From Below k. bench Trough k. bench Crossbar M6-1 x14mm Button Head Hex Machine Screw (G) LH Mast Bottom Bracket RH Mast Bottom Bracket (D) Weldment (C) ©2019 Knoll Inc.
- Page 21 M8-1.25 x 25 Button Head Hex Machine Screws (H) Mast Bottom Brackets (C/D) Center Screen Installation Step 8, Partially Exploded View Center Screen Panel Shroud Shown Installed Upper Masts (A&B) Screen Mast Shroud (E) ©2019 Knoll Inc. k.bench Installation Instructions...
-
Page 22: Hinged Cover
(E) 3AH4008 (F) 3AH4007 Snap Block (C) #8 x ⁄ " Pan Head Screw (D) #8 x ⁄ " Steel Screw (E) Wire Tiedown Clip (F) Tools Needed: Power Driver with #2 Phillips Bit ©2019 Knoll Inc. k.bench Installation Instructions... - Page 23 Attach each pairs of predrilled holes in front of the Hinge Block (B) with (2) #8 x ¾ pan k. bench rail assembly, and attach (2) head screws (D). Snap Blocks (C) to each, using (2) #8 3.
- Page 24 HINGED COVER Hinged Cover, Installed View, From Below Assembled dual k. bench support Installed Hinged Cover structure Distribution Trough ©2019 Knoll Inc. k.bench Installation Instructions...
- Page 25 HINGED COVER Hinged Cover, Exploded, View From Below, Steps 1-2 k. bench worksurface, front k. bench assembly (partial) Step 1 Snap Block (C) Step 2 #8 x ⁄ " Pan Head Hinge Block (B) Screw (D) #8 x ⁄ " Pan...
-
Page 26: Power Strip
#6 x ⁄ " Pan Head Wood Screw (G) (G) 4A22272 (H) 3AE4153 #8 x ¾” Pan Head Wood Screw (H) Dual Bench Assembly Tools Needed: Power Driver with Phillips #2 bit ⁄ " Wrench/Nutdriver ©2019 Knoll Inc. k.bench Installation Instructions... - Page 27 (H) to affix the power strip bracket the worksurface with (1) #6 x ⁄ " pan assembly to the underside of the top. head wood screw (G) per P-Clamp. Utilize the predrilled holes centered in the underside of the top. ©2019 Knoll Inc. k.bench Installation Instructions...
- Page 28 POWER STRIP Plug Strip Installed, Overall View From Below Dual Bench Assembly Power Strip ©2019 Knoll Inc. k.bench Installation Instructions...
- Page 29 Power Strip Bracket (B) #8-32 ⁄ " Pan Head Step 3 Machine Screw (D) Plug Strip (A) Plug Strip clip shown attached to Power Strip Bracket Step 2 #8-32 ⁄ " Pan Head Wood Screw (D) ©2019 Knoll Inc. k.bench Installation Instructions...
-
Page 30: Felt Cable Sleeve
" Diameter P-Clamp (I) (G) 4A22311 (H) 4A22280 (I) 3AE5010 #6 x .375 Pan Head Self-Drilling Screw (J) Felt Sleeve Pre-assembled k. bench Unit Tools Needed: Power Driver with #2 Phillips Bit (J) 4A22312 ©2019 Knoll Inc. k.bench Installation Instructions... - Page 31 3. Insert (2) M6-1 Spring Nuts (D) into towards the bottom. of the Mounting Plate (A) with 3/8" the C-channel inside the k. bench Wrap the upper portion of the felt strap Diameter P-Clamps (I) and #6 x .375 trough and attach the mounting plate...
- Page 32 FELT CABLE SLEEVE Felt Cable Sleeve Installed, View From Below Felt Cable Sleeve Installation Steps 1-3, Exploded View From Below k. bench trough C-channel Step 1 Step 3 Mounting Plate (A) M6-1 Spring Nut (D) Upper Mounting Block (B) M6 x 10mm Pan Head...
- Page 33 Exploded View From Below Worksurface Front Edge Hinged Cover Step 4 Upper Mounting Block (B) M4 x 10 Pan Head Machine Screw (G) Step 5 Lower Mounting Block (C) #8 x 1.5" Pan Head Wood Screw (H) ©2019 Knoll Inc. k.bench Installation Instructions...
- Page 34 FELT CABLE SLEEVE Felt Cable Sleeve Installation Steps 6-7, Connecting the Felt Manager Worksurface Front Edge k. bench Trough Hinged Cover Step 6 Forward Arm of the Lower Mounting Block (C) Felt Manager Felt Manager Shown Installed Step 7 Rear Arm of the Lower Mounting Block (C) ©2019 Knoll Inc.
-
Page 35: Vertical Wire And Infeed Manager
M6-1 x 12mm Pan Head Machine Screw (D) Spring Nut (E) #8-32 Hex Nut (F) (G) 4AA1084 8-32 x .75 Button Head Machine Screw (G) Pre-assembled k. bench Unit Tools Needed: ⁄ " Wrench Power Driver with #2 Phillips Bit ⁄... - Page 36 6. Select the preferred orientation of down, INSIDE the distribution trough of the outer conduit covers (C), and the k. bench assembly, so the holes in pressure fit a cover on each side of the the C-Channel align with a set of pre- assembly.
- Page 37 VERTICAL WIRE AND INFEED MANAGER Vertical Wire and Infeed Manager, Overview k. bench Distribution Trough Vertical Wire & Infeed Manager Vretical Wire and Infeed Manager, Elevation View, Two Connected Dual Benches Vertical Wire & Infeed Manager ©2019 Knoll Inc. k.bench Installation Instructions...
- Page 38 VERTICAL WIRE AND INFEED MANAGER Vertical Wire and Infeed Manager, View From Below Shown with Power Infeed Within Modular Power Power Infeed Vertical Wire & Infeed Manager Support Columns ©2019 Knoll Inc. k.bench Installation Instructions...
- Page 39 Step 1 8-32 x .75 Button Head C-Channel (B) Machine Screw (G) Spring Nut (E) Step 2 M6-1 x 12mm Pan Head Machine Screw (D) Conduit Weldment (A) Step 6 Outer Conduit Cover (C) ©2019 Knoll Inc. k.bench Installation Instructions...
-
Page 40: Data Faceplate Bracket
Data Faceplate Bracket, KHC Parts List: Faceplate Bracket (A) M6 x 10mm Pan Head Machine Screw (B) Spring Nut (C) Pre-assembled k. bench Unit Outlet Fillers (if applicable) Tools Needed: Power Driver with #2 Phillips Bit ©2019 Knoll Inc. k.bench Installation Instructions... - Page 41 3. Install communications faceplates and data modules (provided by others) by snapping into the front and/or back knockout of the Faceplate Bracket (A), as required. 4. Install Outlet Fillers into any unused knockouts in the Faceplate Bracket (A). ©2019 Knoll Inc. k.bench Installation Instructions...
- Page 42 DATA FACEPLATE BRACKET Data Faceplate Bracket, Installed Overview & Detail View, From Below k. bench Distribution Trough Shown with communications faceplates (provided by others) ©2019 Knoll Inc. k.bench Installation Instructions...
- Page 43 From Below, Steps 1-3 Step 1 Distribution Trough Spring Nut (C) Step 3 Communications Faceplates and Data Modules (provided by others) Step 2 Faceplate Bracket (A) M6 x 10mm Pan Head Machine Screw (B) ©2019 Knoll Inc. k.bench Installation Instructions...
Need help?
Do you have a question about the k. bench and is the answer not in the manual?
Questions and answers