Advertisement
Quick Links
Advertisement

Subscribe to Our Youtube Channel
Related Manuals for OLG 50-ROMRB 1612


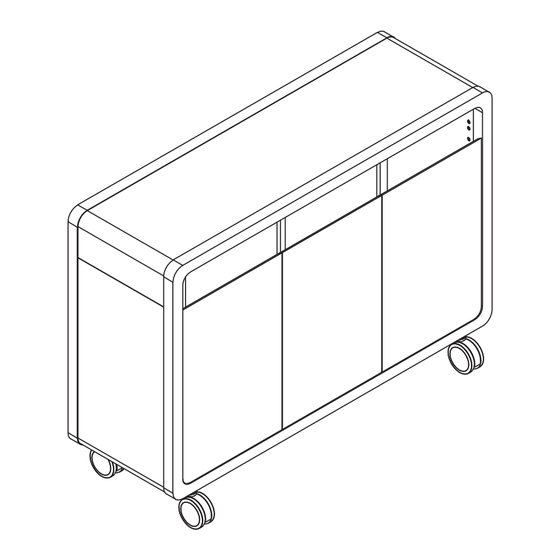
Summary of Contents for OLG 50-ROMRB 1612
- Page 1 Rover Range (50-ROMRB - 1612) Assembly Instructions...
-
Page 2: Components List
Rover Range (50-ROMRB - 1612) Components List 56 x 3.5x14mm 2 x Hinge Stand 12 x 3x14mm Screw Screw 4 x Lock 4 x Hinge Stand adjustable spring pieces 50 x 6x35mm 44 x 8x30mm 20 x 5/8” 16 x Threaded 8 x 4x22mm 24 x 3.5x30mm Cam Bolt... - Page 3 Rover Range (50-ROMRB - 1612) Assembly Instructions STEP 1: STEP 2: Preparation for panel A, G, Z, X, Y, F and D. 1. Insert cam bolts C1 and dowel pins D1 into panels A, G, D, X and Z as illustrated above. 1.
- Page 4 Rover Range (50-ROMRB - 1612) Assembly Instructions STEP 3: STEP 4: Panel A/G assembly Panel D assembly 1. Insert cam bolts C1 and dowel pins D1 on panel A, G into cams on panel X, Z, Y and 1. Insert cam bolts C1 and dowel pins D1 on panel D into cams on panel X, Z, A, G, Y and tighten in a clockwise direction as illustrated above.
- Page 5 Rover Range (50-ROMRB - 1612) Assembly Instructions STEP 5: STEP 6: 1. Install the aluminum piece and X, Z, A, G panel together with screw S1 as illustrated above. 2. Install the aluminum piece and X, Z panel together with screw S1 as illustrated above.
- Page 6 Rover Range (50-ROMRB - 1612) Assembly Instructions STEP 7: STEP 8: 1. Insert Fix Bolt B1 on panel A, X, Z into cams on eva and tighten in a clockwise 1. Install castors T1 and T2 using screws B3. direction as illustrated above. 2.
- Page 7 Rover Range (50-ROMRB - 1612) Assembly Instructions STEP 9: 1. Loosen B screws 1. Loosen screw A 1. Loosen screw A 2. Adjust door vertical 2. Adjust door in depth 2. Adjust door sideways 3. Tighten B screws again 3. Tighten screw A again with screw C 3.
- Page 8 Rover Range (50-ROMRB - 1612) Assembly Instructions Complete: Remove all QC and panel labels and wipe clean using a damp cloth and general household cleaner. Rover Range Assembly Instructions...
- Page 9 Sydney 02 8188 2732 Melbourne 03 9111 0315 Brisbane 07 3733 1923 Adelaide 08 7111 0810 Perth 08 9468 2707 info@olgoffice.com myolg.online | olgoffice.com | officedesigner.net | motionoffice.com...
Need help?
Do you have a question about the 50-ROMRB 1612 and is the answer not in the manual?
Questions and answers