Table of Contents
Advertisement
Quick Links
Advertisement
Table of Contents

Related Manuals for StarTech.com 1MP1ACG-MONITOR-ARM


Summary of Contents for StarTech.com 1MP1ACG-MONITOR-ARM
- Page 1 Single Monitor Desk Mount - Height Adjustable - For up to 30” Monitor *Actual product may vary from photos User Manual SKU: 1MP1ACG-MONITOR-ARM For the latest information and specifications visit www.StarTech.com/1MP1ACG-MONITOR-ARM Manual Revision: 11/14/2023...
- Page 2 This manual may make reference to trademarks, registered trademarks, and other protected names and/or symbols of third-party companies not related in any way to StarTech.com. Where they occur these references are for illustrative purposes only and do not represent an endorsement of a product or service by StarTech.com, or an endorsement of the product(s) to which this manual...
-
Page 3: Safety Statements
Sicherheitsmaßnahmen • Die Installation und/oder Montage des Produkts sollte von einem zertifizierten Fachmann gemäß den örtlichen Sicherheits- und Bauvorschriften durchgeführt werden. To view manuals, videos, drivers, downloads, technical drawings, and more visit www.startech.com/support... -
Page 4: Warning Statements
• StarTech.com Ltd. n’est pas responsable des dommages matériels et/ou corporels résultant des procédures d’installation décrites dans ce document technique. • Assemblez ce produit conformément aux instructions. Lisez l’intégralité To view manuals, videos, drivers, downloads, technical drawings, and more visit www.startech.com/support... - Page 5 • Montera produkten enligt instruktionerna. Läs hela manualen och se till att du har förstått instruktionerna innan du monterar och/eller använder produkten. • Överskrid inte produktens viktkapacitet. Överbelastning av produkten kan To view manuals, videos, drivers, downloads, technical drawings, and more visit www.startech.com/support...
- Page 6 • Gewichtscapaciteit van de monitorarm: 2 tot 9 kg. • Laat kinderen niet op dit product klimmen of dit product gebruiken zonder behoorlijk toezicht. • Dit product is uitsluitend bedoeld voor gebruik binnenshuis en mag niet To view manuals, videos, drivers, downloads, technical drawings, and more visit www.startech.com/support...
- Page 7 • モニターアームの重量容量 : 2〜9 kg。 • 子供が、 本製品に登ったり、 保護者の監視なしに本製品を使用しないでく ださい。 • 本製品は屋内での使用のみを想定しているため、 屋外では使用しないでく ださい。 • 本製品を組み立てる際、 ネジを締めすぎないようにして下さい。 ネジを締め ているうちに手応えを感じたら、 締めるのを止めてください。 • 本製品は、 二人がかりでの組み立てを想定しています。 手助けなしに単独で 組み立てと設置を行わないで下さい。 • 本製品に機器を追加する前に、 本製品が適切に組み立てられていること、 および本製品が追加した機器の重量を支えることができることを確認して To view manuals, videos, drivers, downloads, technical drawings, and more visit www.startech.com/support...
- Page 8 まれる可能性がある部分に手を近づけないでください。 重傷を負う可能性 があります。 Dichiarazioni di avvertenza • StarTech.com Ltd. non è responsabile per eventuali danni a cose e/o persone derivanti dalle procedure di installazione descritte in questo documento tecnico. • Assemblare il prodotto seguendo le istruzioni. Prima di assemblare e/o utilizzare il prodotto, leggere l’intero manuale e assicurarsi che le istruzioni...
- Page 9 Siga las instrucciones proporcionadas y tenga siempre precaución al accionar la manija. No la accione antes del paso 4 del procedimiento de instalación. To view manuals, videos, drivers, downloads, technical drawings, and more visit www.startech.com/support viii...
- Page 10 Betätigung des Griffs stets Vorsicht walten. Betätigen Sie den Griff nicht vor Schritt 4 des Installationsverfahrens. Wenn Sie das Display in der Höhe verstellen, stützen Sie es immer mit beiden Händen (wie abgebildet), um To view manuals, videos, drivers, downloads, technical drawings, and more visit www.startech.com/support...
- Page 11 • Einklemmgefahr! Halten Sie beim Absenken oder Anheben des Displays die Hände von den durch die mechanischen Komponenten verursachten Klemmstellen fern. Andernfalls kann es zu schweren Verletzungen kommen. To view manuals, videos, drivers, downloads, technical drawings, and more visit www.startech.com/support...
-
Page 12: Table Of Contents
Attach the Monitor ..........................15 Operation ....................17 Adjust the Swivel and Tilt Tension ...................... 17 Adjust the Swivel Tension ............................17 Adjust the Tilt Tension ..............................17 Cable Management ..........................19 To view manuals, videos, drivers, downloads, technical drawings, and more visit www.startech.com/support... - Page 13 Warranty Information ................20 Limitation of Liability ................20 To view manuals, videos, drivers, downloads, technical drawings, and more visit www.startech.com/support...
-
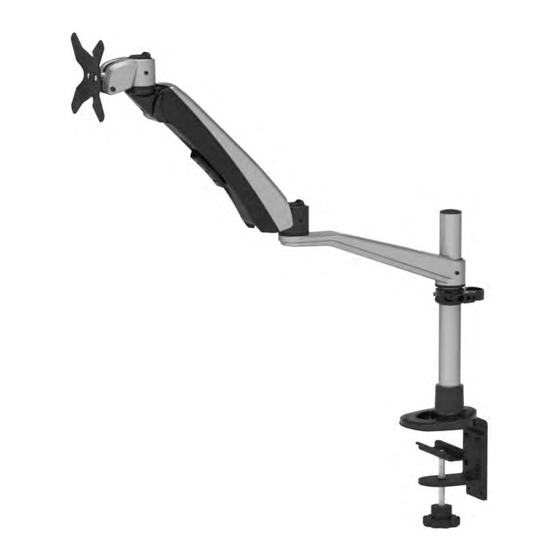
Page 14: Product Diagram
Spring Arm, VESA Monitor Mount Pole Base Mounting Post Release Button Swivel Arm Desk Clamp Monitor Spring Arm Pole Clamping Plate Cable Management Cable Management Clip Hand Knob Channel To view manuals, videos, drivers, downloads, technical drawings, and more visit www.startech.com/support... -
Page 15: Product Dimensions
Product Dimensions Side View and Front Profile 240° 360° 360° Max 590mm 84mm 105° 360° 100° 118.7mm 103mm 59mm To view manuals, videos, drivers, downloads, technical drawings, and more visit www.startech.com/support... -
Page 16: Product Information
Phillips head screwdriver • To view manuals, videos, drivers, downloads, technical drawings, and more visit www.startech.com/support To view manuals, videos, drivers, downloads, technical drawings, and more visit www.startech.com/support To view manuals, videos, drivers, downloads, technical drawings, and more visit www.startech.com/support... -
Page 17: Package Contents
Quantity: 1 Quantity: 1 Quantity: 1 Quantity: 1 Cable Management Monitor Clip Hex Key Thumbscrews Base Cushion Quantity: 1 Quantity: 4 Quantity: 1 Quantity: 1 User Manual Quantity: 1 To view manuals, videos, drivers, downloads, technical drawings, and more visit www.startech.com/support... -
Page 18: Installation
Cushion. Affix the Base cushion to the Pole Assembly Base by applying Pressure for a few seconds for the Adhesive to set. Slide the Desk Clamp onto the Desk. (Figure 2) To view manuals, videos, drivers, downloads, technical drawings, and more visit www.startech.com/support... - Page 19 Figure 2 Use the Hand Knob to Tighten and secure the Desk Clamp onto the Desk. (Figure 3) Figure 3 To view manuals, videos, drivers, downloads, technical drawings, and more visit www.startech.com/support...
-
Page 20: Convert From Desk Mount To Grommet Mount
Hex Screws. Hex Key Hex Screws Figure 4 Use a Phillips Head Screwdriver to remove the Screw from the Clamping Plate attached onto the Hand Knob. (Figure 5) To view manuals, videos, drivers, downloads, technical drawings, and more visit www.startech.com/support... - Page 21 Figure 5 Remove the Clamping Plate, Washers (x2), and the Hand Knob from the Desk Clamp. Insert the Clamping Plate back onto the Hand Knob. (Figure 6) Figure 6 To view manuals, videos, drivers, downloads, technical drawings, and more visit www.startech.com/support...
-
Page 22: Grommet Installation
Position the Pole Base over the Grommet Hole. Insert the Hand Knob through the Grommet Hole and into the Pole Base. Turn the Hand Knob to Tighten it. (Figure 7) Figure 7 To view manuals, videos, drivers, downloads, technical drawings, and more visit www.startech.com/support... -
Page 23: Convert From Grommet Mount To Desk Mount (Optional)
Install the Screw through the Washer, Clamping Plate, Washer and onto the Hand Knob. Use a Phillips Head Screwdriver to tighten the Screw. (Figure 9) Screw Clamping Plate Washers Hand Knob Figure 9 To view manuals, videos, drivers, downloads, technical drawings, and more visit www.startech.com/support... -
Page 24: Adjust The Desk Clamp For Different Desk Thicknesses (Optional)
Insert the Screws (x4) into the Mid and Lower Screw Holes of the Desk Clamp. Use a Phillips Head Screwdriver to Tighten the Screws (x4). (Figure 11) Figure 11 To view manuals, videos, drivers, downloads, technical drawings, and more visit www.startech.com/support... -
Page 25: Attach The Monitor Arms
Pull the Lever and turn the Knob on the Cable Management Clip to loose the tension. (Figure 12) Figure 12 Slide the Cable Management Clip along the Pole to the desired height. (Figure 13) Figure 13 To view manuals, videos, drivers, downloads, technical drawings, and more visit www.startech.com/support... - Page 26 Slide the Swivel Arm down the Pole until it’s sitting on top of the Cable Management Clip. The Hex Key can be stored on the Cable Management Clip. (Figure 15). Figure 15 To view manuals, videos, drivers, downloads, technical drawings, and more visit www.startech.com/support...
- Page 27 Slide the Spring Arm onto the Spring Arm, Mounting Post until snaps into place. (Figure 16) Spring Arm Mounting Post Figure 16 To view manuals, videos, drivers, downloads, technical drawings, and more visit www.startech.com/support...
-
Page 28: Attach The Monitor
Carefully place the Monitor face down on a protective/soft surface with the VESA Mounting Points facing up. Insert the Monitor Thumbscrews (x4) through the VESA Mount Bracket, and onto the back of the Monitor. (Figure 17) To view manuals, videos, drivers, downloads, technical drawings, and more visit www.startech.com/support... - Page 29 Figure 18 Note: To remove the Monitor, slide and hold the Release Button on top of the Vesa Mount Bracket Mounting Post while detaching the VESA Monitor Mount. To view manuals, videos, drivers, downloads, technical drawings, and more visit www.startech.com/support...
-
Page 30: Operation
Tension for Heavier Monitors, or turn Clockwise to Decrease the Tension for Lighter Monitors. (Figure 20) Note: The Monitor should keep its position if the tension is correctly adjusted. To view manuals, videos, drivers, downloads, technical drawings, and more visit www.startech.com/support... - Page 31 While Supporting the weight of the Monitor, use the Hex Key to Loosen or Tighten the Tension Adjustment Screw. (Figure 21) Note: The Monitor should keep its position if the tension is correctly adjusted. Figure 21 To view manuals, videos, drivers, downloads, technical drawings, and more visit www.startech.com/support...
-
Page 32: Cable Management
Swivel Arm. Route the Cable(s) Through the Cable Management Clip at the back of the Pole. (Figure 22) Cable Management Openings Cable Management Clip Cable Management Channel Figure 22 To view manuals, videos, drivers, downloads, technical drawings, and more visit www.startech.com/support... - Page 33 Limitation of Liability In no event shall the liability of StarTech.com Ltd. and StarTech.com USA LLP (or their officers, directors, employees or agents) for any damages (whether direct or indirect, special, punitive, incidental, consequential, or otherwise), loss of profits, loss of business, or any pecuniary loss, arising out of or related to the use of the product exceed the actual price paid for the product.
- Page 34 To view manuals, videos, drivers, downloads, technical drawings, and more visit www.startech.com/support...
- Page 35 To view manuals, videos, drivers, downloads, technical drawings, and more visit www.startech.com/support...
- Page 36 Hard-to-find made easy. At StarTech.com, that isn’t a slogan. It’s a promise. StarTech.com is your one-stop source for every connectivity part you need. From the latest technology to legacy products — and all the parts that bridge the old and new — we can help you find the parts that connect your solutions.
Need help?
Do you have a question about the 1MP1ACG-MONITOR-ARM and is the answer not in the manual?
Questions and answers