Table of Contents
Advertisement
Quick Links
Advertisement
Table of Contents

Subscribe to Our Youtube Channel
Related Manuals for Hyundai HHC8075Q


Summary of Contents for Hyundai HHC8075Q
- Page 1 HHC8075Q, HHC80100Q Manual...
- Page 2 HYUNDAI HHC8075Q, HHC80100Q Licensed by Hyundai Corporation Holdings, Korea. HHC8075Q HHC80100Q _Manual_EN_2024-05-15...
- Page 3 HHC8075Q, HHC80100Q This product is supported by Midland Power. Contact us directly for assistance and warranty help. Do not return this product to store. You must register online for your warranty to be valid. It should only take one minute. We strongly suggest you do this now while you have your purchase receipt.
- Page 4 HYUNDAI Thanks for choosing Hyundai! You're excited to get started, we'll keep this brief. READ THIS ENTIRE GUIDE BEFORE USING THIS PRODUCT AND SAVE FOR LATER USE. This user guide contains important instructions including safety, setup, operation, and maintenance that must be followed.
-
Page 5: Table Of Contents
TABLE OF CONTENTS 1. Safety 2. Learn About Your Air Compressor 2.1 Component Identification and Control Functions 2.2 Make Sure You Have Everything 3. Installation 3.1 Tools 3.2 Choosing Location 3.3 Floor Mounting 3.4 Electrical Connection 4. Controls 4.1 Language 4.2 User Password 5. -
Page 6: Safety
HYUNDAI 1. SAFETY DANGER! NEVER breathe air from the air compressor. The air may contain carbon monoxide, toxic vapours, and/or solid particles. Compressed air will damage your lungs and may cause injury or death. 1.1 OPERATOR SAFETY WARNING! ALWAYS inspect the air compressor, air hose(s) and air tools for damage or obstruction prior to each use. - Page 7 HHC8075Q, HHC80100Q inspect the equipment for damage caused by vibration. Damaged items must be repaired or replaced when necessary. DO NOT use equipment that shows signs of damage. Ensure the air compressor is installed in a stable and secure position before operating.
- Page 8 HYUNDAI 1.3 MAINTENANCE SAFETY WARNING! Allow the air compressor to cool down for 30 minutes after use before performing any maintenance. ALWAYS shut-down the air compressor, release pressure, and disconnect any hoses prior to performing maintenance and repairs.
-
Page 9: Learn About Your Air Compressor
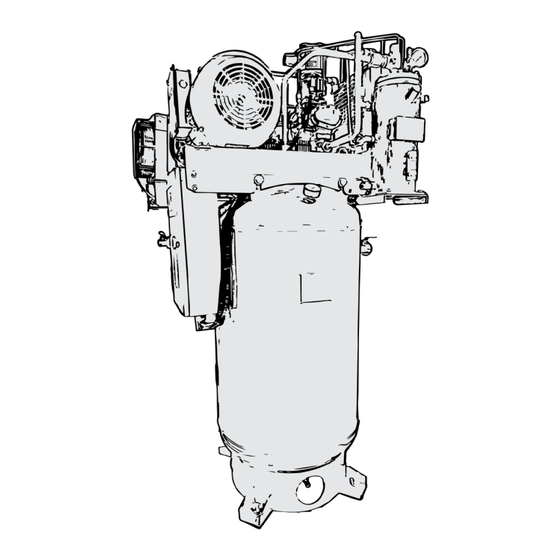
HHC8075Q, HHC80100Q 2. LEARN ABOUT YOUR AIR COMPRESSOR This section will show you how to identify key parts of your air compressor. Going over the terminology below will make sure we’re on the same page. 2.1 COMPONENT IDENTIFICATION AND CONTROL FUNCTIONS... - Page 10 HYUNDAI Air Tank Stores pressurized air. Air Pressure Gauge Shows the pressure in the air tank. Motor Drives the Rotary Screw Air End via a belt. Oil Filter Removes contaminants from the oil that accumulates as the oil keeps the Rotary Screw Air End clean.
- Page 11 HHC8075Q, HHC80100Q Oil Separator Pressure Relief Valve Oil Pressure Gauge Oil Fill Hole Oil Separator Tank Oil Level Gauge Oil Drain Valve Oil Drain Valve Use to drain oil or accumulated water from the Oil Separator Tank, when necessary.
- Page 12 HYUNDAI Oil Level Gauge Shows the oil level in the Oil Separator Tank. Oil level will be above the upper red line when you receive the air compressor; this is normal. It should move down into the area between the two red lines during normal operation.
-
Page 13: Make Sure You Have Everything
HHC8075Q, HHC80100Q Run Light Illuminates green when the air compressor is running, or during start-up or shut-down procedures. Alarm Light Illuminates when an error is detected, or a maintenance task is scheduled. Power Button Press this button to begin start-up or shut-down procedures. -
Page 14: Installation
HYUNDAI 3. INSTALLATION WARNING! DO NOT install this equipment unless you have installation training. ALWAYS use proper tools, such as a forklift, to move heavy components. You must always wear OSHA-approved personal protective equipment when installing the air compressor: leather gloves, steel-toed work boots, eye protection, back belts, and hearing protection. -
Page 15: Choosing Location
HHC8075Q, HHC80100Q 3.2 CHOOSING LOCATION When choosing a location to instal the air compressor, keep in mind the following: DO NOT use the wood shipping pallet as a permanent base. The air 3/8" Flat Washer compressor must be removed from the shipping pallet and bolted to a (not supplied) flat, even surface. -
Page 16: Floor Mounting
HYUNDAI 3.3 FLOOR MOUNTING While optional, to avoid tipping and excessive movement caused by vibrations during operation, the air compressor should be bolted onto a flat, even surface such as a concrete floor or a separate concrete slab. Never mount to a soft or uneven surface. -
Page 17: Electrical Connection
Overheating, short-circuiting, and fire damage could result from improper wiring. 3.4.1 Power Requirements HHC8075Q: 7.5HP, 208-240V, 1 Phase, 60Hz, grounded, 40A breaker. HHC80100Q: 10HP, 208-240V, 1 Phase, 60Hz, grounded, 50A breaker. Ensure that: Adequate wire gauges are used,... - Page 18 HYUNDAI 3.4.2 Installation Based on what is best for your specific location, most customers have their electrician: a. Wire the air compressor directly into the facility’s electrical system, or, b. add a power cord with appropriate plug to the air compressor, which can then be plugged into an appropriate outlet.
- Page 19 HHC8075Q, HHC80100Q Black: Hot/Live Red: Hot/Live Green or bare copper: Ground White: Neutral. If present, leave unconnected and DO NOT connect to the air compressor. WARNING! Power must be connected properly to ensure the motor is rotating in the correct direction.
-
Page 20: Controls
HYUNDAI 4. CONTROLS The air compressor comes pre-set with optimal settings. It is STRONGLY RECOMMENDED that you do not change any settings within the control screen interface. 4.1 LANGUAGE You can choose the control screen’s operating language in by navigating to: ... -
Page 21: Pre-Operation Inspection
Pour Oil in Intake HHC8075Q, HHC80100Q 5. PRE-OPERATION INSPECTION DANGER! DO NOT perform any maintenance or inspections of electrical components without first ensuring all power is fully disconnected at both the equipment and panel level. Depressurize the air tank by opening the air shut-off valve while wearing hearing protection before servicing or inspecting, failure to do so can cause serious injury or death. -
Page 22: Inspect The Oil Level
HYUNDAI Push Down on Valve Pour Oil in Intake Pour 0.5L (0.5 quart) of fresh ISO 46 synthetic compressor oil into the Rotary Screw Air End through the intake valve. Roate the pulley on the Rotary Screw Air End by hand counter-clockwise to ensure all oil enters the element, so that it is well lubricated and not locked. -
Page 23: Operation
HHC8075Q, HHC80100Q 6. OPERATION 6.1 EMERGENCY STOP Follow these steps in an emergency to force the air compressor to shut down: Press the emergency stop button. The air compressor will immediately shut down and enter standby mode. EMERGENCY STOP! will show on the control screen and a 50 second timer will count down;... - Page 24 HYUNDAI Ensure all tools and other components connected to the air outlet(s) of the air compressor are shut off or otherwise ready for the air compressor to be started. Follow these steps to start the air compressor: Press the POWER button OR press and hold the START button on the control screen for 1 second.
-
Page 25: Maintenance
HHC8075Q, HHC80100Q 7. MAINTENANCE WARNING! Ensure all parts are properly secured after performing maintenance tasks. Ensure all tools, rags and equipment are removed from internal areas of the air compressor prior to closing safety panels and starting the machine back up. Failure to do so could result in serious damage to the air compressor and severe injury or even death to the individual. - Page 26 HYUNDAI 7.1.2 Draining the Air Tank WARNING! Ensure the air compressor is shut down prior to draining the air tank. Depressurize the air tank by opening the air shut-off valve while wearing hearing protection. DO NOT stand directly in front of the air shut-off valve as pressurized air will shoot out at a dangerously high pressure.
-
Page 27: Occasional Maintenance
HHC8075Q, HHC80100Q 7.2 OCCASIONAL MAINTENANCE 7.2.1 Air Filter Inspection and Replacement WARNING! Ensure that no foreign objects or debris falls into the intake area during the following maintenance procedures. Ensure the air compressor is shut down and fully cooled down before replacing the filter. - Page 28 HYUNDAI NOTE Replace the oil more frequently in warmer environments. 7.2.3 Replace the Oil Filter WARNING! Ensure the air compressor is shut down and fully cooled down before replacing the oil filter. Depressurize the air tank by opening the air shut-off valve while wearing hearing protection.
-
Page 29: Maintenance Schedules
HHC8075Q, HHC80100Q Bolt down the Rotary Screw Air End into the proper position. Loosen the motor mounting bolts. Using a straight edge or a square and level, adjust the motor until the motor and Rotary Screw Air End pulleys are in the same vertical and horizontal plane. - Page 30 HYUNDAI Check if the Should only be Oil Return strainer is maintained by an Pipe functioning authorized repair Strainer properly. depot. Check to Oil in Return see if the Ensure the oil oil return is return is fluent. Pipe normal.
- Page 31 HHC8075Q, HHC80100Q Oil leakage Check the Mechanical above 1.5 g/h is seal for oil Seal abnormal. leakage. More than 2MΩ when Check the voltage is 500V. Motor insulation Should only be Insulation resistance. maintained by an authorized repair depot. If the valve is...
-
Page 32: Long Term Shutdown
HYUNDAI 7.3.2 Replacement Parts Part Name When to Replace Oil Filter Every 500 hours Oil Separation Filter Every 500 hours Air Filter Every 500 hours Every 100 hours or every 3 (ISO 46 synthetic compressor oil) months, whichever comes first... -
Page 33: Troubleshooting
HHC8075Q, HHC80100Q 8. TROUBLESHOOTING Common issues can be fixed by following these steps. If the unit will not function after following these steps, contact customer support before attempting to use or further repair the product. Problem Cause Solution No input voltage... - Page 34 HYUNDAI Pressure switch, force Repair/replace as needed sensor and/or main controller failure Too much air consumption Repair/replace the pipeline as needed Serious leakage in pipeline Repair/replace as needed Exhaust Air filter blockage Clean/replace the air filter assembly pressure too Air inlet valve breakdown...
- Page 35 HHC8075Q, HHC80100Q Air inlet valve failure Repair/replace as needed Oil leaks in the air filter Gas return in minimum Repair/replace as needed when the air pressure valve compressor is Solenoid valve unloading Repair/replace as needed failure Handpiece, Motor and/or Repair/replace as needed...
-
Page 36: Appendix A - Electrical Diagrams
HYUNDAI 9. APPENDIX A – ELECTRICAL DIAGRAMS Pressure Sensor Temperature Sensor Emergency stop... -
Page 37: Technical Specifications
HHC8075Q, HHC80100Q 10. TECHNICAL SPECIFICATIONS SPECIFICATIONS HHC8075Q HHC80100Q Type Stationary Stationary Horsepower 7.5HP 10HP Voltage 208-230V 208-230V Peak Amperage Running Amperage 32.8A Air Delivery @40 PSI 27.8 SCFM 37 SCFM Air Delivery @90 PSI 25 SCFM 33.5 SCFM Pump Type... -
Page 38: Limited Warranty
HYUNDAI 11. LIMITED WARRANTY This product is distributed by: Midland Power Inc. 376 Magnetic Drive, Toronto, ON M3J 2C4, Canada Warranty Beginning at the time of retail purchase and for the duration of the warranty period Midland Power Inc. (Midland) warrants that Equipment manufactured by it is warranted to be free from defects in material and workmanship. - Page 39 HHC8075Q, HHC80100Q including oils, adhesives, additives, fuel, filters, brushes, belts, lubricants, spark plugs, gaskets, seals, fasteners, wires, tubes, pipes, fittings, wheels, batteries, and other expendables susceptible to natural wear; g. Any accessory or attachment. Any battery supplied with this Equipment is considered a consumable item and is excluded from this warranty.
- Page 40 HYUNDAI Emission Control System Warranty Parts: This list applies to parts supplied by Midland Power Inc. and does not cover parts supplied by the equipment manufacturer. Please see the original equipment manufacturer’s emissions warranty for non-Midland Power Inc. parts. Consumable parts are covered up to a maximum of 30 days.
- Page 41 Customer Service Contact Us: support.midlandpowerinc.com Toll Free: 1-877-528-3772 Enjoy! Be sure to check www.hyundaipower.ca for updates regarding your product.
- Page 42 For Inquiries, Please Contact: Midland Power Inc. 376 Magnetic Drive, Toronto, ON Canada M3J 2C4 1-877-528-3772 support@hyundaipower.ca www.hyundaipower.ca Imported / Distributed by Midland Power Inc., Canada Licensed by Hyundai Corporation Holdings, Korea...
Need help?
Do you have a question about the HHC8075Q and is the answer not in the manual?
Questions and answers