Table of Contents
Advertisement
Quick Links
Advertisement
Table of Contents

Related Manuals for Ambient Weather WS-1965


Summary of Contents for Ambient Weather WS-1965
- Page 1 Version 1.2 ©Copyright 2022, Ambient LLC. All Rights Reserved. Page 1...
- Page 2 Version 1.2 ©Copyright 2022, Ambient LLC. All Rights Reserved. Page 2...
- Page 3 Version 1.2 ©Copyright 2022, Ambient LLC. All Rights Reserved. Page 3...
-
Page 4: Table Of Contents
5.5.2 Initial Display Console Set Up ....................12 5.5.3 Console Factory Reset Steps ....................... 13 6. Key function ............................13 7. Finding the WS-1965 from your device (computer, smart phone, or tablet with a browser) ....14 7.1 PC Users .............................15 7.2 Mac Users ............................16 7.3 Linux Users ............................ - Page 5 10.11.3 Mounting ..........................36 11. Live Internet Publishing ........................36 12. Optional sensors ..........................37 12.1 Connecting optional sensors to WS-1965 via the web GUI............38 12.2 Indoor/Outdoor Thermo-Hygrometer, 8 Channel (optional) ............39 13. Best Practices for Wireless Communication ..................40 14.
-
Page 6: Introduction
1. Introduction Thank you for your purchase of the Ambient Weather WS-1965 Wi-Fi Weather Station. The following user guide provides step by step instructions for installation, operation, and troubleshooting. The product is continuously changing and improving, particularly online services and associated applications. -
Page 7: Getting Started
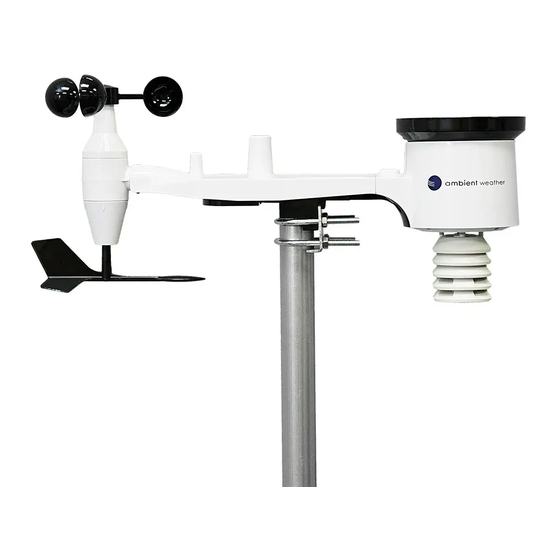
5. Getting Started 5.1 Parts List Item Display Console Frame Dimensions (LxWxH): 4.12 x 1.1 x 4.4” LCD Dimensions (LxH): 3.20 x 3.80” Outdoor sensor array (Thermo-hygrometer / Rain Gauge / Wind Speed Sensor /Transmitter) Wind Vane Wind Cups Pole mounting U-bolts Pole mounting U-bolt nuts Metal mounting plate to be used with U-Bolts User manual... -
Page 8: Install Wind Vane
5.4.1 Install wind vane Push the wind vane onto the shaft on the top of the sensor, until it stops moving further, as shown in figure 1. Tighten the set screw, with the provided Philips screwdriver (size PH0), until the wind vane cannot be removed from the axle, as shown in figure 2. -
Page 9: Install Rain Gauge Funnel
Figure 5 Loosely screw on the nuts on the ends of the U-bolts. You will tighten these later during final mounting. Final assembly is shown in Figure 6. Figure 6 The plate and U-Bolts are not yet needed at this stage but doing this now may help avoid damaging wind vane and wind speed cups later. -
Page 10: Install Batteries
Figure 7 5.4.6 Install Batteries Insert 2 x AA batteries in the battery compartment. The LED indicator on the back of the transmitter will turn on for four seconds and normally flash once every 16 seconds (the sensor transmission update period). Figure 8 Figure 9 Note: If no LED light up or is permanently on, make sure the batteries are inserted the correct way or a proper... - Page 11 Figure 10 Figure 11 (1) A/C power port for A/C adapter part# WS-1965-AC (2) Unfold the desk stand and place 5 to 10 feet away from the outdoor sensor array per Figure 11. (3) Sensor arm containing temperature and humidity sensor.
-
Page 12: Screen Display
5.5.1 Screen Display Figure 13 Description Description Wind direction Rainfall Wind speed Rate of Change of Pressure Graph RF icon Weather forecast 8 Channel Indoor/Outdoor Thermo- Date Hygrometer recycle icon (optional) Outdoor temperature WIFI icon Outdoor humidity Time Indoor humidity Daylight Savings Time (DST) Indoor temperature 5.5.2 Initial Display Console Set Up... -
Page 13: Console Factory Reset Steps
5.5.3 Console Factory Reset Steps Under AC power (using optional AC adapter): press and hold Light + Mode (Figure 15) for 5 seconds Under battery power (no AC adapter connected): press and hold Light button (Figure 15) for 2 seconds until “WAK” is displayed then press and hold Light + Mode (Figure 15) for 5 seconds Note: WAK mode will revert to normal after 3 seconds. -
Page 14: Finding The Ws-1965 From Your Device (Computer, Smart Phone, Or Tablet With A Browser)
7. Finding the WS-1965 from your device (computer, smart phone, or tablet with a browser) To send weather data to these services you must configure Wi-Fi via Web GUI to connect your console to the internet. During console credentials setup, firmware update, the communication between device and console is based on Wi- Fi so your device needs to be able to connect to the console Wi-Fi. -
Page 15: Pc Users
7.1 PC Users To find the WS-1965, connect to power and look for the following WIFI network. Connect to the network and then open a browser Note: you may be told network has no internet. Navigate to the following IP address 192.168.4.1 you will be presented with the following screen. -
Page 16: Mac Users
7.2 Mac Users To find the WS-1965, connect to power and look for the following WIFI network. Connect to the network and then open a browser Note: you may be told network has no internet. Navigate to the following IP address 192.168.4.1 you will be presented with the following screen. -
Page 17: Linux Users
7.3 Linux Users To find the WS-1965, connect to power and look for the following WIFI network. Connect to the network and then open a browser Note: you may be told network has no internet. Navigate to the following IP address 192.168.4.1 you will be presented with the following screen. -
Page 18: Updating Console Firmware
Please note that you can send data to all cloud services at the same time. 9.1 AmbientWeather.net Registration for the Ambient Weather Network is accomplished through the web GUI After access the web GUI you will click on the Weather Services tab. -
Page 19: Ambient Weather Dashboard Apps
Once registered, select the dashboard to view your data, as shown in Figure 18. Figure 18 9.1.1 Ambient Weather Dashboard Apps Android and iOS Ambient Weather Dashboard apps are available in addition to AmbientWeather.net. Search “Ambient Weather Dashboard” in the Google Play or iOS app store, or visit: Ambient Weather Dashboard for Android: ... -
Page 20: Ifttt
Ambient Weather about the indoor conditions." You can also ask for a report about a specific day, month, or year. Just say "Alexa, ask Ambient Weather about the weather yesterday." or "Alexa, ask Ambient Weather about the weather in May". -
Page 21: Setting Mode
10.Setting mode Note: DST, Time Zone you will need to set time zone info properly if you have the console connected to internet and these setting need to be adjusted for your setup, otherwise console will be synchronized to default setting if you don’t setup these parameters on the APP properly. -
Page 22: Barometric Pressure Display
10.1 Barometric Pressure Display 10.1.1 Viewing Absolute vs. Relative Pressure Press and hold [RAIN/PRE] for two seconds switch between Rain and Pressure. While in Pressure mode Press [RAIN/PRE] to switch between absolute and relative pressure Absolute pressure is the measured atmospheric pressure, and is a function of altitude, and to a lesser extent, changes in weather conditions. -
Page 23: Rain Display
Press the [TEMP] button to switch between Outdoor Temperature, Wind Chill, Dew Point, Heat Index. The WS-1965 supports up to 8 additional temperature humidity sensors (WH31E, WH31P, WH31PF). If you have the extra sensors, press the [TEMP +] button to switch between Outdoor Temperature, Wind Chill, Dew Point, Heat Index, 8 channel optional Indoor/Outdoor Thermo-hygrometer, Scroll Mode. -
Page 24: Alarms
10.5 Alarms 10.5.1 Viewing High and Low Alarms To view the high alarm settings, press MODE button a third time, and the high alarms will be displayed, as shown in Figure 21 (a). To view the low alarm settings, press the MODE button a fourth time, and the low alarms will be displayed, as shown in Figure 21 (b). - Page 25 Command Mode Settings [MODE] + Enter High Press [TEMP +] or [WIND -] to adjust alarm hour up or down. 2 seconds Alarm Set Mode, Alarm Press [RAIN/PRE] to turn the time alarm on or off. When the alarm is on, the alarm Hour time icon will appear.
-
Page 26: Backlight Operation
[MODE] Alarm Low Press [TEMP +] or [WIND -] to adjust alarm value up or down. Indoor Humidity Press [RAIN/PRE] to turn the alarm on. The alarm icon will appear. Press [RAIN/PRE] to turn the alarm off. The alarm icon will disappear. [MODE] Alarm Low Press [TEMP +] or [WIND -] to adjust alarm value up or down. -
Page 27: Wireless Signal Quality Indicator
10.6.4 Wireless Signal Quality Indicator The wireless signal strength displays reception quality. If no signal is lost, the signal strength indicator will display 5 bars. If the signal is lost once, four bars will be displayed, as shown in Figure 24. Five Bars Four Bars No signal loss... -
Page 28: Max/Min Mode
10.8 Max/Min Mode 10.8.1 Viewing Max/Min Values To view the max value, press the MODE button, and the max values will be displayed, as shown in Figure 26(a). To clear the max values, press and hold the MODE button while the max values are displayed. To view the low alarm settings, press the MODE button again, and the min values will be displayed, as shown in Figure 26 (b). -
Page 29: Resynchronize Wireless Sensor
While the min values are displayed as outlined in Section 9.8.1, press, and hold the RAIN/PRE button for two seconds to enter pressure display, press RAIN/PRE button to switch between Relative pressure and Absolute pressure While the min values are displayed as outlined in Section 10.8, press and hold the PRESSURE button for two seconds to view the absolute pressure, and press and hold the PRESSURE button for two seconds again to return to relative pressure. - Page 30 Parameter Type of Default Typical Calibration Source Calibration Temperature Offset Current Value Red Spirit or Mercury Thermometer (1) Humidity Offset Current Value Sling Psychrometer (2) ABS Barometer Offset Current Value Calibrated laboratory grade barometer REL Barometer Offset Current Value Local airport (3) Wind Direction Offset Current Value...
- Page 31 ± 5%. To improve this accuracy, the indoor and outdoor humidity can be calibrated using an accurate source, such as a sling psychrometer. (3) The WS-1965 displays two different pressures: absolute (measured) and relative (corrected too sea-level). To compare pressure conditions from one location to another, meteorologists correct pressure to sea-level conditions.
-
Page 32: Relative Barometric Pressure Calibration Example
Without a calibrated source, wind speed can be difficult to measure. We recommend using a calibrated wind meter (available from Ambient Weather) and a constant speed, high speed fan. (7) The rain collector is calibrated at the factory based on the funnel diameter. The bucket tips every 0.01” of rain (referred to as resolution). -
Page 33: Aqin Calibration
10.10.3 AQIN Calibration The calibration equations are as follows: Calibrated C02 = Measured C02 + C02 Offset Calibrated PM2.5 = Measured PM2.5 + PM2.5 Offset Calibrated PM10 = Measured PM10 + PM10 Offset 10.10.4 Soil Moisture Calibration The soil moisture sensor provides for optional two-point linear calibration. This is important due to different soil types and density. -
Page 34: 0% Soil Moisture Set Point
10.10.4.1 0% Soil Moisture Set Point To determine the 0% soil moisture, collect a soil sample in a cup from where the sensor will be installed, and allow the soil to completely dry out. Next, place the soil sensor in the medium and allow the sensor to stabilize for one hour. -
Page 35: Install Mounting Pole
10.11 Install Mounting Pole 10.11.1 Before you mount Before proceeding with the outdoor mounting detailed in this section, you may want to skip to setup instructions in section 5.4 and onwards first, while you keep the assembled outdoor sensor package nearby (although preferably not closer than 5 ft. -
Page 36: Mounting
8. Visit Ambient Weather Mounting Solutions for assistance and ideas for mounting your weather station: https://ambientweather.com/weather-station-mounting 10.11.3 Mounting You can attach a pipe to a permanent structure and then attach the sensor package to it (see Figure 27-28). The U- Bolts will accommodate a pipe diameter of 1.25-2 inches (pipe not included). -
Page 37: Optional Sensors
The item supports the following optional sensors, and the console receives and sends this data directly to the Ambient Weather Network or Wunderground.com. The data is not displayed on the console (pass through only) and sensor management and calibration can only be accomplished via the web GUI... -
Page 38: Connecting Optional Sensors To Ws-1965 Via The Web Gui
(*) The WH31E, WH31P and WH31PF share the same 8-channels. Note: The Ambient Weather PM25IN and AQIN utilize the same channel on the WS-1965 console. Users can only utilize one sensor PM25IN or AQIN at a time. If you already have a PM25IN and are adding a AQIN to your console, please see Section # 4.1 of the AQIN manual to sync your new AQIN sensor. -
Page 39: Indoor/Outdoor Thermo-Hygrometer, 8 Channel (Optional)
This item supports up to 8 additional thermo-hygrometer sensors (WH31), the data display on the console and sends the data to the Ambient Weather Network. Note: WH31P sensor body is not waterproof the probe is please when installing sensor body under a protected are such as an eave. -
Page 40: Best Practices For Wireless Communication
Insert two AA batteries. Verify the correct channel number (CH) and temperature units of measure (°F vs. °C) are on the display, as shown in Figure 33. Figure 33 (1) temperature (2) temperature units (°C vs. F) (3) channel number (4) relative humidity Close the battery door. -
Page 41: Measurement Specifications
14.2 Measurement Specifications The following table provides the specifications for the measured parameters. Measurement Range Accuracy Resolution Indoor Temperature 32˚F to + 122 °F ± 2 °F 0.1 °F Outdoor Temperature -40 to 149 °F (lithium batteries) ± 1 °F 0.1 °F -23 to 140 °F (alkaline batteries) Indoor Humidity... -
Page 42: Troubleshooting Guide
16.Troubleshooting Guide Problem Solution Outdoor sensor The sensor array may have initiated improperly, and the data is registered by the console as array does not invalid, and the array must be reset. Press the reset button as described in Section 5.3. communicate to the display console. -
Page 43: Accessories
Accessory Description Ambient Weather Mounting Ambient Weather provides the most comprehensive mounting solutions for Solutions weather stations, including tripods, pole extensions, pole mounting kits, guy wires, ground stakes and more. The WH31-SRS is specifically designed to house the WH31E temperature / humidity sensor, WH31P waterproof probed thermometer and WH31L Lightning Detector. -
Page 44: Fcc Statement
21.California Prop 65 WARNING: Use of the Ambient Weather Products can expose you to chemicals, including lead and lead compounds, which are known to the State of California to cause cancer and bisphenol A (BPA), and phthalates DINP and/or DEHP, which are known to the State of California to cause birth defects or other reproductive harm. - Page 45 While using Ambient Weather Products as intended, we believe any potential exposure would be negligible or well within the "no significant risk" range. However, to ensure compliance with California law and our customers' right to know, we have elected to place the Proposition 65 warning signs on Ambient Weather Products.
Need help?
Do you have a question about the WS-1965 and is the answer not in the manual?
Questions and answers
How to set time on WS 1965