
Related Manuals for Ambient Weather WS1900


Summary of Contents for Ambient Weather WS1900
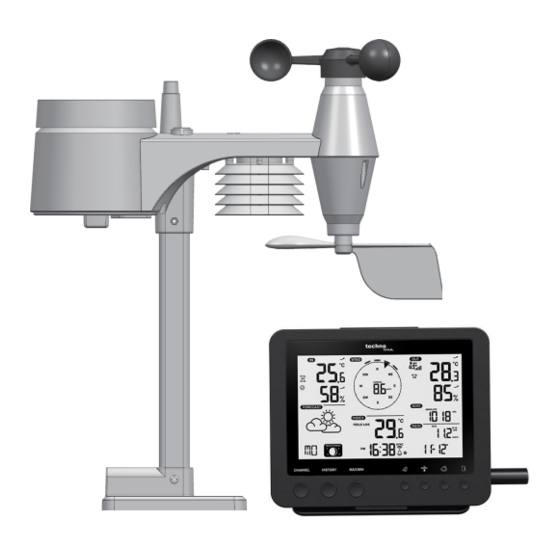
- Page 1 WI-FI weather station with 5-In-1 professional sensor Model: WS1900 User Manual CHANNEL HISTORY MAX/MIN...
-
Page 2: Table Of Contents
Table of contents Introduction Overview Installation and setup Power-up station Pairing wireless 5-in-1 weather sensor & station Pairing additional wireless sensor & station (optional) Create weather server account & setup of wi-fi connection Create Weather Underground account Create Weathercloud account Setup of wi-fi connection Setup the weather server connection Advanced setting in web interface... -
Page 3: Introduction
Introduction Thank you for selecting Wi-fi weather station with 5-in-1 professional sensor. This system gathers and automatically uploads accurate and detailed weather data to Weather Underground and Weathercloud website - the famous weather service which allows weather observers to upload their local weather data with automated personal weather stations (PWS) - at which you can access and upload your weather data freely. - Page 4 1 . Table stand 10 . LCD display 19 . [ °C / °F ] slide switch 2 . [ SNOOZE ] key 11 . [ CLOCK SET ] key 20 . [ BARO UNIT ] key 3 . [ CHANNEL ] key 12 .
-
Page 5: Installation And Setup
Rain gauge 1 . Rain collector 2 . Tipping bucket 3 . Rain sensor 4 . Drain holes Temperature and humidity sensor 1 . Radiation shield Sensor casing 2 . Temperature and humidity sensor (inside the radiation shield) Wind sensor 1 . - Page 6 Assemble the stand and pole Step 1 Insert the top side of the pole to the square hole of the weather sensor. Note: Ensure the pole and sensor's indicator align. Step 2 Place the nut in the hexagon hole on the sensor, then insert the screw in other side and tighten it by the screw driver.
-
Page 7: Power-Up Station
Install the wireless 5-IN-1 sensor in an Add rubber open location with no obstructions above pads before Point to and around the sensor for accurate mount on NORTH rain and wind measurement. Install the pole the sensor with the smaller end facing the North to properly orient the wind direction vane. -
Page 8: Pairing Wireless 5-In-1 Weather Sensor & Station
Pairing 5-in-1 weather sensor & station After insert of batteries, the console will automatically search and connect the wireless 5-IN-1 sensor (the sensor antenna icon blinking). Once the connection is successful, antenna icon and readings for outdoor temperature & humidity, wind speed, wind direction and rainfall will appear on the LCD. Changing batteries and manual pairing of sensor Whenever you changed the batteries of the wireless 5-IN-1 sensor, pairing must be done manually. -
Page 9: Create Weathercloud Account
5. Note your Station ID and Station Key. Create Weathercloud account 1 . In https://weathercloud.net enter your information in "Join us today" section, then follow the instructions to create your account . Note: Use the valid email address to register your account. 2 . -
Page 10: Setup Of Wi-Fi Connection
4 . Jot down your ID and key for the further setup step. Setup wi-fi connection 1 . When you first power up the console, or press and hold the [ WI-FI / SENSOR ] key for 6 seconds in normal mode, the console LCD will show "AP" and " "... -
Page 11: Setup The Weather Server Connection
PWS-XXXXXX PWS-XXXXXX PC WI-FI network interface Android WI-FI network interface 4 . Once connected, enter the following IP address into your internet browser’s address bar, to access the console’s web interface: http://192.168.1.1 Note: Some browsers will treat 192.168.1.1 as a search, so make sure you include http:// header. ... - Page 12 Press “SETUP” icon Language: English to SETUP page ADVANCED WiFi Router setup Press to search router Select the Wi-fi router (SSID) you will connect to Search Router: ROUTER_A Manually enter the SSID if not on the list Add Router Press to allow add router manually Select router’s security type (usually WAP2) Security type:...
-
Page 13: Advanced Setting In Web Interface
The time will automatically synchronize Internet time server at 12:00AM and 12:00PM per day. Also you can press the [REFRESH ] key to get the internet time manually within 1 minute. Advanced setting in web interface Press "ADVANCED" key at the top of web interface to enter the advance setting page, this page allow you to set and view the calibration data of the console, also you can update the firmware in here (Only available in PC platform). -
Page 14: View Your Weather Data In Weathercloud
Update function, however, is not available through mobile/smart devices. In case that a new firmware is available you can find it at: https://www.technoline.de/software/ws1900 If no new firmware is available, then no firmware update can be found in above URL. Two types of firmware updates are available, namely Function Firmware and System WI-FI Firmware, and are located at the bottom of ADVANCED page. -
Page 15: Other Settings & Functions Of The Station
Current Function firmware version Current WI-FI firmware version Firmware update steps 1 . Download the latest version firmware (function or WI-FI) to your PC. 2 . Set the Console into AP (access point) mode then connect the PC to the console (ref to "SETUP WI-FI CONNECTION"... -
Page 16: Moon Phase
startup, press and hold the [ WI-FI / SENSOR ] key for 6 seconds and let the console back to normal mode. 1 . In normal mode, press and hold [ CLOCK SET ] key for 2 seconds to enter setting. 2 . -
Page 17: Setting The Alarm Time
Note: - Changing the hemisphere setting will automatically switch the direction of the moon phase on the display. Setting the alarm time 1 . In normal time mode, press and hold [ ALARM ] key for 2 seconds until the alarm hour digit flashes to enter alarm time setting mode. -
Page 18: Room Comfort Indicator
Note: When indoor temperature is below -40°C, the LCD will display “Lo”. If temperature is above 70°C, LCD will display “HI”. When outdoor temperature is below -40°C, the LCD will display “Lo”. If temperature is above 80°C, LCD will display “HI”. ... -
Page 19: Wind
Wind Wind speed and direction section overview Real time wind direction indicator Past wind directions indicator of last 5 minutes Average / gust wind speed To set the wind speed unit and direction display format 1 . In normal mode, press and hold [ WIND ] key for 2 seconds to enter into wind speed unit mode and the unit will flash. -
Page 20: Weather Forecast
The dew point temperature is determined by the temperature & humidity data from wireless IN-1 sensor . Weather forecast The built-in barometer can notice atmosphere pressure changes. Based on the data collected, it can predict the weather conditions in the forthcoming 12~24 hours within a 30~50km (19~31 miles) radius. -
Page 21: Max / Min Data Recording
To select the rainfall display mode Press [ RAIN ] key to toggle between: 1. HOURLY - the total rainfall in the past hour 2. DAILY - the total rainfall from midnight 3. WEEKLY - the total rainfall of the current week 4. - Page 22 To set alert 1 . Press [ ALERT ] to select and display the desired weather alert reading in the sequence below: Alert reading Sequence Setting Range Display Section Default Value Indoor Temperature High Alert 40°C (current channel) -40°C ~ 80°C Indoor Temperature Low Alert 0°C (current channel)
-
Page 23: Maintenance
Maintenance Battery replacement If the low battery indicator “ ” displayed in OUT or CH section, it indicates that the current channel wireless or outdoor 5-in-1 sensor battery power is low. You should replace all the batteries in the current channel sensor at once . Cleaning the rain collector 1 . - Page 24 Recommended web browser Web browsers that support HTML 5, such as the latest for setup UI version of Chrome, Safari, Edge, Firefox or Opera. Wireless Sensor side Communication Specification 1 Wireless 5-in-1 weather outdoor sensor and up to 7 Support sensors Wireless hygro-thermo indoor sensors RF frequency 868Mhz...
- Page 25 Indoor / Outdoor Humidity Display & Function Specification Note: The following details are listed as they are displayed or operate on the console. Humidity unit Display range 1 ~ 99% 20~39% or 71~90% RH ±8%RH @ 25°C (77°F) Indoor Accuracy 40~70% RH ±5%RH @ 25°C (77°F) 1 ~ 20% RH ±...
-
Page 26: Precautions
Wireless 5-in-1 sensor Dimensions (W x H x D) 343.5 x 393.5 x 136mm (13.5 x 15.5 x 5.35in) Weight 734g (with batteries) 3 x AA size 1.5V batteries Main power ( Lithium batteries recommended) Weather data Temperature, Humidity, Wind speed, Wind direction and Rainfall RF transmission range 150m RF frequency... -
Page 27: Battery Safety Warnings
Place the console at least 20cm from nearby persons. This main unit is intended to be used only indoors. Do not subject the unit to excessive force or shock. Do not expose the unit to extreme temperatures, direct sunlight, dust or humidity. ...
Need help?
Do you have a question about the WS1900 and is the answer not in the manual?
Questions and answers