Table of Contents
Advertisement
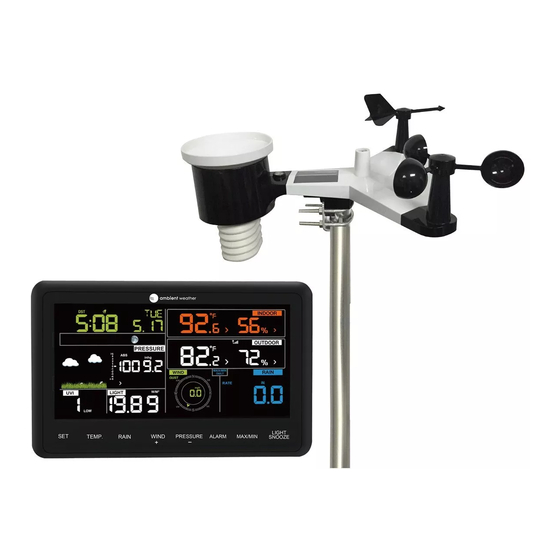
Ambient Weather WS-1900 OSPREY Solar Powered
Wireless Weather Station User Manual
Table of Contents
1.
Introduction ..................................................................................................................................... 2
2.
Warnings and Cautions ................................................................................................................... 2
3.
Quick Start Guide............................................................................................................................ 2
4.
Pre-Installation Checkout and Site Survey...................................................................................... 3
4.1
Pre Installation Checkout ....................................................................................................... 3
4.2
Site Survey ............................................................................................................................. 3
5.
Getting Started ................................................................................................................................ 3
5.1
Parts List ................................................................................................................................. 4
5.2
Recommend Tools .................................................................................................................. 4
5.3
Sensor Array Set Up ............................................................................................................... 5
5.3.1
Install Wind Vane ............................................................................................................... 5
5.3.2
Install Wind Cups ............................................................................................................... 6
5.3.3
Install U-Bolts .................................................................................................................... 6
5.3.4
Install the Rain Gauge Funnel ............................................................................................ 7
5.3.5
Install Batteries................................................................................................................... 8
5.3.6
Install Mounting Pole ......................................................................................................... 9
5.5 Best Practices for Wireless Communication ................................................................................. 9
5.6
Display Console ................................................................................................................... 10
5.6.1
Vertical Desk Stand .......................................................................................................... 12
6.
Display Console Operation ........................................................................................................... 13
6.1
Screen Display ...................................................................................................................... 13
6.2
Console Initialization ........................................................................................................... 14
6.2.1
Button Operation .............................................................................................................. 15
6.3
Set Mode .............................................................................................................................. 16
6.4
Barometric Pressure Display ................................................................................................ 18
6.4.1
Viewing Absolute vs. Relative Pressure ........................................................................... 18
6.4.2
Rate of Change of Pressure Graph ................................................................................... 18
6.4.3
Viewing Pressure History ................................................................................................. 19
6.4.4
Relative Pressure Calibration Discussion......................................................................... 19
6.5
Rain Display ......................................................................................................................... 19
6.5.1
Rain Increments of Measure ............................................................................................ 19
6.5.2
Resetting Rain .................................................................................................................. 19
6.5.3
Increments of Rain Definitions ........................................................................................ 20
6.6
Wind Display ........................................................................................................................ 20
6.7
Temperature Display ............................................................................................................ 20
6.7.1
Wind Chill, Dew Point and Heat Index Display .............................................................. 20
6.8
Alarms .................................................................................................................................. 20
6.8.1
Viewing High and Low Alarms ........................................................................................ 20
6.8.2
Setting High and Low Alarms .......................................................................................... 21
6.9
Max/Min Mode .................................................................................................................... 24
6.9.1
Viewing Max/Min Values ................................................................................................. 24
6.10
Calibration ............................................................................................................................ 25
6.10.1
Calibration Settings ...................................................................................................... 25
Version 1.1
©Copyright 2020, Ambient LLC. All Rights Reserved.
Page 1
Advertisement
Table of Contents

Related Manuals for Ambient Weather WS-1900


Summary of Contents for Ambient Weather WS-1900
-
Page 1: Table Of Contents
Ambient Weather WS-1900 OSPREY Solar Powered Wireless Weather Station User Manual Table of Contents Introduction ............................. 2 Warnings and Cautions ........................2 Quick Start Guide..........................2 Pre-Installation Checkout and Site Survey..................3 Pre Installation Checkout ....................... 3 Site Survey ..........................3 Getting Started .......................... -
Page 2: Introduction
California Prop 65 ........................38 1. Introduction Thank you for your purchase of the Ambient Weather WS-1900 OSPREY Solar Powered Wireless Weather Station. The following user guide provides step by step instructions for installation, operation and troubleshooting. To download the latest manual and additional troubleshooting tips, please visit: AmbientWeather.net/help... -
Page 3: Pre-Installation Checkout And Site Survey
Make sure your display console is at least five feet away from any electronic device to avoid interference. 8. Visit Ambient Weather Mounting Solutions for assistance and ideas for mounting your weather station: http://www.ambientweather.com/amwemoso.html 5. -
Page 4: Parts List
5.1 Parts List Item Display Console Frame Dimensions (LxWxH): 7.50 x 4.50 x 0.75” LCD Dimensions (LxW): 3.00 x 6.75” Vertical Desk Stand Sensor Array Wind Vane 5V DC Adaptor Pole mounting U-bolts Pole mounting U-bolt nuts User manual 5.2 Recommend Tools ... -
Page 5: Sensor Array Set Up
5.3 Sensor Array Set Up Figure 1 Description Description Wind Vane (measures wind direction) Solar panel Wind Speed Sensor (measures wind speed) U-Bolt UV sensor/ Light sensor Battery compartment Thermometer-hygrometer sensor (measures Reset button temperature and humidity) Rain collector LED transmitter Indicator Bubble level 5.3.1 Install Wind Vane Reference Figure 2. -
Page 6: Install Wind Cups
Figure 2 5.3.2 Install Wind Cups Reference Figure 3. (a) push the wind cups on to the shaft. (b) tighten the set screw with a precision screw driver and make sure the wind cups spin freely. Note: You may need to back out the set screw first before sliding the cups onto the shaft. Figure 3 5.3.3 Install U-Bolts Note: Your U-bolts may have come preassembled at the factory. -
Page 7: Install The Rain Gauge Funnel
Figure 4 5.3.4 Install the Rain Gauge Funnel Reference Figure 5. Install the rain gauge funnel. Rotate clockwise to attach the funnel to the sensor array. Version 1.1 ©Copyright 2020, Ambient LLC. All Rights Reserved. Page 7... -
Page 8: Install Batteries
Figure 5 5.3.5 Install Batteries Reference Figure 6. Insert 2 x AA non-rechargeable batteries (not included) into the battery compartment. The LED indicator on the back of the transmitter will turn on for four seconds, and then flash once every 16 seconds (the sensor transmission update period). Figure 6 Note: If the LED does not light up, or stays on permanently, make sure the battery polarity is correct, or the batteries are fresh. -
Page 9: Install Mounting Pole
5.3.6 Install Mounting Pole Reference Figure 7. The mounting assembly includes two U-Bolts and a bracket that tightens around a 1 to 2” diameter pole (not included) using the four U-Bolt nuts. Figure 7 Use the bubble level next to the rain sensor to make sure the sensor array is completely level. If the sensor array is not level, the rain gauge, UV and solar radiation sensors will not measure properly. -
Page 10: Display Console
siding. If you have metal siding, align the remote and console through a window to get a clear line of sight. The following is a table of reception loss vs. the transmission medium. Each “wall” or obstruction decreases the transmission range by the factor shown below. Medium RF Signal Strength Reduction Glass (untreated) - Page 11 Figure 9 Reference Figure 9. (1) Connect the display console power jack to AC power adapter with the included power adapter. (2) Unfold the desk stand and place 5 to 10 feet away from the sensor array. Remove the battery door on the back of the console, and insert 3xAAA batteries per Figure 10. (3) Wait several minutes for the remote sensors to synchronize with the display console.
-
Page 12: Vertical Desk Stand
Figure 10 5.6.1 Vertical Desk Stand The console is best viewed above from a 20 to 30 degree angle. In addition to the fold out desk stand on the back of the display, console, the console also includes a vertical desk stand to improve the viewing able on a desk, as shown in Figure 11. Version 1.1 ©Copyright 2020, Ambient LLC. -
Page 13: Display Console Operation
Figure 11 6. Display Console Operation 6.1 Screen Display The display console home screen layout is shown in Figure 12. Figure 12 Version 1.1 ©Copyright 2020, Ambient LLC. All Rights Reserved. Page 13... -
Page 14: Console Initialization
Description Description Time Rainfall Moon phase Outdoor temperature Barometric Pressure Outdoor humidity Weather forecast RF icon UV index Indoor humidity Solar Radiation Indoor temperature Wind speed Date Wind direction MAX/MIN Daily 6.2 Console Initialization After the console is connected to AC power, the console will display the software version number two seconds after power up. -
Page 15: Button Operation
6.2.1 Button Operation Figure 15 The console has 8 buttons at the bottom for easy operation: Description Press and hold to enter the SET mode. TEMP Press to switch between Outdoor Temperature, Wind Chill, Heat Index, Dew Point. To bypass RF reception, press and hold while powering up the console (connecting the AC adapter with batteries removed). -
Page 16: Set Mode
6.3 Set Mode Press and hold the SET button for two seconds to enter the SET Mode. To proceed to the next setting, press (do not hold) the SET button. To exit the SET mode at any time, press the LIGHT / SNOOZE button. Figure 16 summarizes the set mode sequence and commands. - Page 17 Command Mode Settings Image [SET] + 2 Enter Set Press [WIND +] to switch OFF and seconds Mode, Beep On or Off This will prevent the beep from sounding when pressing any button. [SET] Clear Max/Min Press [WIND +] to switch OFF and When set to ON, the minimum and maximum values reset every day at midnight (00:00).
-
Page 18: Barometric Pressure Display
[SET] Relative Press [WIND +] or [PRESSURE -] to Pressure adjust relative pressure up or down Calibration Reference Section 6.4.4 for details on calibration of relative pressure. [SET] Light Units of Press [WIND +] to change light units Measure of measure between lux, fc, or w/m2 [SET] Temperature Press [WIND +] to change... -
Page 19: Viewing Pressure History
Figure 17 6.4.3 Viewing Pressure History Press the [PRESSURE -] button to view the 12 hour, 24 hour, 48 hour and 72 hour pressure average. 6.4.4 Relative Pressure Calibration Discussion To compare pressure conditions from one location to another, meteorologists correct pressure to sea-level conditions. -
Page 20: Increments Of Rain Definitions
Resetting the weekly rain also resets the daily rain. Resetting the monthly rain also resets the daily and weekly rain. Resetting the total rain also resets the monthly, weekly and daily rain. 6.5.3 Increments of Rain Definitions ... -
Page 21: Setting High And Low Alarms
Figure 18 6.8.1.1 Rain Alarm While the High Alarm is displayed (reference Section 6.8.1), press the RAIN button to display the rain rate and daily rain alarm values. 6.8.1.2 Wind Alarm While the High Alarm is displayed (reference Section 6.8.1), press the WIND button to display the wind speed and wind gust alarm values. - Page 22 Command Mode Settings [ALARM] Enter Alarm Set Mode, Alarm Press [WIND +] or [PRESSURE -] to adjust alarm Hour hour up or down. seconds Press [ALARM] to turn the time alarm on or off. When the alarm is on, the alarm time icon will appear.
- Page 23 [SET] Alarm Low Indoor Humidity Press [WIND +] or [PRESSURE -] to adjust alarm value up or down. Press [ALARM] to turn the alarm on. The alarm icon will appear. Press [ALARM] to turn the alarm off. The alarm icon will disappear. [SET] Alarm High Outdoor Press [WIND +] or [PRESSURE -] to adjust alarm...
-
Page 24: Max/Min Mode
[SET] Alarm High Wind Speed Press [WIND +] or [PRESSURE -] to adjust alarm value up or down. Press [ALARM] to turn the alarm on. The alarm icon will appear. Press [ALARM] to turn the alarm off. The alarm icon will disappear. [SET] Alarm High Wind Gust Press [WIND +] or [PRESSURE -] to adjust alarm... -
Page 25: Calibration
while the min values are displayed. To return to normal mode, press the MAX/MIN button again. Figure 20 6.9.1.1 Display Wind Chill, Heat Index vs. Dew Point Max/Min Values While the max values are displayed as outlined in Section 6.9.1, press the TEMP button once to view the heat index, twice to view the dew point, and a third time to return to outdoor temperature. - Page 26 To proceed to the next calibration setting, press (do not hold) the SET button. To exit and save the calibration setting, press the LIGHT / SNOOZE button. Figure 21 Figure 22 summarizes the set mode sequence and commands. Version 1.1 ©Copyright 2020, Ambient LLC.
-
Page 27: Calibration Ranges
Command Mode Settings TEMP. and Enter Calibration Press [WIND +] or [PRESSURE -] to adjust the indoor MAX/MIN Mode, Indoor temperature up or down. + 5 seconds Temperature To restore to factory default, press [ALARM]. [SET] Indoor Humidity Press [WIND +] or [PRESSURE -] to adjust the indoor humidity up or down. -
Page 28: Calibration Discussion
Parameter Range Indoor Temperature ± 9 °F Indoor Humidity ± 9% Outdoor Temperature ± 9 °F Outdoor Humidity ± 9% Absolute Pressure ± 10 hpa (± 2.95 inHg) Wind Direction ± 180 ° Wind Speed Factor 0.5 to 1.5 Rain Factor 0.5 to 1.5 Figure 23 6.10.3 Calibration Discussion... - Page 29 Without a calibrated source, wind speed can be difficult to measure. We recommend using a calibrated wind meter (available from Ambient Weather) and a constant speed, high speed fan. (6) The rain collector is calibrated at the factory based on the funnel diameter. The bucket tips every 0.01”...
-
Page 30: Restoring The Console To Factory Default
http://www.ambientweather.com/stprraga.html Make sure you periodically clean the rain gauge funnel. 6.11 Restoring the Console to Factory Default To restore the console to factory default, perform the following steps: 1. Remove the power from the console by removing the batteries and disconnecting the AC adapter. -
Page 31: Wireless Signal Strength Indicator
6.15 Wireless Signal Strength Indicator The wireless signal strength displays reception quality. If no signal is lost, the signal strength indicator will display 5 bars. If the signal is lost once, four bars will be displayed, a shown in Figure 26. Five Bars Four Bars No signal loss... -
Page 32: Glossary Of Terms
24-48 hours in advance. In most locations, this prediction is only 70% accurate and it is a good idea to consult the National Weather Service for more accurate weather forecasts. In some locations, this prediction may be less or more accurate. However, it is still an interesting educational tool for learning why the weather changes. - Page 33 Term Definition HectoPascals Pressure units in SI (international system) units of measurement. Same as millibars (hPa) (1 hPa = 1 mbar) Hygrometer A hygrometer is a device that measures relative humidity. Relative humidity is a term used to describe the amount or percentage of water vapor that exists in air. Inches of Pressure in Imperial units of measure.
-
Page 34: Specifications
Term Definition the wind is blowing. Figure 28 8. Specifications 8.1 Wireless Specifications Line of sight wireless sensor array RF transmission (in open air): 330 feet, 100 feet under most conditions Update Rate: Outdoor Sensor: 16 seconds, Indoor Sensor: 64 seconds ... -
Page 35: Troubleshooting Guide
Figure 30 2. Clean the solar radiation sensor and solar panel every 3 months with damp cloth. 3. Replace batteries every 1-2 years. If left in too long, the batteries may leak due to environmental challenges. In harsh environments, inspect the batteries every 3 months (when cleaning the solar panel). -
Page 36: Accessories
The following software and hardware accessories are available for this weather station at www.AmbientWeather.com Accessory Description Ambient Weather Mounting Ambient Weather provides the most comprehensive mounting solutions Solutions for weather stations, including tripods, pole extensions, pole mounting kits, guy wires, ground stakes and more. WS-1900-C Display Add as many display consoles as you like to your weather station. -
Page 37: Fcc Statement
Reading the “User manual” is highly recommended. The manufacturer and supplier cannot accept any responsibility for any incorrect readings and any consequences that occur should an inaccurate reading take place. This product is designed for use in the home only as indication of weather conditions. This product is not to be used for medical purposes or for public safety information. -
Page 38: California Prop 65
15. California Prop 65 WARNING: Use of the Ambient Weather Products can expose you to chemicals, including lead and lead compounds, which are known to the State of California to cause cancer and bisphenol A (BPA), and phthalates DINP and/or DEHP, which are known to the State of California to cause birth defects or other reproductive harm. - Page 39 "You could think of Proposition 65 more as a 'right to know' law than a pure product safety law." While using Ambient Weather Products as intended, we believe any potential exposure would be negligible or well within the "no significant risk" range. However, to ensure compliance with California law and our customers' right to know, we have elected to place the Proposition 65 warning signs on Ambient Weather Products.
Need help?
Do you have a question about the WS-1900 and is the answer not in the manual?
Questions and answers