Table of Contents
Advertisement
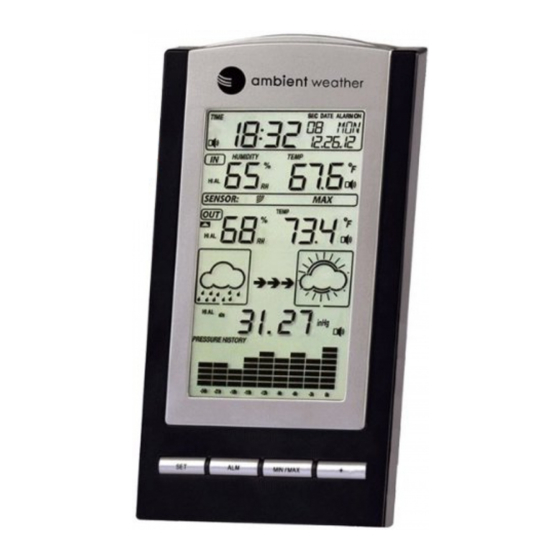
Ambient Weather WS-1171A Advanced Weather Station
Table of Contents
1
Introduction ..................................................................................................................................... 2
2
Getting Started ................................................................................................................................ 2
2.1 Parts List ....................................................................................................................................... 2
2.2 Recommend Tools ......................................................................................................................... 2
2.3 Thermo-Hygrometer Sensor Set Up .............................................................................................. 2
2.4 Display Console Set Up ................................................................................................................ 3
2.4.1 Radio Controlled Clock (RCC) .............................................................................................. 3
2.4.2
Display Console Layout ..................................................................................................... 4
2.4.3
Sensor Operation Verification ............................................................................................ 5
3
Remote Sensor Installation ............................................................................................................. 5
3.1
Sensor Placement ................................................................................................................... 5
3.2
Wireless Reception Considerations ........................................................................................ 5
4
Console Operation........................................................................................................................... 6
4.1 Quick Display Mode ..................................................................................................................... 6
4.2 Set (Program) Mode ...................................................................................................................... 6
4.2.1 Setting Barometric Pressure ................................................................................................... 9
4.2.2
Setting Calibrated Humidity............................................................................................... 9
4.2.3
Setting Calibrated Temperature ........................................................................................ 10
4.3
Alarm Mode ......................................................................................................................... 10
4.3.1 Alarm Display ...................................................................................................................... 10
4.3.2
Alarm Programming ......................................................................................................... 10
4.3.3
Cancelling the Alarm ........................................................................................................ 11
Outdoor Alarm - Temperature vs. Dew Point .................................................................. 11
4.3.4
4.4 Min/Max Mode ........................................................................................................................... 12
4.5
Other Console Features ........................................................................................................ 12
4.5.1
Weather Forecasting ......................................................................................................... 12
4.5.2
Weather Icons ................................................................................................................... 13
4.5.3
Weather tendency indicator .............................................................................................. 13
4.5.4
Storm threshold indicator ................................................................................................. 13
4.5.5
Pressure threshold setting ................................................................................................. 14
4.5.6
Pressure Graph ................................................................................................................. 14
4.5.7
Restoring Lost Outdoor Temperature and Humidity Sensor ............................................ 14
5
Glossary of Terms ......................................................................................................................... 14
6
Specifications ................................................................................................................................ 15
6.1 Wireless Specifications ............................................................................................................... 15
6.2 Measurement Specifications ....................................................................................................... 15
6.3 Power Consumption .................................................................................................................... 15
7
Troubleshooting Guide .................................................................................................................. 15
8
Accessories ................................................................................................................................... 17
9
Product Revisions ......................................................................................................................... 17
10
Liability Disclaimer .................................................................................................................. 17
11
FCC Statement .......................................................................................................................... 18
Version 1.10
©Copyright 2013, Ambient LLC. All Rights Reserved.
User Manual
Page 1
Advertisement
Table of Contents

Related Manuals for Ambient Weather WS-1171A


Summary of Contents for Ambient Weather WS-1171A
-
Page 1: Table Of Contents
Ambient Weather WS-1171A Advanced Weather Station User Manual Table of Contents Introduction ............................. 2 Getting Started ..........................2 2.1 Parts List ............................2 2.2 Recommend Tools ......................... 2 2.3 Thermo-Hygrometer Sensor Set Up ....................2 2.4 Display Console Set Up ........................ 3 2.4.1 Radio Controlled Clock (RCC) .................... -
Page 2: Introduction
13.2 Set Mode ........................... 20 1 Introduction Thank you for your purchase of the Ambient Weather WS-1171A Advanced Weather Station with Temperature, Humidity, Barometer and Advanced Forecasting. The following user guide provides step by step instructions for installation, operation and troubleshooting. To download the latest manual and additional troubleshooting tips, please visit: http://ambientweather.wikispaces.com/ws1170... -
Page 3: Display Console Set Up
Figure 1 2.4 Display Console Set Up Note: To avoid permanent damage, please take note of the battery polarity before inserting the batteries. Place the remote thermo-hygrometer about 5 to 10’ away from the display console (if the sensor is too close, it may not be received by the display console). -
Page 4: Display Console Layout
search will automatically resume every two hours until the signal is successfully captured. The regular RF link will resume once RCC reception routine is finished. In some locations, RCC reception may take a couple of days to receive the signal. The temperature and humidity data will continue to transmit during this period. -
Page 5: Sensor Operation Verification
12. Indoor temperature and humidity 27. Barometer air pressure alarm on indicator 28. Pressure display unit (inHg or hPa) 13. Remote sensor transmit signal 29. Pressure alarm ON indicator indicator NOTE: The snooze key is on the top of 14. MIN/MAX information the display console 15. -
Page 6: Console Operation
decreases the transmission range by the factor shown below. Medium RF Signal Strength Reduction Glass (untreated) 5-15% Plastics 10-15% Wood 10-40% Brick 10-40% Concrete 40-80% Metal 90-100% 4 Console Operation Note: The console has four keys for easy operation: SET key, ALARM key, MIN/MAX key and key. - Page 7 Press the + key or MIN/MAX key to adjust the time zone from -12 to 12, based on the number of hours from Coordinated Universal Time, or Greenwich Mean Time (GMT). The following table provides times zones throughout the world. Locations in the eastern hemisphere are positive, and locations in the western hemisphere are negative.
- Page 8 MIN/MAX key to adjust the calendar month. Change Day. Press the SET key again to set the calendar day. Press the + key or MIN/MAX key to adjust the calendar day. Temperature Units (Celsius or Fahrenheit). Press the + key again to toggle the temperature units from Celsius to Fahrenheit.
-
Page 9: Setting Barometric Pressure
To calibrate humidity, you will need an accurate source, such as a sling psychrometer or Humidipaks One Step Calibration kit, available from Ambient Weather, which uses a salt bath. To calibrate indoor humidity, in the Set Mode with indoor humidity flashing, press the... -
Page 10: Setting Calibrated Temperature
4.2.3 Setting Calibrated Temperature Temperature is measured by a resistive thermal device (RTD) and is subject to electronic variation. Temperature errors can also occur when a sensor is placed too close to a heat source (such as a building structure, the ground or trees). To calibrate the indoor or outdoor temperature, we recommend a mercury or red spirit (fluid) thermometer. -
Page 11: Cancelling The Alarm
Indoor humidity low alarm Indoor temperature low alarm Outdoor humidity low alarm Outdoor temperature / dew point low alarm Pressure low alarm In the alarm mode, Press the key or MIN/MAX key to change or scroll the alarm value. Hold the key or MIN/MAX key for 3 seconds to change the number rapidly. -
Page 12: Min/Max Mode
Figure 4 4.4 Min/Max Mode While in Normal Mode, press the MIN/MAX key to enter the maximum mode, and the MAX icon and maximum records will be displayed and begin flashing. Press MIN/MAX key again to enter the minimum mode, and the MIN icon and minimum records will be displayed and begin flashing. -
Page 13: Weather Icons
4.5.2 Weather Icons Sunny Partly Cloudy Cloudy Rainy The four weather icons are Sunny, Partly Cloudy, Cloudy and Rainy. There are also two weather tendency indicators to show the air pressure tendency between the weather icons. 4.5.3 Weather tendency indicator The weather tendency arrow is located between the weather icons to show the air pressure tendency and provide a forecast based on increasing or decreasing air pressure. -
Page 14: Pressure Threshold Setting
activated, and the clouds with rain icon and tendency arrows will flash for 3 hours indicating the storm warning feature has been activated. 4.5.5 Pressure threshold setting The pressure threshold (the negative or positive rate of change of pressure signifying a change in the weather) can be adjusted by the user from level 2 to level 4 (default level 2 mbar/hour). -
Page 15: Specifications
vapor that exists in air. Inches of Mercury (inHg) Pressure in Imperial units of measure. 1 inch of mercury = 33.86 millibars Range Range is defined as the amount or extent a value can be measured. Relative Barometric Measured barometric pressure relative to your location or ambient Pressure conditions. - Page 16 There are dashes (--) on the display minutes for the remote sensor to report in, or the console. search icon to turn off. Do not press any buttons while in the search mode. 2. Check the remote sensor is powered up and displaying the temperature and humidity on the LCD display.
-
Page 17: Accessories
Remove and Humidity Solar the rain guard and install over Radiation Shield thermo-hygrometer. Ambient Weather Humidity One step calibration kits for digital Calibration Kits hygrometers use salt slurry formula to accurately calibrate the indoor and outdoor hygrometers. -
Page 18: Fcc Statement
wild country and/or in unauthorized grounds strongly damages the environment. Reading the “User manual” is highly recommended. The manufacturer and supplier cannot accept any responsibility for any incorrect readings and any consequences that occur should an inaccurate reading take place. This product is designed for use in the home only as indication of weather conditions. - Page 19 This limited warranty begins on the original date of purchase, is valid only on products purchased and only to the original purchaser of this product. To receive warranty service, the purchaser must contact Ambient, LLC for problem determination and service procedures. Warranty service can only be performed by a Ambient, LLC.
- Page 20 13.2 Set Mode Command Mode Settings [SET] + 3 seconds Enter Set Mode, Daylight Savings Time (DST) Press [+] to toggle OFF and ON [SET] Time Zone (TZ) Press [+] to increase. [MIN/MAX] to decrease [SET] 12/24 Hour Format Press [+] to toggle between 12 hour (12h) and 24 hour (24h) format [SET] Hour of Day Press [+] to increase.
Need help?
Do you have a question about the WS-1171A and is the answer not in the manual?
Questions and answers