
Related Manuals for StarTech.com PM1115P3


Summary of Contents for StarTech.com PM1115P3
- Page 1 10/100Mbps Ethernet to Parallel Network Print Server *Actual product may vary from photos User Manual SKU: PM1115P3 For the latest information and specifications visit www.StarTech.com/PM1115P3 Manual Revision: 08/09/2024...
- Page 2 Le présent appareil est conforme aux CNR d’Industrie Canada applicables aux appareils radio exempts de licence. L’exploitation est autorisée aux deux conditions suivantes: (1) L’appareil ne doit pas produire de brouillage, et (2) L’utilisateur de l’appareil For additional self-service support options and community forums, please visit: www.StarTech.com/support...
- Page 3 This manual may make reference to trademarks, registered trademarks, and other protected names and/or symbols of third-party companies not related in any way to StarTech.com. Where they occur these references are for illustrative purposes only and do not represent an endorsement of a product or service...
- Page 4 StarTech.com, or an endorsement of the product(s) to which this manual applies by the third-party company in question. Regardless of any direct acknowledgement elsewhere in the body of this document, StarTech.com hereby acknowledges that all trademarks, registered trademarks, service marks, and other protected names and/or symbols contained in this manual and related documents are the property of their respective holders.
-
Page 5: Safety Statements
• Los cables (incluidos los de alimentación y carga) deben colocarse y tenderse de forma que no creen riesgos eléctricos, de tropiezo o de seguridad. For additional self-service support options and community forums, please visit: www.StarTech.com/support... - Page 6 安全対策 • 電源が入っている状態の製品または電線の終端処理を行わないでくださ い。 • ケーブル (電源ケーブルと充電ケーブルを含む) は、 適切な配置と引き回し を行い、 電気障害やつまづきの危険性など、 安全上のリスクを回避するよう にしてください。 For additional self-service support options and community forums, please visit: www.StarTech.com/support...
-
Page 7: Table Of Contents
Setting Up a Printer ..........................17 Windows ....................................17 macOS ....................................25 Warranty Information ................29 Limitation of Liability ................30 To view manuals, videos, drivers, downloads, technical drawings, and more visit www.startech.com/support For additional self-service support options and community forums, please visit: www.StarTech.com/support... -
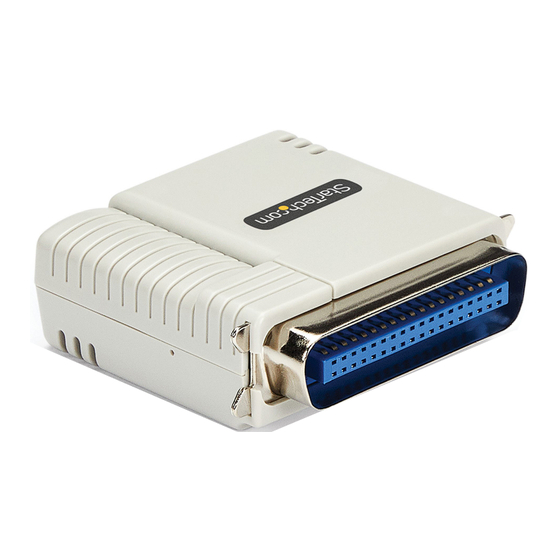
Page 8: Product Diagram
Product Diagram Front View Rear View *Actual product may vary from photos For additional self-service support options and community forums, please visit: www.StarTech.com/support... - Page 9 Seconds, then Release Note: The Reset Button is recessed. Use a fine object to press it Centronics 36-Pin Parallel Port use to • Parallel Port connect to a Parallel Printer For additional self-service support options and community forums, please visit: www.StarTech.com/support...
-
Page 10: Product Dimensions
Product Dimensions Top Profile Side Profile For additional self-service support options and community forums, please visit: www.StarTech.com/support... -
Page 11: Product Information
Quick-Start Guide x 1 • To view manuals, videos, drivers, downloads, technical drawings, and more visit www.startech.com/support To view manuals, videos, drivers, downloads, technical drawings, and more visit www.startech.com/support For additional self-service support options and community forums, please visit: www.StarTech.com/support... -
Page 12: Installation
Alternatively, type CMD in the Search Bar and select Command Prompt. (Figure 1) Figure 1 In the Command Prompt or Terminal, type the command ipconfig and press Enter. (Figure 2) Figure 2 For additional self-service support options and community forums, please visit: www.StarTech.com/support... - Page 13 (Figure 3) Figure 3 Navigate to System Settings and select Network & Internet. (Figure 4) Figure 4 Click Change adapter options. (Figure 5) For additional self-service support options and community forums, please visit: www.StarTech.com/support...
- Page 14 Note: The Host Computer must have an RJ45 Ethernet Port, either built-in or via an external adapter. In the Properties Window, select Internet Protocol Version 4 (TCP/IPv4) and then click Properties to the lower right. (Figure 6) For additional self-service support options and community forums, please visit: www.StarTech.com/support...
- Page 15 Figure 6 Set the following settings. (Figure 7) IP address: 192.168.0.15 • Subnet mask: 255.255.255.0 • Gateway: (blank) • Figure 7 Continue on the Hardware Installation section of this For additional self-service support options and community forums, please visit: www.StarTech.com/support...
-
Page 16: Macos
Figure 8 Take note of the Existing Network details, IP address, Subnet mask, and Router addresses, as they will be referenced later in the setup. (Figure 9) Figure 9 For additional self-service support options and community forums, please visit: www.StarTech.com/support... - Page 17 In the interface screen, click Details. (Figure 11) Figure 11 Select TCP/IP on the Left Pane. On the Configure IPv4 field, change it from Using DHCP to Manually. (Figure 12) Figure 12 For additional self-service support options and community forums, please visit: www.StarTech.com/support...
- Page 18 Set the following settings. Click OK when ready. (Figure 13) IP address: 192.168.0.15 • Subnet mask: 255.255.255.0 • Router: (blank) • Figure 13 Continue on the Hardware Installation section of this document. For additional self-service support options and community forums, please visit: www.StarTech.com/support...
-
Page 19: Hardware Installation
Plug the Power Adapter into the DC Power Port on the Print Server. Wait until the Status LED has stopped flashing. Continue on the Configure the Print Server via a Web Browser section of this document. For additional self-service support options and community forums, please visit: www.StarTech.com/support... -
Page 20: Configure The Print Server Via A Web Browser
Note: Use the previously gathered information of the Existing Network [as shown in Step 4 (Windows) on Page 6 or Step 3 (macOS) Page 9] from the Manually Setting Up the For additional self-service support options and community forums, please visit: www.StarTech.com/support... - Page 21 Set the Subnet mask to match the Existing Network. Typically, 255.255.255.0. Set Gateway to the Default Gateway/Router address of the Router or Modem from the Existing Network. Figure 15 For additional self-service support options and community forums, please visit: www.StarTech.com/support...
- Page 22 Access the Web Interface of the Print Server by entering the Print Server’s New IP address, [as shown in Step 4.a on Page 14] of this section, in the Address Bar of a Web Browser. For additional self-service support options and community forums, please visit: www.StarTech.com/support...
- Page 23 RJ45 Ethernet Cable. Connect the Host Computer to the same Network as the Print Server using a Wireless (if available) or Wired connection with an RJ45 Ethernet Cable. For additional self-service support options and community forums, please visit: www.StarTech.com/support...
-
Page 24: Setting Up A Printer
Navigate to the Windows Settings screen and select the Devices icon. (Figure 19) Figure 19 Select Printers & Scanners on the left pane, then click Add a printer or scanner. (Figure 20) Figure 20 For additional self-service support options and community forums, please visit: www.StarTech.com/support... - Page 25 New IP address assigned to the Print Server [as shown in Step 4.a on Page 14] from the Configure the Print Server via a Web Browser section. Then click Next. (Figure 23) For additional self-service support options and community forums, please visit: www.StarTech.com/support...
- Page 26 On the Add Printer screen, select the Custom option. Click Next. (Figure 24) Figure 24 On the Configure Standard TCP/IP Port Monitor screen, select the Protocol to LPR. Under LPR Settings, enter lp1 For additional self-service support options and community forums, please visit: www.StarTech.com/support...
- Page 27 If Windows fails to detect the proper Printer Driver, select the Printer’s Manufacturer and Model from the Install the Printer Driver screen that appears. Click Next.(Figure 26) Figure 26 For additional self-service support options and community forums, please visit: www.StarTech.com/support...
- Page 28 On the Type a printer name screen, enter a name for the Printer. Use any name that helps recognize the Printer once it’s installed, e.g., PM1115P3 - Lexmark MS310 Series V2 XL. Click Next. (Figure 28) For additional self-service support options and community forums, please visit: www.StarTech.com/support...
- Page 29 Note: If unsure of sharing the Printer, select Do not share, as this can also be done later. Figure 29 Do not Print a test page. Choose whether or not to make this the Default Printer. Click Finish. For additional self-service support options and community forums, please visit: www.StarTech.com/support...
- Page 30 On the next screen, click on Printer Properties. (Figure 31) Figure 31 Click the Ports tab and ensure the Enable bidirectional support check box is Not Checked, then click OK. (Figure 32) For additional self-service support options and community forums, please visit: www.StarTech.com/support...
- Page 31 Click Print a test page. A printout with information about the Printer and Print Server should be printed to ensure everything is working as expected. (Figure 33) Figure 33 For additional self-service support options and community forums, please visit: www.StarTech.com/support...
-
Page 32: Macos
Download and Install the latest Drivers on the Host Computer. Navigate to Settings and select Printers & Scanners on the left (Usually near the bottom) and click Add Printer, Scanner, or Fax…. (Figure 34) Figure 34 For additional self-service support options and community forums, please visit: www.StarTech.com/support... - Page 33 Open the drop-down and choose the • Select Software… option Look through the list to find the Printer Make and • Model, e.g, Lexmark Universal Mono. (Figure 36) Click OK • For additional self-service support options and community forums, please visit: www.StarTech.com/support...
- Page 34 Figure 35 Figure 36 For additional self-service support options and community forums, please visit: www.StarTech.com/support...
- Page 35 Click the Printer menu bar and select Print Test Page. A printout with information about the Printer and Print Server should be printed to ensure everything is working as expected. (Figure 39) Figure 39 For additional self-service support options and community forums, please visit: www.StarTech.com/support...
-
Page 36: Warranty Information
Limitation of Liability In no event shall the liability of StarTech.com Ltd. and StarTech.com USA LLP (or their officers, directors, employees or agents) for any damages (whether direct or indirect, special, punitive, incidental, consequential, or otherwise), loss of profits, loss of business, or any pecuniary loss, arising out of or related to the use of the product exceed the actual price paid for the product. - Page 37 Hard-to-find made easy. At StarTech.com, that isn’t a slogan. It’s a promise. StarTech.com is your one-stop source for every connectivity part you need. From the latest technology to legacy products — and all the parts that bridge the old and new — we can help you find the parts that connect your solutions.
Need help?
Do you have a question about the PM1115P3 and is the answer not in the manual?
Questions and answers