Table of Contents
Advertisement
Quick Links
Download this manual
See also:
Instruction Manual
Advertisement
Table of Contents

Related Manuals for StarTech.com PEXSAT34RH


Summary of Contents for StarTech.com PEXSAT34RH
- Page 1 4 Port PCIe 2.0 SATA III 6Gbps RAID Controller Card with HyperDuo Actual product may vary from photos User Manual SKU#: PEXSAT34RH For the latest information and specifications visit www.startech.com/PEXSAT34RH Manual Revision: 01/07/2019...
-
Page 2: Compliance Statements
This manual may make reference to trademarks, registered trademarks, and other protected names and/or symbols of third-party companies not related in any way to StarTech.com. Where they occur these references are for illustrative purposes only and do not represent an endorsement of a product or service by StarTech.com, or an endorsement of the product(s) to which this manual... -
Page 3: Safety Statements
• I cavi (inclusi i cavi di alimentazione e di ricarica) devono essere posizionati e stesi in modo da evitare pericoli di inciampo, rischi di scosse elettriche o pericoli per la sicurezza. To view manuals, videos, drivers, downloads, technical drawings, and more visit www.startech.com/support... - Page 4 • Kablar (inklusive elkablar och laddningskablar) ska dras och placeras på så sätt att risk för snubblingsolyckor och andra olyckor kan undvikas. To view manuals, videos, drivers, downloads, technical drawings, and more visit www.startech.com/support...
-
Page 5: Table Of Contents
RAID Configuration ..........................10 HyperDuo Configuration ........................12 Software Operation ................15 Create a RAID Array ..........................15 Create a HyperDuo Array ........................20 Managing Your Array ..........................21 To view manuals, videos, drivers, downloads, technical drawings, and more visit www.startech.com/support... -
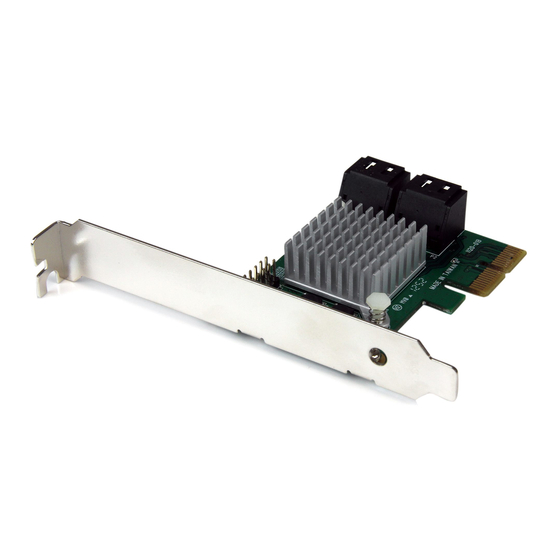
Page 6: Product Diagram
Product Diagram 4 x SATA III Ports To view manuals, videos, drivers, downloads, technical drawings, and more visit www.startech.com/support... -
Page 7: Product Information
If an anti-static strap is unavailable, discharge yourself of any static electricity build-up by touch- ing a large grounded metal surface (such as the computer To view manuals, videos, drivers, downloads, technical drawings, and more visit www.startech.com/support... - Page 8 Place the cover back onto the computer case. Insert the power cable into the socket on the power supply and reconnect all other connectors removed in Step 1. To view manuals, videos, drivers, downloads, technical drawings, and more visit www.startech.com/support...
-
Page 9: Driver Installation
Driver CD into the computer’s CD/DVD drive. AutoPlay should give you the option to browse the files on the CD or automatically open the CD. Autoplay screen To view manuals, videos, drivers, downloads, technical drawings, and more visit www.startech.com/support... -
Page 10: Management Utility Installation - Windows Only
Management Utility Installation - Windows Only RAID and/or HyperDuo configuration can be accomplished either through the integrated card-BIOS utility, or through the Marvell Storage Utility (MSU). Details for installing the MSU are below. To view manuals, videos, drivers, downloads, technical drawings, and more visit www.startech.com/support... -
Page 11: Operation
BIOS utility. Press <Ctrl>+<M> to enter BIOS Setup or <Space> to continue. Using the arrow keys to navigate, move to “HBA0: Marvell 0” and press Enter to select Press Enter again to open the Configuration Wizard To view manuals, videos, drivers, downloads, technical drawings, and more visit www.startech.com/support... - Page 12 RAID level and other configuration options: Select 2 HDDs for RAID 0 or RAID 1 • Select 3 HDDs for RAID 0 • Select 4 HDDs for RAID 0 or RAID 10 • To view manuals, videos, drivers, downloads, technical drawings, and more visit www.startech.com/support...
-
Page 13: Hyperduo Configuration
Virtual disks created in safe mode can also be partially rebuilt if the SSD fails, but not if the HDD fails. To view manuals, videos, drivers, downloads, technical drawings, and more visit www.startech.com/support... - Page 14 <Space> to continue. Using the arrow keys to navigate, move to “HBA0: Marvell 0” and press Enter to select Press Enter again to open the Configuration Wizard. Configuration Wizard screen To view manuals, videos, drivers, downloads, technical drawings, and more visit www.startech.com/support...
- Page 15 Make sure to back up all data before continuing. The “Keep original data” option is disabled when you choose Capacity mode, as it is inherently data- destructive. Create Virtual Disk option To view manuals, videos, drivers, downloads, technical drawings, and more visit www.startech.com/support...
-
Page 16: Software Operation
Launch the MSU software using the icon on your desktop. MSU Software icon Once the application window is opened you will need to login using your OS account user name and password. To view manuals, videos, drivers, downloads, technical drawings, and more visit www.startech.com/support... - Page 17 Operations tab The Create New VD window is now displayed, using the Select RAID Level drop down menu choose your desired RAID mode. Select Raid Level drop-down menu To view manuals, videos, drivers, downloads, technical drawings, and more visit www.startech.com/support...
- Page 18 Create New VD screen To rename the array, click the Name field and type your desired name. To view manuals, videos, drivers, downloads, technical drawings, and more visit www.startech.com/support...
- Page 19 Select the Initialization method for your choice from the drop-down menu. Select Initialization method Select your desired stripe size using the Stripe size drop down menu. Click the Submit button, to rename the array. Submit button To view manuals, videos, drivers, downloads, technical drawings, and more visit www.startech.com/support...
- Page 20 Your RAID array has now been created. The Property tab will now be displayed for your newly created RAID array. Property tab To view manuals, videos, drivers, downloads, technical drawings, and more visit www.startech.com/support...
-
Page 21: Create A Hyperduo Array
Safe: Creates an array for optimal fault tolerance. • Capacity: Creates an array for optimal performance • (Capacity Mode will delete all content currently saved on your drives). To view manuals, videos, drivers, downloads, technical drawings, and more visit www.startech.com/support... -
Page 22: Managing Your Array
Note: It can take up to 30 minutes for the HyperDuo array to be created. Managing Your Array View Properties of your RAID/HyperDuo Array Select the desired array from list of Virtual Disks in the Marvell Storage Menu. To view manuals, videos, drivers, downloads, technical drawings, and more visit www.startech.com/support... - Page 23 Rename Your Array Select the Name field on the Property tab and type your desired Name in the field. Click the Modify button, to rename the selected array. Modify button To view manuals, videos, drivers, downloads, technical drawings, and more visit www.startech.com/support...
- Page 24 A message will now be displayed asking: Do you want to delete the partition information if this has one? Click OK to delete the partition information or Cancel to keep the partition information stored on the drive. To view manuals, videos, drivers, downloads, technical drawings, and more visit www.startech.com/support...
- Page 25 Please follow the below steps to erase previously configured RAID data. Select your desired physical disk from list of Physical Disks in To view manuals, videos, drivers, downloads, technical drawings, and more visit www.startech.com/support...
- Page 26 Marvell Storage Menu. Hover-over the Operation tab and select Erase Foreign Configuration. Erase Foreign Configuration function Your previously installed RAID data will now be deleted. To view manuals, videos, drivers, downloads, technical drawings, and more visit www.startech.com/support...
- Page 27 Limitation of Liability In no event shall it be the liability of StarTech.com Ltd. and StarTech.com USA LLP (or their officers, directors, employees or agents) for any damages (whether direct or indirect, special, punitive, incidental, consequential, or otherwise), loss of profits, loss of business, or any pecuniary loss, arising out of or related to the use of the product exceed the actual price paid for the product.
- Page 28 StarTech.com is an ISO 9001 Registered manufacturer of connectivity and technology parts. StarTech.com was founded in 1985 and has operations in the United States, Canada, the United Kingdom and Taiwan servicing a worldwide market.
Need help?
Do you have a question about the PEXSAT34RH and is the answer not in the manual?
Questions and answers