Table of Contents
Advertisement
Quick Links
Download this manual
See also:
User Manual
2 Port 12V 24V PoweredUSB Adapter Card -
USB PlusPower
PUSBADAP/LP
PCI312PUSB/LP
PEX312PUSB/LP
DE: Bedienungsanleitung - de.startech.com
FR: Guide de l'utilisateur - fr.startech.com
ES: Guía del usuario - es.startech.com
IT: Guida per l'uso - it.startech.com
NL: Gebruiksaanwijzing - nl.startech.com
PT: Guia do usuário - pt.startech.com
For the most up-to-date information, please visit: www.startech.com
Manual Revision: 11/16/2011
*actual product may vary from photos
Advertisement
Table of Contents

Related Manuals for StarTech.com PUSBADAP/LP


Summary of Contents for StarTech.com PUSBADAP/LP
- Page 1 DE: Bedienungsanleitung - de.startech.com FR: Guide de l'utilisateur - fr.startech.com ES: Guía del usuario - es.startech.com IT: Guida per l'uso - it.startech.com NL: Gebruiksaanwijzing - nl.startech.com PT: Guia do usuário - pt.startech.com For the most up-to-date information, please visit: www.startech.com Manual Revision: 11/16/2011...
-
Page 2: Fcc Compliance Statement
StarTech.com. Where they occur these references are for illustrative purposes only and do not represent an endorsement of a product or service by StarTech.com, or an endorsement of the product(s) to which this manual applies by the third-party company in question. Regardless of any direct acknowledgement elsewhere in the body of this document, StarTech.com hereby... -
Page 3: Table Of Contents
Table of Contents Introduction ....................1 Features ................................ 1 Package Contents ............................. 1 Hardware Guide ..................2 PCI312PUSB/LP, PEX312PUSB/LP ......................2 Jumper Settings ............................2 PUSBADAP/PUSBADAPLP ........................3 Jumper Settings ............................4 Hardware Installation ..........................4 PCI312PUSB/LP or PEX312PUSB/LP Only ..................5 PUSBADAP/PUSBADAPLP Only ...................... -
Page 4: Introduction
Introduction Thank you for purchasing a StarTech.com Powered USB 2.0 Adapter Card (available in both PCI and PCI Express formats as well as Standard and Low Profile). Now, adding Powered USB capability to a computer has never been easier! Fully compatible with USB1.1 OHCI and USB2.0 ECHI specifications, the cards support data speeds of up to 480 Mbps and provide power to Powered USB devices through industrial standard Powered USB connectors. -
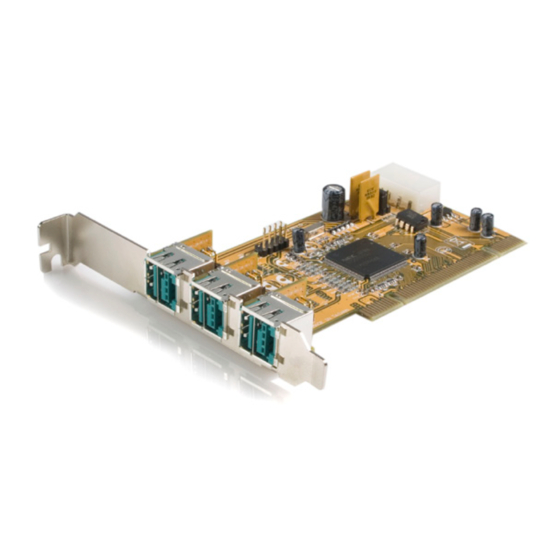
Page 5: Hardware Guide
Hardware Guide PCI312PUSB/LP, PEX312PUSB/LP USB Ports 4, 5 (for Expansion) JP2: +12V Selector J5: AUX Power J1~J3: External JP1: Powered +5V Selector USB Ports (x3) Jumper Settings JP1 (+5V Selector) Settings Default: The USB2.0 Bus Power is supplied by the motherboard PCI slot (DC+5V supplied from PCB) The USB2.0 Bus Power is supplied by the AUX power connector (J5). -
Page 6: Pusbadap/Pusbadaplp
JP1 (+5V Selector) Settings Default: The 12V power source of the Powered USB connectors are supplied by the PCI slot into which the card is installed The 12V power source of the Powered USB connectors are supplied by the AUX power connector (J5). -
Page 7: Jumper Settings
Please see http://www. startech.com for more information. Hardware Installation PCI312PUSB/LP, PEX312PUSB/LP & PUSBADAP/LP 1. Remove the computer cover. For more detailed instruction on how to perform this step, please refer to the documentation that was included with your computer at the time of purchase. -
Page 8: Pci312Pusb/Lp Or Pex312Pusb/Lp Only
If JP2 has been set to EXT, the PUSBADAP will draw power through the External Input Power DIN Connector, and will require an external power source (see http:// www.startech.com for accessories). 8. Once both cards have been properly positioned, and the necessary link has been made between them, close the computer case and power on the computer. -
Page 9: Pusbadap/Pusbadaplp Only
PUSBADAP/PUSBADAPLP Only This section details how to install PUSBADAP as a stand alone card. 1. Remove the computer cover. For more detailed instruction on how to perform this step, please refer to the documentation that was included with your computer at the time of purchase. -
Page 10: Specifications
Specifications PCI312PUSB PEX312PUSB PUSBADAP 3 x 12V Powered USB male 1x 12v Power USB Connector connectors 1x 24v Power USB Connector 1 x LP4 Connector 1x 4 pin Power Din Connector Connectors 1 x Internal USB (9 pin) Header 1x Internal USB Connector Connector for expansion 1x Jumper Connector 1x Jumper Connector... -
Page 11: Technical Support
Limitation of Liability In no event shall the liability of StarTech.com Ltd. and StarTech.com USA LLP (or their officers, directors, employees or agents) for any damages (whether direct or indirect, special, punitive, incidental, consequential, or otherwise), loss of profits, loss of business, or any pecuniary loss, arising out of or related to the use of the product exceed the actual price paid for the product. - Page 12 StarTech.com is an ISO 9001 Registered manufacturer of connectivity and technology parts. StarTech.com was founded in 1985 and has operations in the United States, Canada, the United Kingdom and Taiwan servicing a worldwide market.
Need help?
Do you have a question about the PUSBADAP/LP and is the answer not in the manual?
Questions and answers