Table of Contents
Advertisement
Quick Links
Advertisement
Table of Contents

Related Manuals for Risco WisDom RWSALV433USA


Summary of Contents for Risco WisDom RWSALV433USA
- Page 1 User Manual...
- Page 2 Important Notice This manual is delivered subject to the following conditions and restrictions: ♦ This manual contains proprietary information belonging to RISCO Group. The information is supplied solely for the purpose of assisting explicitly and properly authorized users of the system.
-
Page 3: Table Of Contents
TABLE OF CONTENTS Summary of User Commands ..........5 Chapter 1: Introduction ............7 WisDom Main Features ............8 WisDom Architecture............9 Chapter 2: Operating the WisDom..........10 Operating Tools...............10 Voice Messaging .............11 LED Indicators..............12 Power LED ..............12 Arm LED ..............12 Ready LED..............13 Bypass LED ..............13 Trouble LED ..............14 Message LED ...............14 Keys Functionality............14... - Page 4 Operations Menu .............28 Two Way Communication ..........29 Family Message Center..........30 Receiving Calls from the System ........32 Receiving an Event Call..........32 Acknowledge Menu ............33 Chapter 5: User Codes ............35 Setting / Changing User Codes ........36 Deleting User Codes............37 Chapter 6: Main User Settings ..........38 Defining System Time and Date ........38 Setting Follow-Me Numbers ..........39 Scheduling Weekly Programs ..........40...
-
Page 5: Summary Of User Commands
Summary of User Commands Away Arm Code > Stay (Home) Code> Partition [1/2/3] > [1/2/3]>Code> Away Arming Partition [1/2/3] > [1/2/3]>Code> Stay Arming System Disarm Code> Partition [1/2/3] > [1/2/3]>Code> Disarm Duress Disarm Duress Code > Silence an Code> Alarm Activate Output >... - Page 6 Define Follow-Me >[2]>[2]>[1]>[Code] > Phone View Alarm >[3]>[2]>[Code]> Memory View Event >[3]>[5]>[Code]> Memory Battery Test >[4]>[Code]> >[1]>[5] Edit User Code >[5]>[Code]> >[1] >[1] >[6]>[Grand Master Code]> Set Time >[1] >[6]>[Grand Master Code]> Set Date >[2] >[6]>[Grand Master Code]> Automatic Arm/Disarm >[5] >[Schedule No]>[1] Macro A for 2 seconds...
-
Page 7: Chapter 1: Introduction
Chapter 1: Introduction Congratulations on your purchase of the WisDom - RISCO Group's Wireless Security System. The WisDom has been specifically designed to meet a wide range of security needs for many residential and commercial applications. Your WisDom controls and monitors a variety of sensors, detectors, and contacts placed throughout the premises, which provide external, perimeter and interior burglary protection. -
Page 8: Wisdom Main Features
WisDom Main Features The following table lists the main features of the WisDom: Feature Maximum Capability Total Wireless Zones Wired Zones Partitions / Areas User Codes Utility Outputs Total Key fobs Wireless Keypads Follow Me Numbers Scheduling Weekly Programs WisDom User Manual... -
Page 9: Wisdom Architecture
WisDom Architecture Your WisDom controls and monitors a variety of sensors, detectors, and contacts placed throughout the premises, which provide external, perimeter and interior burglary protection. The system is supervised, meaning that the panel checks the status of each sensor to detect problems. If the panel detects trouble it will notify you with beeps and indicator lights on the panel itself. -
Page 10: Chapter 2: Operating The Wisdom
♦ If your system is equipped with RISCO Group's GSM module it can provide information about the system by SMS and enable to operate the system using SMS commands for setting and unsetting the system and more. -
Page 11: Voice Messaging
Voice Messaging Three types of spoken messages are heard when using the WisDom, locally in the premises or remotely to your mobile: ♦ Event messages: Upon event occurrence, the WisDom initiates a call to a remote Follow Me (FM) telephone number, informing you of a security situation by playing a pre-recorded Event announcement message. -
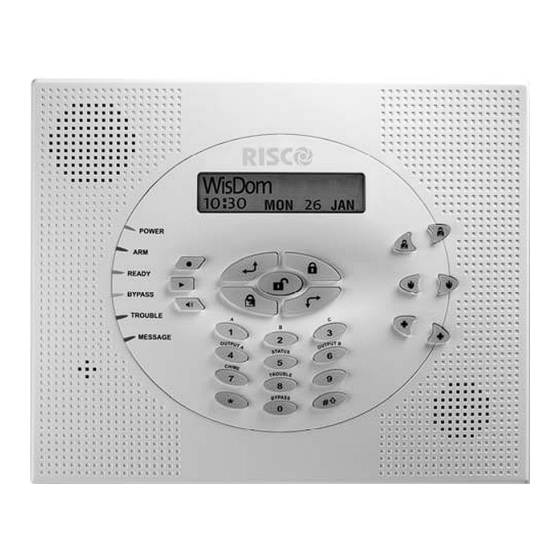
Page 12: Led Indicators
LED Indicators The six LED indicators found at the upper left provide typical system indications, as discussed below. Some indicators have additional functions, which are explained later on. Power LED The Power LED indicates system operation. Condition Description The system is operating properly from commercial (AC) power and its backup battery is in good condition. -
Page 13: Ready Led
Ready LED The Ready LED indicates whether or not the system's intrusion zones are secured and ready to be armed. Condition Description All intrusion zones are secure; the system is ready to be armed. One or more intrusion zones are not secure, and the system is not ready to be armed. -
Page 14: Trouble Led
Trouble LED The Trouble LED indicates troubles in the system. Condition Description RAPID FLASH There is at least one trouble in the system. No troubles in the system. NOTE: If a trouble condition exists, the Trouble LED will flash only when the system is in disarmed state. -
Page 15: Control Keys
Control Keys The functions of the control keys vary according to the mode being used. The following table lists the functions of the keys in Normal Operation mode and when using the User Functions menu: Normal Operation User Functions Activates the User Exits from the current menu Functions mode. -
Page 16: Emergency Keys
Emergency Keys The WisDom has three dedicated sets of emergency keys. Each set of keys must be pressed simultaneously for at least 2 seconds in order to be activated. The following table describes the Emergency keys and their optional corresponding messages. The system sounds that results during these emergency alarms are described in Appendix B, on page 57. -
Page 17: Quick Key Operation
User Functions The following speaker levels are available: ♦ “Speaker off” ♦ “Speaker Level 1” ♦ “Speaker Level 2” ♦ “Speaker Level 3” ♦ “Speaker Level 4” Quick Key Operation The Quick Key Operation is a short effective way that helps you to easily operate your system and quickly activate user functions, skipping the user code. -
Page 18: Chapter 3: Local Arming And Disarming Of The System
Chapter 3: Local Arming and Disarming of the System Arming Arming your system causes the intrusion detectors to trigger an alarm when violated. The arming operation will be followed by a local message announcement (If defined). You can arm your system by code arming, in which you need to use your user code, or you can use quick arming (without using a code) NOTE: If during code arming you enter a wrong user code, the keypad produces... -
Page 19: Away Arming
Away Arming Away arming prepares all of the system's intrusion detectors to activate an alarm if violated, and is used when leaving the premises. To away arm: 1) Check the Ready LED and make sure that the system is ready to be armed. Enter your user code and press . -
Page 20: Stay Arming
Stay Arming Stay arming activates only perimeter detectors (as defined by your installer), enabling individuals to remain inside and move about the premises while the system is partially armed. To Stay arm: Check that the system is ready for Stay arming. Enter your user code and press . -
Page 21: Partition Arming
Partition Arming One of the WisDom’s advantages is its ability to divide the system to up to 3 partitions. Each partition may be viewed as a separate security system, each of which can be armed and disarmed individually regardless of the condition of the other. Partitions can be armed/disarmed one at a time, or all at once, and each partition can be armed at Stay or Away. - Page 22 Examples: To arm partition 3 with code 1234 in Away mode press: 3 1-2-3-4 To arm partition 3 in Quick Away mode (If defined) press: To arm partition 3 with code 1234 in Stay mode press: 3 1-2-3-4 To arm partition 3 in Quick Stay mode (if defined) press: WisDom User Manual...
-
Page 23: Disarming
Disarming Disarming your system causes the detectors not to trigger an alarm when violated. The disarming operation will be followed by a local message announcement (If defined). NOTE: If during disarming you enter a wrong user code, the keypad produces three short beeps and the “Fail to disarm, Wrong Code. -
Page 24: Partition Disarming
Partition Disarming Partition disarming enables you to disarm individual partitions within an armed system. To disarm partitions: Select the required partition by pressing followed by the partition number [1/2/3]. Enter your user code and press to confirm. A confirmation message will be heard: “{System / [Partition x]} disarmed “... -
Page 25: Silencing An Alarm
To disarm using a duress code: If outside the premises, open an "entry" door. The WisDom beeps, indicating that the Entry Delay time period has begun. The following message will be heard "System In Disarm Process. Please Enter Your Code" Enter your duress code and press .All partitions assigned to the code are disarmed and a silent alarm is... -
Page 26: Chapter 4: Remote Phone System Operation
Chapter 4: Remote Phone System Operation The WisDom enables you to operate the system from remote phone. This consists of initiating a telephone call to or from the system, and interacting with voice menus that guide you through your required remote operation. - Page 27 If an answering machine is not in use at the premises: Wait until the system picks up. After the system picks up a short tone is heard. NOTE: When the system picks up, all phones on the same line are effectively disconnected, and cannot be used.
-
Page 28: Operations Menu
Operations Menu The voice operations menu announces options and instructions to use the system functions. The options in the Operations menu vary according to system status and your access rights. For example, to arm the system option is not announced if all partitions in your system are already armed. -
Page 29: Two Way Communication
NOTES: Arming: When performing forced arming, remember that it results in leaving a partition unsecured. Zone Bypassing: ♦ Bypassing a zone results in leaving the partition to which that zone belongs unsecured. ♦ A bypassed zone’s status is automatically returned to unbypassed when the partition to which it belongs is disarmed. -
Page 30: Family Message Center
To listen and talk: From the Operations/Acknowledge menu, press [6]. The following messages are announced: “To Listen In press 1, To Talk press 2, To return to the previous menu, Press [ ]” NOTE: The bell alarm resumes sounding 2 minutes after the last key has been pressed, and the previous menu is announced. - Page 31 To Remotely Record a Message: The Family Message Center enables you to record and store 1 message up to 8 seconds long. When you record a new message, the previous message is deleted: From the Operations menu, press [7]. Press [2]. The following message appears announced. “Press [#] to start and stop recording “...
-
Page 32: Receiving Calls From The System
Receiving Calls from the System Upon event occurrence, such as alarm activation, the system informs you of security situations such as intrusion or fire, by calling you and announcing a pre-recorded event announcement message, followed by the Acknowledge menu, as described on page 33. The system can call up to 4 Follow Me numbers, enabling you, a relative or neighbor to be informed of the security situation. -
Page 33: Acknowledge Menu
Event Announcement After you say “Hello”, the Event announcement message is made, informing you of a security situation in your system, for example: “24 Oaklands Street, Intruder alarm, Ground Floor, kitchen” The event messages can be disabled or defined for only specific events. - Page 34 To Listen and Talk [6] [Code] This option enables you to perform the remote listen and talk option as described on page 29 NOTE: The Access to the Operations Menu and Listen and Talk options are only announced if your FM number has permission to access these options. For more information refer to page 41.
-
Page 35: Chapter 5: User Codes
Chapter 5: User Codes To perform many of the WisDom functions, a security code (often called a user code) must used. Each individual using the system is assigned a user code, which, in turn, is linked to an Authority Level. Those with a "higher authority"... -
Page 36: Setting / Changing User Codes
Setting / Changing User Codes The user assigned the Grand Master Authority Level can change all user codes but cannot view the digits in the user codes. Users with other Authority Levels can only change their own codes. The system must be disarmed in order to set or change user codes. -
Page 37: Deleting User Codes
Deleting User Codes At times, it may be desirable to completely delete a user code. Note that it is impossible to delete the Master Code (although it can be changed). The system must be disarmed in order to delete user codes. To delete a user code: 1) Follow steps 1-5 in the previous procedure. -
Page 38: Chapter 6: Main User Settings
Chapter 6: Main User Settings The WisDom comes with a variety of selectable user functions that become available when you enter the User Functions mode. The following chapter lists the main functions. NOTE: Although these functions are in the user functions menu, you can ask your installer to perform the programming of these functions for you. -
Page 39: Setting Follow-Me Numbers
Setting Follow-Me Numbers In the case of an alarm or event, the system can initiate a phone call to a designated telephone or pager, send SMS or send an Email and employ unique tones or messages to express the active event. Your engineer defines the type of reporting to a follow me destination. -
Page 40: Scheduling Weekly Programs
If required, include the special functions described below to achieve the related effect. You can press the keys to toggle to the required character. Function Sequence Results Stop dialing and wait for a new dial [ ] [1] tone. Wait a fixed period before [ ] [2] continuing. -
Page 41: Automatic Arming/Disarming
Automatic Arming/Disarming An arming program automatically arms and disarms the system during your required time intervals. When defining the automatic arming/disarming program, you need to define the following parameters: Partition, Arming Mode (Away/Stay), Time, and Label. During the automatic activation, announcement messages will be heard in the premises. -
Page 42: Defining A User Limitation Program
To define a UO activation program: 1) Repeat stages 1- 4 of the Arming/Disarming schedule programming procedure. 2) Select [2] UO On/Off 3) Follow the LCD display messages that will guide you through the programming procedure NOTES: The [3] VACATION option for the UO scheduling program defines the way in which the group of UOs are activated during a vacation: N: During vacation, UOs are activated in the same way as defined in the time windows of the week. - Page 43 To enable and disable Announcement messages: 1) Press [ ][7] from the main user menu to enter the Voice Message menu. 2) Enter your user code followed by 3) From the Voice Msg. menu, select [4] Announce Message. 4) The Announce Message menu lists system events. 5) Select the event for which you want to enable or disable an Announcement message from the following options: [1] Intruder Alarm...
-
Page 44: Premises Operation Of The Family Message Center
Premises Operation of the Family Message Center The Family Message Center enables you to play and record a memo message on the premises. The message is up to 8 seconds. When you record a new message the previous message is deleted. To record a message: Press the button continuously for 2 seconds. - Page 45 NOTE: 1. Only the Grand Master can program a Macro Key. 2. Macro keys cannot be programmed to perform disarming commands. To program a Macro key: 1) From the User Functions menu, select [8] Macro Key. 2) Enter the Grand Master code followed by 3) The Choose Key menu lists the 3 Macro keys.
- Page 46 Character Represents The Numerical keys from 0 to 9. The Macro keys from A to C. key - Away arming. key - Stay arming. key. key. NOTE: You can also use the Numerical keys to enter numbers when programming Macro keys. Use the [ ] and [ ] keys to move the cursor.
-
Page 47: Chapter 7: Backup Batteries
Chapter 7: Backup Batteries The WisDom has 6 backup batteries that are used in time of main power failure. The batteries can be of two types: ♦ Non rechargeable: Size AA, 1.5VDC Alkaline ♦ Rechargeable: Size AA, 1.2VDC cells NOTE: The provided batteries by the manufacturer are rechargeable Nickel Cadmium cylindrical cell 1.2V 800mA AA or 2300mA. - Page 48 Non rechargeable batteries: 1) Pull out the battery housing located on the WisDom’s rear side. NOTE: Your installer may have locked the battery case by an internal screw. In this case contact your installer to replace the batteries. 2) Replace all the batteries with the same battery type. Pay attention to the batteries polarity printed on the case 3) Put the battery housing back to its place.
-
Page 49: Chapter 8: Complete Menu Of User Functions
Chapter 8: Complete Menu of User Functions Your WisDom comes with a variety of selectable user functions that become available when you enter the User Functions mode. This chapter lists the complete menu of user functions. To enter the User Functions mode, press followed by the function Index or quick key (see the table below) and your user code. - Page 50 Quick Function Description 2 Activities Operate Allows user control of previously designated Utility external devices (e.g. an appliance, a motor-driven Output garage door, etc.) (UO) This option allows to program 2 options regarding Follow Me the follow Me number: (FM) 1) Define FM: Define up to 4 Follow Me telephone numbers.
- Page 51 Quick Function Description Anti-Code If defined by your installer the WisDom can be defined to be not ready to Arm after an alarm or tamper condition. To restore the system to Normal Operation mode, a technician code or an Anti-code must be entered. Entering the code supplied by the technician at this location will restore the system to the Normal Operation mode.
- Page 52 Quick Function Description 4 Maintenance Testing The testing function allows the Grand Master to perform 3 – second test to the following elements in the system: 1) LCD + Buzzer 2) Internal siren 3) External siren 4) Speaker 5) Battery test 6) Battery voltage (only with Installer Code) Walk Test Used to easily test and evaluate the operation of...
- Page 53 Quick Function Description 4) Label: Assigns labels to users (10 characters) Remote 2-digit access code that is used when calling the Phone system from a remote phone. The Installer or the code Grand master can program this code. 6 Clocks System Allows the setting of the system time.
- Page 54 Quick Function Description can assign the zones and partitions with a prerecorded label from a list of messages. For more information refer to your installer. Test Used to verify remote and local communication, Message 1) Send message: Remote communication is verified by sending a “Test Event”...
-
Page 55: Appendix A: System Troubles
Appendix A: System Troubles The following table lists some of the possible trouble conditions, their descriptions, and recommended responses. To check for troubles in the system press ; an opening message "System Troubles" followed by a list of current trouble messages will be heard. - Page 56 Trouble Description LCD Display Message Response The commercial "AC Loss" Check the Loss of TROUBLE: TROUBLE: power has been MAIN:AC TROUBLE MAIN:AC TROUBLE connection of the AC Power interrupted; the WisDom 's system will transformer to the continue to mains. Ensure that operate on its power is not standby battery as...
-
Page 57: Appendix B: System Sounds
Appendix B: System Sounds In addition to the visual indications provided by the WisDom’s LEDs , your system produces audible annunciation after certain events . Event System Sound Intrusion Alarm Rapid beeping - continuous (See notes 1) Fire Alarm Rapid beeping – Staggered (See note 1) Keypad Police Emergency Siren - continuous (See note 1) Keypad Fire Emergency... -
Page 58: Appendix C: Terms And Definitions
Appendix C: Terms and Definitions There are a few terms with which you should become familiar. Knowing them will help you to better understand and use your system. Authority Level: Each individual using the system is assigned a user code, which, in turn, is linked to an Authority Level. Those with a "higher authority"... - Page 59 Partition: One of the WisDom advantages is its ability to divide any system into a number of partitions. You can think of each partition as a separate security system that can be armed and disarmed individually. Tamper: A device that prevents system hardware from being tampered with by triggering an alarm whenever a hardware component is opened.
-
Page 60: Appendix D: Scheduling Table
Appendix D: Scheduling Table Use the following table to define each of the weekly programs. Weekly Program No:__________ Program Name: ______________ Program Type Parameter Definitions Arming Mode: Arm / Disarm Partition Away Stay 1st UO No:__________ 3rd UO No:_________ Utility Output 2nd UO No:_________ 4th UO No:_________ NOTE: In the UO weekly program, you can define a... -
Page 61: Technical Specifications
Technical Specifications The following technical specifications are applicable for the WisDom: Electrical Characteristics System Power 220\110VAC, External Transformer 1500mA, 9VAC Current Consumption 140 mA minimum / 1200 mA maximum (Minimum/Maximum) Backup Battery 6 x 1.5VDC Size AA, Alkaline 6 x 1.2V Size AA, rechargeable cells Relay Outputs 2 x 3 Amps 24 VDC programmable relay outputs Transistor Outputs... - Page 62 Notes WisDom User Manual...
- Page 63 Drawn up in: Miami , FL On: 4/07/07 S. Karas - President RISCO Ltd. located at 14 Hahoma Street, Rishon Lezion, Israel, Hereby declare that the control panel, brand name WisDom, p/n RWSAL0433USA, RWSALV433USA, bearing labeling identification number US:RISAL10BRWSALX433 complies with the Federal Communications commission's ("FCC") rules and regulations 47 CFR part 68, and the Administrative Council on...
- Page 64 RISCO Group Limited Warranty RISCO Group and its subsidiaries and affiliates ("Seller") warrants its products to be free from defects in materials and workmanship under normal use for 24 months from the date of production. Because Seller does not install or connect the product and because the product may be used in conjunction with products not manufactured by the Seller, Seller can not guarantee the performance of the security system which uses this product.
Need help?
Do you have a question about the WisDom RWSALV433USA and is the answer not in the manual?
Questions and answers