VEVOR MHTJJPZY02 User Manual
Hide thumbs
Also See for MHTJJPZY02:
- User manual (17 pages) ,
- User manual (170 pages) ,
- User manual (21 pages)
Advertisement
Support and E-Warranty Certificate https://www.vevor.com/support
-
We continue to be committed to provide you tools with competitive price. "Save
Half", "Half Price" or any other similar expressions used by us only represents
an estimate of savings you might benefit from buying certain tools with us
compared to the major top brands and doses not necessarily mean to cover all
categories of tools offered by us. You are kindly reminded to verify carefully
when you are placing an order with us if you are actually saving half in
comparison with the top major brands.
Cotton Candy Makers
User Manual
Advertisement
Table of Contents

Related Manuals for VEVOR MHTJJPZY02


Summary of Contents for VEVOR MHTJJPZY02
- Page 1 Support and E-Warranty Certificate https://www.vevor.com/support We continue to be committed to provide you tools with competitive price. "Save Half", "Half Price" or any other similar expressions used by us only represents an estimate of savings you might benefit from buying certain tools with us compared to the major top brands and doses not necessarily mean to cover all categories of tools offered by us.
- Page 2 This is the original instruction, please read all manual instructions carefully before operating. VEVOR reserves a clear interpretation of our user manual. The appear- ance of the product shall be subject to the product you received. Please forgive us that we won' t inform you again if there are any technology or software updates on our product.
-
Page 3: Product Parameters
Product Parameters MHTJJPZY02; MHTJJPHC02; Model MHTJJPZY03; MHTJJPHC03; Dimensions(mm) 518*518*485 518*820*995 Heating Plate Power 1000W 1000W Motor Power 18.6W 18.6W Voltage 220-240V 220-240V Frequency 50Hz/60Hz 50Hz/60Hz Packing List Picture Item Part Name Cotton Candy Machine 1 PCS Stainless Steel Bowl 1 PCS... - Page 4 Power Cord 1 PCS User Manual 1 PCS Installation Tools 1 SET Note: For the cart-style ones only. Installation Kit Accessories List Note: Only the cart-style machines come with the installation kits. Item Part Name Picture Wheel 2 PCS Table 1 PCS Handle 1 PCS...
-
Page 5: Product Description
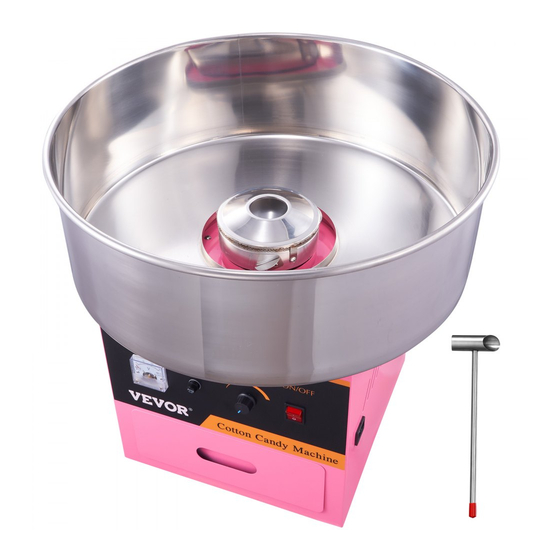
Bolts (M8*70) 2 PCS Screw (M5*12) 16 PCS Screw (M5*35) 6 PCS Product Description ①Meet Your Commercial Needs: Our commercial cotton candy machine' s power is 1000W, which only requires 2-minute preheat time, ensuring rapid cotton candy production; The spinning head, with 3000RPM rotating speed, can store 0.5 oz / 15g sugar at one time and product 120 cotton candy per hour, satisfying your large output demands. - Page 6 Product Composition Diagram Spinning Head Bowl Voltmeter Fuse Heating Switch Power Plug Power Switch Drawer Cotton Candy Machine (Countertop Type with Cabinet) - 5 -...
- Page 7 Cotton Candy Machine (Cart Type) - 6 -...
- Page 8 Cart Type Please install the wheels for the in the following order. 1. Use screws (M5*12) and screws (M5*35) to install the bracket as shown in the figure. The installation steps on both sides are the same. Screws (M5*12) Screws (M5*35) Plastic Pad - 7 -...
- Page 9 2. Install two wheels under the frame with two Bolts (M8*70). Wheel Bolt 3. Install the table on the left side of the main body, and install the push handle on the right side with 8 pcs Screw (M5*12) Table Screw (M5*12) Main Body - 8 -...
- Page 10 Table Push Handle 4.Place the stainless steel pan on top of the box and fix it with the 4 locking clips on both sides. - 9 -...
-
Page 11: Operation Precautions
5.After all assembly is completed, it is ready to use. Please properly keep the other components, which will be used during use or maintenance. Operation Precautions 1. Please read this manual carefully before use. In order to give full play to its advantages and achieve satisfactory results, please understand the structure and function of the machine, and be familiar with its main parts and related safety operations. - Page 12 Operating Instructions 1. Press the switch to turn on the machine and wait for 1-2 minutes. Observe whether the machine runs smoothly when the spinning head of the machine is rotating. If the vibration is too severe, the machine needs to be adjusted. It must be ensured that the machine is placed stably. 2.
-
Page 13: Circuit Diagram
into the bowl until the sugar is gone. To avoid burns, do not move the machine while it is working. 5. Do not touch the plug or wire when the plug or wire is wet or your hands are wet, otherwise it may cause an electric shock. -
Page 14: Troubleshooting
Troubleshooting Fault: No Sugar Filament 1. Check whether the sugar head is rotating or not, and stop the machine to sense whether the sugar head is hot. 2. If the sugar head does not rotate: check whether the machine is powered on, and whether the motor is broken. - Page 16 Support and E-Warranty Certificate https://www.vevor.com/support Made in China...
Need help?
Do you have a question about the MHTJJPZY02 and is the answer not in the manual?
Questions and answers