Advertisement
Quick Links
This Owner's Manual is provided and hosted by Appliance Factory Parts.
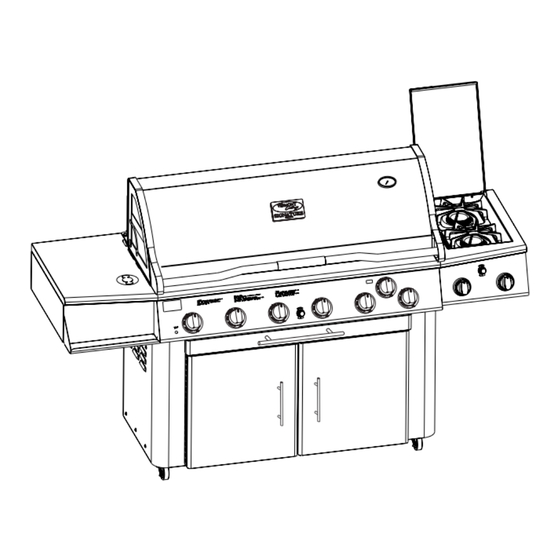
Vermont Castings VCS6006
Owner's Manual
Shop genuine replacement parts for Vermont Castings
VCS6006
Find Your Vermont Castings Grill Parts - Select From 273 Models
-------- Manual continues below --------
Advertisement

Subscribe to Our Youtube Channel
Related Manuals for Vermont Castings Signature VCS6006


Summary of Contents for Vermont Castings Signature VCS6006
- Page 1 This Owner's Manual is provided and hosted by Appliance Factory Parts. Vermont Castings VCS6006 Owner's Manual Shop genuine replacement parts for Vermont Castings VCS6006 Find Your Vermont Castings Grill Parts - Select From 273 Models -------- Manual continues below --------...
- Page 2 VCS6006 ASSEMBLY PROCEDURES Tools Required: knife or scissors, Phillips or Robertson screwdriver, 7/16” wrench. For shelf light and console back lights refer to ELECTRONIC INSTRUCTIONS. For rotisserie setup refer to ROTISSERIE SETUP. Step 1: Unpack Carton and Verify Contents Use a sharp cutting tool to cut the straps on the packaging and then open the carton top. The sleeve surrounding the barbecue can be removed by lifting it straight up and over the top of the unit.
- Page 3 VCS6006 Assembly Step 2: Install Casters (4) casters. Materials Required: Alternately prop up each end of the grill with a block of wood or other solid item. Position the caster pin to the proper opening at the bottom of the grill. Push the caster as far as possible.
- Page 4 VCS6006 Assembly Step 4: Install Battery Shroud Battery Shroud Materials Required: Battery Shroud (1) Plastic Push-In Fastener (1) Slide the battery shroud onto the internal shelf and secure Push-in Fastener with push-in fastener. Fig. 4 Bolts Step 5: Attach Side Shelves (Left for Shelf Light, Right with Side Burner) S l i d e Materials Required:...
- Page 5 VCS6006 Assembly Step 6: Attach Condiment Tray to Console (Part of Side Shelf Assembly Left) Materials Required: 10-24 Nut Black (1) 10-24 x 1/2” Long s/s Bolt (1) Secure Condiment Tray to console with stainless bolt and nut. Ensure the surfaces of the condiment tray and console are aligned.
- Page 6 VCS6006 Assembly Step 8: Side Burner Grates, Side Burner Knobs Fig. 8 Materials Required: Side Burner Grate (2) Side Burner Knob (2) Place side burner grates in proper position. Attach knobs. Side Burner Grates Side Burner Knobs Step 9: Backlit Knobs Materials Required: Backlit Knob (7) Attach to the console backlit knobs as shown.
- Page 7 VCS6006 Assembly Step 11: Grease Tray and Grease Cups Materials Required: Grease Cups (2) Grease Tray Assembly (1) Grease Cup Openings Place grease cups in position into openings in the upper base panel area. (Fig. 11a) Place grease tray in position under the combustion area.
- Page 8 VCS6006 Assembly Step 13: Attach Stabilizer Bracket olts Materials Required: Stabilizer Bracket (2) 10-24 x 1/2” Long Black Bolt (4) Attach the stabilizer brackets to the bottom panel. Secure with four (4) bolts. Fig. 13 Stabilizers Step 14: Install the Tank Pull-Out and LP Cylinder (LP models Only) Materials Required: Tank Pull-Out Kit...
- Page 9 VCS6006 Assembly Step 15: Side Burner / Rotisserie Control Functions Fig. 15 Rear Burner Front Burner Rotisserie Burner and Side Burner Igniter Control Knob for Front Burner Control Knob for Rotisserie Burner CFM Corporation 2695 Meadowvale Boulevard Mississauga, Ontario L5N 8A3 Canada (800) 668-5323 www.cfmcorp.com Page 8...
Need help?
Do you have a question about the Signature VCS6006 and is the answer not in the manual?
Questions and answers