Vermont Castings Signature Series Assembly Procedures
Hide thumbs
Also See for Signature Series:
- User manual (30 pages) ,
- Assembly procedures (21 pages) ,
- Assembly procedures (12 pages)
Advertisement
Quick Links
This Owner's Manual is provided and hosted by Appliance Factory Parts.
Vermont Castings VCS5007B1
Owner's Manual
Shop genuine replacement parts for Vermont Castings
VCS5007B1
Find Your Vermont Castings Grill Parts - Select From 273 Models
-------- Manual continues below --------
Advertisement

Related Manuals for Vermont Castings Signature Series


Summary of Contents for Vermont Castings Signature Series
- Page 1 This Owner's Manual is provided and hosted by Appliance Factory Parts. Vermont Castings VCS5007B1 Owner's Manual Shop genuine replacement parts for Vermont Castings VCS5007B1 Find Your Vermont Castings Grill Parts - Select From 273 Models -------- Manual continues below --------...
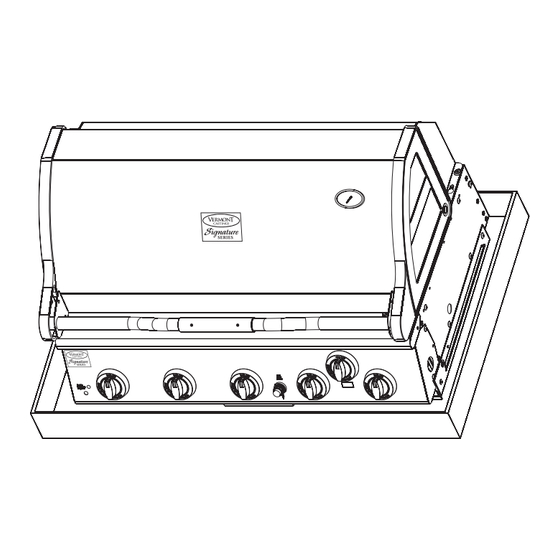
- Page 2 VCS3507BI / VCS5007BI ASSEMBLY PROCEDURES Tools Required: knife or scissors, Phillips or Robertson (square head) screwdriver. Model VCS5007BI Shown Rotisserie Kit PART KIT (VCS5007BI) Griddle Plate Cook Grates Rotisserie Spit Rod (VCS5007BI) Step 1: Unpack Carton and Verify Contents Use a sharp cutting tool to cut the straps on the packaging and then lift off the carton top. The sleeve surrounding the barbecue can be removed by lifting it straight up and over the top of the unit.
- Page 3 VCS3507BI / VCS5007BI Assembly VCS3507BI / VCS5007BI FRAMING DIMENSIONS Fig. 2 Combustible Clearances Non-Combustible Clearances With ZC Insulated Jacket VCS3507BI VCS5007BI VCS3507BI VCS5007BI Ref. 23-3/4" [603.3mm] 23-3/4" [603.3mm] 23-3/4" [603.3mm] 23-3/4" [603.3mm] [101.6mm] [101.6mm] [76.2mm] [76.2mm] 4" 4" 3" 3" 2"...
- Page 4 VCS3507BI / VCS5007BI Assembly Step 3: Assemble Fascia Brackets Parts Required: (1) Main Grill Unit (1) Left Fascia Bracket (1) Right Fascia Bracket (4) #10 x 1/2” Bolts (4) #10 Lock Nuts Prop up the front of the Grill Unit on a 2” or 3” block of wood or some other similar item. Remove the two (2) 1/4”-20 x 3/8”...
- Page 5 VCS3507BI / VCS5007BI Assembly Step 4: Assemble the Rear Panel Parts Required: (1) Rear Panel (1) Back Flange (5) Self-Tapping Screws Attach the Back Flange of the Rear Panel to the Grill Base with three (3) Self-Tapping screws. Next: Fasten the ends of the Rear Panel to the Left and Right Fascia Brackets with (2) Self-Tapping screws.
- Page 6 VCS3507BI / VCS5007BI Assembly Step 5: Assemble the Grease Tray Front and Handle Parts Required: (1) Grease Tray Front (1) Handle (with screws) (2) #10 Bolts (2) #10 Nuts Remove the Grease Tray from the front of the Grill Base (Below the Control Console). Remove the protective plastic from the Grease Tray Front and attach it to the front lip of the Grease Tray with the two (2) #10 Bolts and...
- Page 7 VCS3507BI / VCS5007BI Assembly Step 6: Assemble the Grill Unit to the Enclosure This step should be performed by two (2) persons wearing gloves. Note: Before positioning the Grill Unit into the prepared enclosure or insulated jacket, depending on available access, it may be necessary to temporarily disconnect the LP regulator or 12 ft.
-
Page 8: Parts Required
VCS3507BI / VCS5007BI Assembly Step 7: Install Internal Components and Knobs Parts Required: VCS3506 - (3) Sear Plates, (2) Cooking Grates, (1) Warming Rack, (4) Knobs VCS5006 - (5) Sear Plates, (4) Cooking Grates, (1) Warming Rack, (6) Knobs Carefully place each of the Sear plates side by side inside the barbecue by making sure the semicircular finger groove is facing toward the front of the grill. - Page 9 CFM Corporation 410 Admiral Boulevard Mississauga, Ontario L5T 2N6 Canada (800) 668-5323 www.cfmcorp.com Service Note: If you are experiencing difficulties or are dissatisfied with your purchase, please contact CFM at the telephone number listed above prior to returning your grill to the store. Page 8...
Need help?
Do you have a question about the Signature Series and is the answer not in the manual?
Questions and answers