Advertisement
Quick Links
1. Begin by removing factory tire carrier assembly from JL.
a. Be sure to keep all factory components since you will utilize some from factory carrier.
2. Once factory carrier is removed, you will need to trim factory tailgate exhauster so that they are flush. You do not
need to grind them flat. Only remove tabs.
3. Open your new TCJL-01 and inspect all items prior to installation.
4. With the rear door of the Jeep closed and latched, begin to remove the (4) four factory torx bolts.
a. As you remove them, the hinges will pull away from the door. Don't be alarmed, just be sure not to open or
move the rear door.
DV8 Offroad TCJL-01
2018+ JL Tire Carrier Reinforcement Plate
(Recommend up to a 35" tire)
Advertisement

Related Manuals for DV8 OFFROAD TCJL-01


Summary of Contents for DV8 OFFROAD TCJL-01
- Page 1 Only remove tabs. 3. Open your new TCJL-01 and inspect all items prior to installation. 4. With the rear door of the Jeep closed and latched, begin to remove the (4) four factory torx bolts.
- Page 2 NOTE: 5. Place DV8 tire carrier main enforcement plate up against the hinges. (This step is better with assistance to prevent any damage to your paint) a. Place one of the provided (12) twelve spacers between the plate and the hinge, and then one M10x1.5 60 bolt and washer in hole.
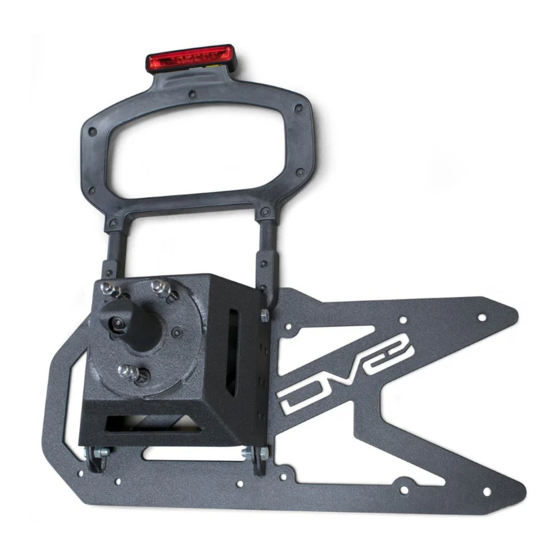
- Page 3 7. Tighten down hardware until secure. 8. Remove the factory third brake light from original tire carrier by removing the (4) screws. a. Replace this onto new DV8 tire carrier. Screws 9. If you are running a rear camera you will utilize the factory camera bracket (plastic) and the provided camera enclosure.
- Page 4 10. Remove the factory stud plate by undoing the two screws on the factory tire mount. 11. Using a punch, lightly tap out the factory camera mount. NOTE: This is plastic and so be careful and punch out the two holes in the center equally.
- Page 5 12. If using a camera, place factory camera mount and camera (plastic) though holes. Place factory stud plate behind it. Secure using factory screws. Factory screws 13. Using the provided camera enclosure, cover the camera and bolt using supplied flush mount allen head bolts.
- Page 6 14. Place entire assembly on spare tire and attach using stock lug nuts. Take entire assembly and tire, and hold it up to carrier. Since there is many holes for adjustment, find what ones best fit your tire size. a. Mark which (4) four holes will be used on carrier. Note: This is much easier with assistance. 15.
- Page 7 If you have any questions or concerns, please feel free to contact us at 951-680-9595 or by email at info@dv8offroad.com...
Need help?
Do you have a question about the TCJL-01 and is the answer not in the manual?
Questions and answers