Advertisement
Available languages
Available languages
Hyundai Elantra 2001-2006 /
Tiburon
(all but SE)
Kia Optima 2001-2006
KIT FEATURES
• ISO DDIN radio provision
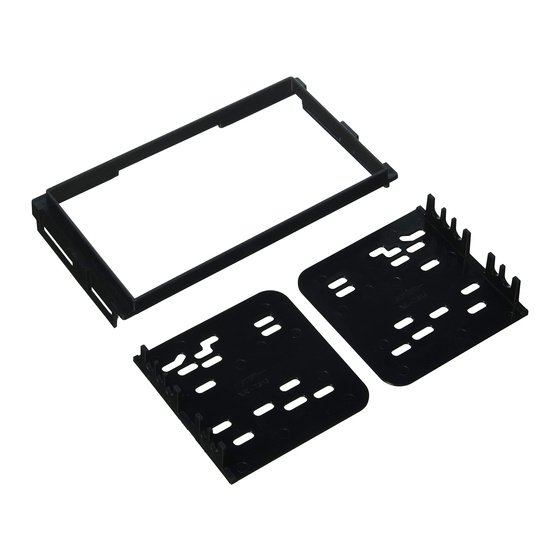
KIT COMPONENTS
A) Radio housing • B) Radio brackets
A
B
WIRING & ANTENNA CONNECTIONS (sold separately)
Wiring Harness: • 70-7301
Antenna Adapter: • Not required
TOOLS REQUIRED
• Panel removal tool • Phillips screwdriver • Cutting tool
METRA. The World's best kits.
Installation instructions for part 95-7313
2003-2008 / Sonata 2002-2005
(2006 Early Production Models Only)
95-7313
™
metraonline.com
Table of Contents
Dash Disassembly ..............................................2-3
Kit Assembly
– ISO DDIN radio provision ...................................... 4
CAUTION!
Metra recommends disconnecting the negative bat -
tery terminal before beginning any installation, unless the vehicle
manufacturer recommends against so. Please check with your local
Dealership for more information. All accessories, switches, climate
controls panels, and especially air bag indicator lights must be con -
nected before reconnecting the battery or cycling the ignition. Also,
do not remove the factory radio with the key in the on position, or the
vehicle running. It would be best to remove the key from the ignition
and then wait a few seconds before removing the factory radio.
© COPYRIGHT 2004-2015 METRA ELECTRONICS CORPORATION
Advertisement
Table of Contents

Related Manuals for Metra Electronics 95-7313


Summary of Contents for Metra Electronics 95-7313
- Page 1 Installation instructions for part 95-7313 Table of Contents Hyundai Elantra 2001-2006 / Tiburon 2003-2008 / Sonata 2002-2005 Dash Disassembly ..........2-3 (all but SE) Kia Optima 2001-2006 (2006 Early Production Models Only) Kit Assembly 95-7313 – ISO DDIN radio provision ........4 KIT FEATURES •...
-
Page 2: Dash Disassembly
95-7313 Dash Disassembly Sonata 2002-2005/ Elantra 2001-2006 Kia Optima 2001-2005 1. Remove (2) Phillips screws from under the instrument cluster. (Figure A) 1. Unclip and remove the entire panel surrounding radio. (Figure A) 2. Remove the ashtray, and then remove (2) Phillips screws now 2. - Page 3 95-7313 Dash Disassembly Kia Optima 2006 (2006 Early Production Models Only) 1. Unclip and remove the panel surrounding the shifter. (Figure A) 3:30 2. Remove (2) Phillips screws at the bottom of the panel surrounding the radio and climate control, and then unclip and remove entire panel.
-
Page 4: Kit Assembly
Installation instructions for part 95-7313 Kit Assembly IMPORTANT ISO DDIN radio provision If you are having difficulties with the 1. Attach the radio brackets to the radio housing, aligning installation of this product, please call our the holes in the radio housing to the clips on the radio Tech Support line at 1-800-253-TECH. -
Page 5: Herramientas Requeridas
Instrucciones de instalación para la pieza 95-7313 Indice Hyundai Elantra 2001-2006 / Tiburon 2003-2008 / Sonata 2002-2005 (todos excepto SE) Desmontaje tablero ..........2-3 Kia Optima 2001-2006 (2006 Sólo los modelos de producción tempranas) Ensamble del kit 95-7313 – Provisión de radio ISO DDIN ......... 4 CARACTERÍSTICAS DEL KIT... - Page 6 95-7313 Desmontaje tablero Sonata 2002-2005/ Elantra 2001-2006 Kia Optima 2001-2005 1. Quite los (2) tornillos Phillips de abajo del conjunto de instrumentos. (Figura A) 1. Desenganche y quite todo el panel que rodea el radio. (Figura A) 2. Quite el cenicero y luego los (2) tornillos Phillips expuestos en la 2.
- Page 7 95-7313 Desmontaje tablero Kia Optima 2006 (2006 Sólo los modelos de producción tempranas) 1. Desenganche y quite el panel que 3:30 rodea la palanca de velocidades. (Figura A) 2. Quite los (2) tornillos Phillips de la parte inferior del panel que rodea el radio y el control de clima y luego desenganche y quite todo el panel.
-
Page 8: Ensamble Del Kit
Instrucciones de instalación para la pieza 95-7313 Ensamble del kit IMPORTANTE Provisión de radio ISO DDIN Si tiene dificultades con la instalación 1. Una los soportes del radio en la carcasa del radio, de este producto, llame a nuestra línea alineando los orificios de la carcasa con los ganchos de soporte técnico al 1-800-253-TECH.
Need help?
Do you have a question about the 95-7313 and is the answer not in the manual?
Questions and answers