Advertisement
Quick Links
STAR ARMOR
BEFORE INSTALLATION
READ INSTRUCTIONS CAREFULLY BEFORE STARTING INSTALLATION.
REMOVE CONTENTS FROM BOX AND VERIFY ALL PARTS ARE PRESENT.
FAILURE TO IDENTIFY DAMAGE BEFORE INSTALLATION COULD LEAD
TO A REJECTION OF ANY CLAIM. IF MISSING PARTS OR ANY DAMAGE
FOUND, PLEASE TAKE A PICTURE FOR THE CLAIM
CLAIM,
O
UR
PLAESE
VISIT:
Y
Torque Value
Fastener
Class 8.8 Tightening
Size
Torque (ft-lbs)
6mm
8mm
10mm
12mm
14mm
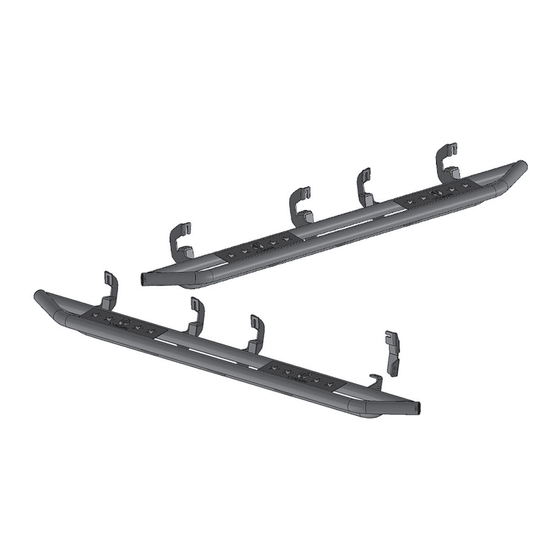
Passenger/right Side Armor Assembly
!
®
P
WWW.TYGERAUTO.COM/
Class10.9 Tightening
Torque (ft-lbs)
6-7
15-16
31-32
54-55
87-88
Driver/left Side Armor Assembly
Customer Support: www.TygerAuto.com/Contact
TG-AM2C20028
U
RP
O
SE.
O T
FILE
C
ONTACT
6-7
22-23
44-45
78-79
125-126
1/8
Customer Support 1-866-340-3038
Parts List
Driver/Left Side Armor
x1
Passenger/Right Side Armor
x1
Passenger/Right Front Upper Bracket (DEF)
x1
8-1.25mm Clip-On Nuts
x8
8mm Nut Plate
x8
8mm x 35mm Bolt Plate
x1
8-1.25mm x 25mm Hex Bolts, Black Zinc
x16
8mm x 24mm x 2mm STD Flat Washers,
x16
Black
Zinc
8mm Lock Washers, Black Zinc
x16
8-1.25mm x 35mm Hex Bolts
x2
8mm x 16mm x 1.6mm Washers
x4
8mm Nylon Lock Nuts
x3
8mm Bolt Plate
(8) 8mm Welded Nut Plates
(8) 8mm Clip Nuts
Passenger/right
front Upper
Mounting Bracket
V200916
Advertisement

Subscribe to Our Youtube Channel
Related Manuals for Tyger STAR ARMOR TG-AM2C20028


Summary of Contents for Tyger STAR ARMOR TG-AM2C20028
- Page 1 Customer Support 1-866-340-3038 STAR ARMOR ® Parts List TG-AM2C20028 Driver/Left Side Armor Passenger/Right Side Armor BEFORE INSTALLATION Passenger/Right Front Upper Bracket (DEF) READ INSTRUCTIONS CAREFULLY BEFORE STARTING INSTALLATION. 8-1.25mm Clip-On Nuts REMOVE CONTENTS FROM BOX AND VERIFY ALL PARTS ARE PRESENT. FAILURE TO IDENTIFY DAMAGE BEFORE INSTALLATION COULD LEAD 8mm Nut Plate TO A REJECTION OF ANY CLAIM.
- Page 2 NOTE: Factory 8mm threaded insert in body panel On models with def tank, select a flat, level area for installation. Front Cutting may be required. Assistance is highly recommended. STEP 1 8mm Weld Nut Start the installation under the driver side of the vehicle. Locate the 4 tabs along the bottom edge of the body, (pinch weld-Fig 1).
- Page 3 STEP 3 Hold driver/left Side Armor up to bottom of pinch weld. Attach (2) 8mm Hex Bolts Side Armor to pinch weld with the included (4) 8mm Hex Bolts, (4) (2) 8mm Lock Washers 8mm Lock Washers and (4) 8mm STD Flat Washers, (Figs 5-7). (2) 8mm Flat Washers Leave hardware loose at this time.
- Page 4 Front STEP 6 Move to the passenger side of the vehicle. On the passenger side, determine if the vehicle is equipped with a plastic diesel exhaust fluid (DEF) tank, (Figs 8-10). Models without DEF tank skip to Step 7. Models with DEF tank, rst determine correct proce- dure for your model year: •...
- Page 5 Front STEP 7 Locate the first tab on the edge of the pinch weld, (Figs 2-4 & 12). Select the Upper Bracket, (Fig 11). 8mmx 25mm Hex Bolt 8mm Lock Washer On models with threaded insert in body panel: 8mm STD Flat Washer Insert 8mm Hex Bolt with Lock Washer and Flat Washer and 8mm STD Flat Washer into the threaded hole, (Figures 2, 3 &...
- Page 6 Front 8mm x25mm Hex Bolt STEP 10 8mm Lock Washer 8mm STD Flat Washer Repeat Step 4 to attach the top mounting tab on the Side Armor to the (2) passenger side center locations and the rear mounting location, (Figs 2-7 & 14). Front 8mm x25mm Hex Bolt 8mm Lock Washer...
- Page 7 STEP 13 STEP 12 Attach the Side Armor to the passenger/right Front Upper 2017-on 2500/3500 DEF tank models only: Mounting Bracket with (2) 8mm Hex Bolts, (4)8mm x 16mm Hold the DEF cover in place and mark the 2nd Bracket location Small Flat Washers and (2) 8mm Nylon Lock Nuts, (Figs 20-22).
- Page 8 STEP 16 STEP 14 Do periodic inspections to the installation to make sure that all Level and adjust the Side Armor and fully tighten all hardware. hardware is secure and tight. IMPORTANT: Tighten the lower 8mm hardware attaching the Mounting Brackets to the bottom of the pinch weld first, then tighten the remaining upper hardware.
Need help?
Do you have a question about the STAR ARMOR TG-AM2C20028 and is the answer not in the manual?
Questions and answers