Advertisement
Table of Contents
Advertisement
Table of Contents

Related Manuals for Comica EJoy Uni Pro


Summary of Contents for Comica EJoy Uni Pro
- Page 1 EJoy Uni Pro RGB Cardioid Condenser Wireless USB Microphone User Manual...
-
Page 3: Main Features
Foreword Thanks for purchasing Comica EJoy Uni Pro Main Features · Groundbreaking Studio Mic with Integrated Wireless Module · Support Wired/Wireless Dual Modes for Flexible Usage · 48kHz/24bit Recording, Professional Studio Quality · Support Gain Control, Monitoring, One-key Denoise & Muting ·... - Page 4 When connect the mic with computer, please click sound setting and choose "Comica_EJoy Uni Pro TX" as the output and input device; when connect the receiver with computer, please click sound setting and choose "Comica_EJoy Uni Pro RX" as the output and input device When connect the microphone with computer: When connect the receiver with computer: Sound...
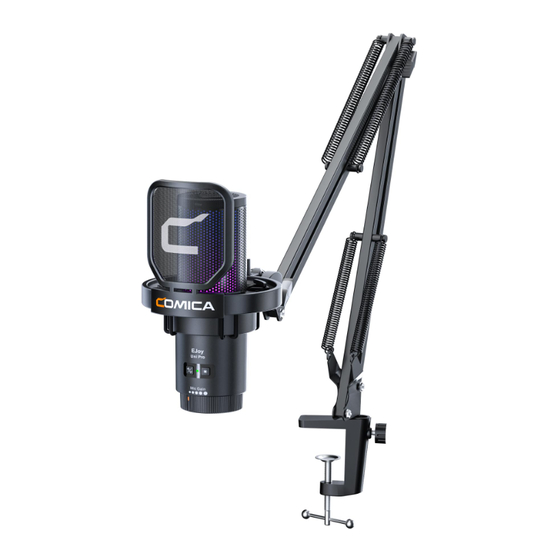
- Page 5 Packing List EJoy Uni Pro(A): Microphone(TX)*1 Receiver(RX)*1 Pop Filter *1 USB C-USB C/USB A 2 in 1 Audio Cable *1 享听Uni Pro RGB心型电容无线USB麦克风 产品使用说明书 Boom Arm *1 Hook and Loop User Manual *1 Warranty Card *1 Fastener *5 EJoy Uni Pro(D):...
- Page 6 Components and Instruction Microphone(TX): Muting Touch Key Muting Indicator Light Microphone Capsule RGB Light E ect Area Power Switch/Denoise/ RGB Light Power/ Pairing Key E ect Switch/Pairing Key 3.5mm TRS/TRRS Headphone Microphone Status Monitoring Port Indicator Light USB-C Charging/Digital Output Port Gain/Volume Adjustment Knob...
- Page 7 1.Muting Touch Key Touch to adjust the Microphone normal pick up or muting status. 2.Muting Indicator Light Red light keeps on when muting is on, no light will on when muting is o . 3.Microphone Capsule 4.RGB Light E ect Area 5.Power Switch/Denoise/Pairing Key Long press to turn the power on / o ;...
-
Page 8: Receiver(Rx
8.3.5mm TRS/TRRS Headphone Monitoring Port Plug in 3.5mm TRS/TRRS headphones for real-time monitoring 9.USB-C Charging/Digital Output Port Charging the Mic with a rechargeable battery/DC power supply via the 2 in 1 charging/output cable, or connect to devices for audio output 10.Gain/Volume Adjustment Knob Taking the orange scale in the center as a standard, rotate left to decrease the mic gain and headphone monitoring volume;... - Page 9 Installation and Usage Install the Boom Arm: 1.Clamp the stand base of boom arm to the desktop or other objects, then tighten the fixing clip clockwise. 2. Connect the boom arm to the stand base, adjust the angle of boom arm through the fixing clip on stand base.
- Page 10 3. Connect the mic shock-mount to the boom arm, then tighten the fixing clockwise. 4. Adjust and fix the mic through the locking screw on boom arm.
- Page 11 Install the Desktop Mic Stand: 1. Connect the threaded hole of the shock-mount to the thread of the desktop mic stand, turn clockwise to tighten and fix 2.Install the pop filter on the shock-mount 3.Adjust and fix the shock-mount and mic through the locking screw...
-
Page 12: Wired Mode
Wired Mode Connected the mic with smartphone/computer through 2 in 1 audio cable and related audio adapter cable/adapter; Choose whether to monitor according to your needs. Adapter Adapter Cable 1.Please purchase USB-Lightning Adapter Cables/Adapters support OTG function by yourself when connected with lightning port devices. 2.The microphone will automatically switch on when connected with a device,and it will automatically turn o after 10 minutes if disconnected from a device. -
Page 13: Wireless Mode
Wireless Mode Pairing (the mic and receiver are paired by default at the factory. If you need to re-pair in special circumstances, please refer to the following pairing method) Long press the two pairing keys of mic to enter pairing status, and connect the receiver to a device to enter wireless state. -
Page 14: Specifications
Specifications Transmitting Power +10dBm Reception Sensitivity -97dBm Antenna Type Ceramic Antenna Wireless Delay <20ms Directivity Cardioid Microphone Sensivity -35dB±2dB Frenquency Range 20Hz ~ 20kHz Maximum SPL 105dB (@ 1% THD) Signal / Noise 72dB SPL(A-weighted,as per IEC651) Equivalent Noise 22dB SPL(A-weighted,as per IEC651) Dynamic Range 83dB SPL(A-weighted,as per IEC651) Sampling Rate... - Page 17 享听Uni Pro RGB心型电容无线USB麦克风 产品使用说明书...
- Page 19 前言 感谢您购买科唛享听Uni Pro 产品主要功能 ·首创棚麦集成无线射频模块,有线无线双模式 ·48kHz/24bit录音,专业棚级音质 ·增益调节,实时监听,一键降噪及静音 ·RGB动态灯效,3种灯效模式选择 ·USB-C数字输出,通用于手机、电脑 ·独特减震架及金属防喷罩,有效滤除噪音 ·可调节悬臂支架,承重高达1.5kg —Uni Pro(A) ·搭配圆盘支架,可灵活延展及组合—Uni Pro(D)
- Page 20 注意事项 为获得更好的录音效果,请将麦克风的正面对准音源 请勿将本设备放置在热源或干扰源附近使用,如散热器、烤箱、冰箱、 空调等 本产品属于高精密仪器类产品,请避免使用时掉落、碰撞或重击 不要在雨中或潮湿的环境中使用该设备,否则会有短路的危险 请在干燥环境中对该产品进行保存 当麦克风连接电脑使用时,请打开声音设置界面选择“Comica_EJoy Uni Pro TX ”为输出和输入设备;当接收器连接电脑使用时,请打开声音设 置界面选择“Comica_EJoy Uni Pro RX ”为输出和输入设备 麦克风连接电脑使用时: 接收器连接电脑使用时: 声音 声音 输出 输入 输出 输入 选择输出设备 选择输入设备 选择输出设备 选择输入设备 Comica_EJoy Uni Pro TX Comica_EJoy Uni Pro TX Comica_EJoy Uni Pro RX Comica_EJoy Uni Pro RX 若连接电脑输入时声音偏大,可以调节电脑“麦克风属性-级别”降低...
- Page 21 包装清单 享听Uni Pro(A): USB C-USB C/USB A 麦克风(TX)*1 接收器(RX)*1 防喷罩 *1 二合一音频连接线 *1 享听Uni Pro RGB心型电容无线USB麦克风 产品使用说明书 悬臂支架 *1 魔术贴 *5 说明书 *1 保修卡 *1 享听Uni Pro(D): USB C-USB C/USB A 接收器(RX)*1 麦克风(TX)*1 防喷罩 *1 二合一音频连接线 *1 享听Uni Pro RGB心型电容无线USB麦克风 产品使用说明书...
- Page 22 部件介绍及说明 麦克风(TX): 静音触控按键 静音指示灯 麦克风咪头 RGB灯效区 RGB灯效开关/ 电源开关/降噪/配对按键 灯效切换/配对按键 3.5mm TRS/TRRS 麦克风状态指示灯 耳机监听口 USB-C充电/数字输出接口 增益/音量调节旋钮...
- Page 23 1.静音触控按键 轻触切换麦克风正常拾音或静音状态 2.静音指示灯 静音开启后红灯长亮,静音关闭后指示灯熄灭 3.麦克风咪头 4.RGB灯效区 5.电源开关/降噪/配对按键 长按开机或关机;短按开启或关闭降噪功能 6.RGB灯效开关/灯效切换/配对按键 长按开启或关闭灯光效果;短按切换呼吸灯/动态渐变/音频动态三种灯光 效果 同时长按以上两个配对按键进入配对状态,此时麦克风状态指示灯蓝灯快闪 7.麦克风状态指示灯 未配对 蓝灯慢闪 配对中 蓝灯快闪 配对成功 蓝灯长亮 降噪开启 绿灯长亮 关机时充电 红灯长亮 关机时充满 蓝灯长亮 8.3.5mm TRS/TRRS耳机监听口 可插入3.5mmTRS/TRRS耳机进行实时监听...
- Page 24 9.USB-C充电/数字输出接口 可通过二合一充电/输出连接线连接充电宝/DC电源进行充电,或连接设备输 出音频 10.增益/音量调节旋钮 以中间橙色刻度线为标准,往左旋转减小麦克风增益及耳机监听音量;往右 旋转增大麦克风增益及耳机监听音量 接收器(RX): USB-C接口...
- Page 25 安装与使用 安装悬臂支架: 1.将悬臂支架底座的固定夹夹在桌面或其他物体上,顺时针拧紧固定 2.将固定夹与悬臂支架相连,通过底座上的固定螺丝钮来调整支架的角度...
- Page 26 3.将麦克风减震架与悬臂支架相连,顺时针旋转拧紧固定 4.通过悬臂支架上的锁紧螺杆来调整和固定麦克风的位置...
- Page 27 安装圆盘支架: 1.将减震架的螺纹孔与圆盘支架的螺纹相连,顺时针旋转拧紧固定。 2.将防喷罩安装在减震架上 3. 通过减震架上的锁紧螺杆来调整并固定减震架与麦克风的位置...
- Page 28 有线模式 通过二合一充电/输出连接线和相关音频转接线/转接头连接麦克风和手机/电 脑,根据个人需求选择是否监听 1.搭配Lightning接口设备时,请自行购买支持OTG功能的USB-Lightning转 接线/转接头 2.麦克风连接设备后会自动开机;断开设备10分钟未使用会自动关机...
- Page 29 无线模式 配对(出厂时麦克风与接收器默认配对,如遇特殊情况需重新配对可参考 以下配对方法) 同时长按麦克风的两个配对按键进入配对状态,将接收器连接设备进入无 线状态;此时麦克风状态指示灯蓝灯快闪;配对成功后麦克风状态指示灯 蓝灯长亮 当麦克风与接收器配对失败时,请将麦克风关机,然后参照上述步骤重新 进行配对 使用 当接收器连接设备,请参考以下连接方式: 1.搭配Lightning接口设备时,请自行购买支持OTG功能的USB-Lightning 转接线/转接头 2.请先确认已开启手机OTG功能,否则会出现配对失败的情况 3.有线模式和无线模式可同时使用...
- Page 30 规格参数 +10dBm 发射功率 -97dBm 接收灵敏度 天线类型 陶瓷天线 <20ms 无线延迟 指向性 心型指向 -35dB±2dB 咪头灵敏度 20Hz ~ 20kHz 频率范围 105dB (@ 1% THD) 最大声压级 72dB SPL(A-weighted,as per IEC651) 信噪比 22dB SPL(A-weighted,as per IEC651) 等效噪声 83dB SPL(A-weighted,as per IEC651) 动态范围 48kHz 采样率 位深 麦克风录音:24-bit 耳机监听:16-bit USB-C...
Need help?
Do you have a question about the EJoy Uni Pro and is the answer not in the manual?
Questions and answers